• Home
  • Suggest A Craft
  • DIY Newsletter

Recycled Crafts

Creative DIY Projects That Turn Trash Into Treasure

  • About CraftGossip
  • Our Network
    • Bath & Body Crafts
    • Candle Making Ideas
    • Crochet Ideas
    • Cross Stitch
    • Edible Crafts
    • Felting Patterns
    • Glass Art
    • Home & Garden Ideas
    • Indie Crafts
    • Jewelry Making
    • Kids Crafts
    • Knitting Patterns
    • Lesson Plans
    • Needlework
    • Party Ideas
    • Polymer Clay
    • Quilting Ideas
    • Recycled Crafts
    • Scrapbooking
    • Sewing Patterns
    • Card Making
    • DIY Weddings
    • Not Craft Ideas
  • Giveaways
  • Roundups
  • Store
  • Search

How to make your own alcohol inks

February 29, 2016 by Stefanie Girard

header-homemade-alcohol-inks-markers-dreamalittlebigger

Have you ever found yourself frustrated when your favorite markers run out of ink? It can be disappointing to toss them away, especially if they have unique colors that you can’t find in any other set. However, instead of throwing them out, you can recycle your dried up markers into usable ink again. This not only saves money but also helps reduce waste in the environment.

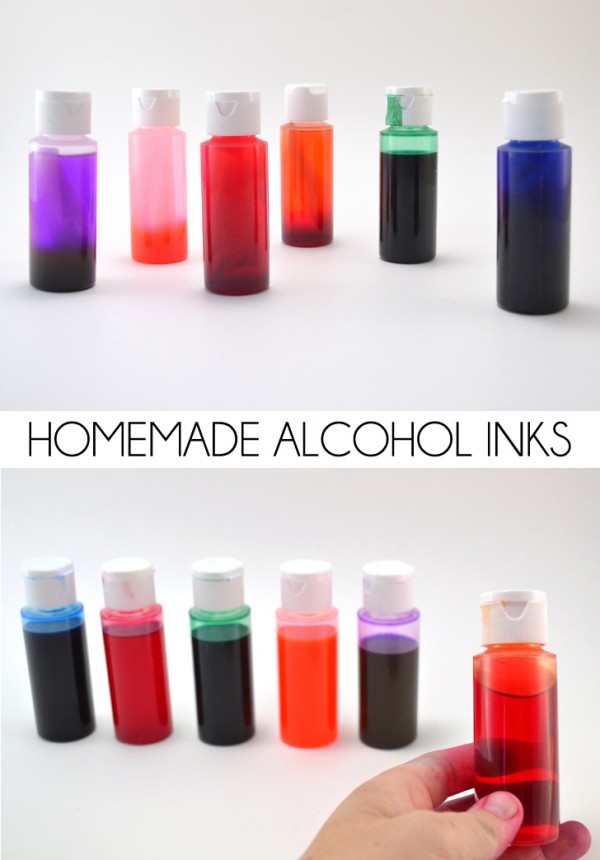
There are many tutorials available on how to recycle dried up markers, but one that stands out is the technique of cutting open the interior foam part. This tutorial is a great way to repurpose your markers and create alcohol ink that you can use for a variety of art projects. The technique involves disassembling the marker and extracting the ink-soaked foam from the interior, which is then mixed with rubbing alcohol to create a vibrant and versatile ink.

This technique is especially useful for markers with unique or interesting colors that you can’t find in traditional ink sets. It’s a great way to customize your ink and make it truly one-of-a-kind. If you’re interested in trying out this technique, be sure to check out the tutorial on the blog Dream a Little Bigger. The tutorial is easy to follow and provides step-by-step instructions for creating your own alcohol ink from recycled markers.

In conclusion, recycling dried up markers into usable ink is a great way to save money and reduce waste. By cutting open the interior foam part of the marker, you can extract the ink and mix it with rubbing alcohol to create a versatile and vibrant ink. This technique is a great way to repurpose your markers and create custom ink colors that you can’t find anywhere else. Be sure to check out the tutorial on Dream a Little Bigger and give this technique a try for your next art project.

Pop on over to the blog Dream a Little Bigger for the tutorial on how to make your own alcohol ink.

Love working with recycled items? Check out this amazing recycled Crafts book.


Related Posts:

  • Your pasta machine is good for more than pasta or…
  • Teaching Kids About Recycling: Fun Activities to…
«
»

Comments

  1. Allison Murray says

    February 29, 2016 at 4:27 pm

    Thanks so much for the share! I hope your marker makes some fab alcohol ink for you 🙂

  2. Renee V. says

    March 2, 2016 at 2:07 am

    LOVE this idea, thank you!

Have you read?

How to Paint Melamine Furniture

Recently, we received an email from Jenny, one of our readers, asking for some advice on painting melamine furniture. Jenny was looking to refresh an old dresser but wasn’t sure about the right way to tackle the project. Well, we’ve got just the thing! After some digging, we came across a fantastic article on Spraypaint Blog titled How to Recycle and Paint Melamine Furniture, which walks you through the process step-by-step.

Why This Article is Perfect for Jenny (and You!)

This guide is incredibly comprehensive, covering everything you need to know about painting melamine—an often tricky material to work with. Melamine is known for its smooth, glossy surface, which can be tough to paint without the right preparation. But with the tips from this article, you’ll learn how to properly prep your melamine pieces, choose the right paint, and achieve a professional-looking finish.

The article also dives into the importance of sanding and priming the surface to ensure that the paint adheres well. With these steps, Jenny (and anyone else trying this project) can be sure that their painted melamine furniture will not only look great but last for years to come.

Jenny, we hope this article gives you all the info you need to tackle your melamine furniture project! It’s clear from the tutorial that a little prep work goes a long way, and with the right products, even melamine can be transformed into a beautiful, personalized piece.

For anyone else curious about painting melamine, check out the full article on Spraypaint Blog for all the tips and techniques: How to Recycle and Paint Melamine Furniture. Happy painting!

My Tips for Painting Melamine Furniture

Hey Jenny (and anyone else planning a melamine project), here are my top tips to help you get the best results when painting melamine furniture:

Prep is Key
Clean the surface well, then lightly sand it with fine-grit sandpaper to give the primer something to grip onto. Trust me, it makes a big difference!

Prime Like a Pro
Don’t skip the primer! Use a bonding primer that’s made for glossy surfaces or melamine. It’ll make sure your paint sticks and lasts.

Pick the Right Paint
Go for a good enamel or acrylic paint. I use a foam roller for a smooth finish—no brushstrokes! Apply a few thin coats, letting each one dry in between.

Topcoat for Durability
Once the paint’s dry, apply a protective topcoat (polyurethane or polycrylic) to help it stay scratch-free.

Give It Time
Let the paint cure for at least 48 hours before using the furniture—longer is even better! It’ll help the finish hold up over time.

Get Creative
Don’t be afraid to try fun colors or finishes! Melamine is perfect for getting a bit adventurous.

Explore

books Christmas CraftGossip Giveaways Craft Inspirations Easter glass halloween Home Decor kid crafts mason jar More Crafts Patterns & Tutorials recycled art Recycled Clothing Recycled Jewelry Recycled Sewing Recycled Tutorials Recycling Ideas Recycling Organizing tin can

RSS More Articles

  • Artistic Stitches: Exploring Punch Needle Tattoo Designs
  • Knit Dinosaurs on a Circular Knitting Machine
  • Emily’s Paris Scarf – Crochet Kit
  • 30 Big Block Quilts For Beginners Or Time Poor Quilters
  • FREE Patchwork Pouch Pattern
  • Book Review: Secret Stories of Lost Beasts
  • Etsy Spotlight: 1955 Baby Doll Nightgown & Bloomers Pattern
  • Baby Banner and Mini Album Project
  • Color Wheel Block Tutorial by Red Pepper Quilts
  • How to Paint Melamine Furniture

Pick Your Blog

  • Sewing
  • Knitting
  • Quilting
  • Crochet
  • Home & Garden
  • Recycled Crafts
  • Scrapbooking
  • Card Making
  • Polymer Clay
  • Cross-Stitch
  • Edible Crafts
  • Felting
  • Glass Art
  • Indie Crafts
  • Kids Crafts
  • Jewelry Making
  • Lesson Plans
  • Needlework
  • Bath & Body
  • Party Ideas
  • Candle Making
  • DIY Weddings
  • Not Craft
  • Free Craft Projects

Copyright © 2025 · CraftGossip | Start Here | Contact Us | Link to Us | Your Editors | Privacy and affiliate policy