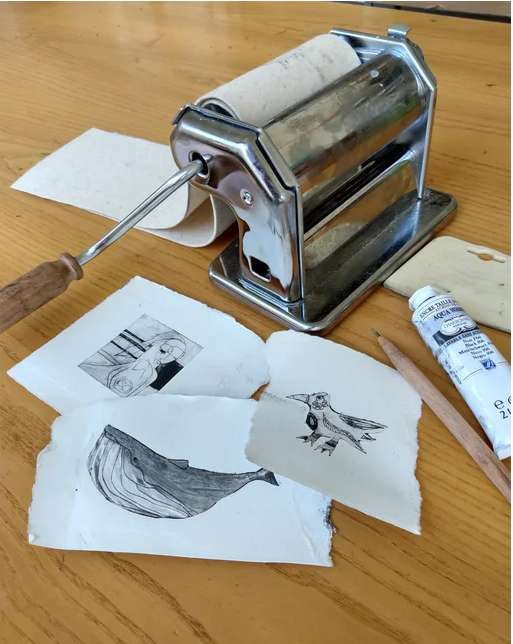
Don’t you just adore discovering new ways to utilize tools and materials you already have? It’s like a burst of creativity that justifies holding onto those items that may not see daily use. If you’re anything like me, you’ll find yourself inspired to dust off forgotten tools and embark on exciting crafting adventures.
Case in point: polymer clay. Though it might have been a while since you’ve worked with it, there’s a captivating technique that involves an unexpected tool—the pasta machine.
I haven’t worked with polymer clay in a while but now I want to get out my pasta machine and try printing with it.
Remember that pasta machine tucked away in your kitchen cupboard, perhaps gathering a bit of culinary dust? It’s time to see it in a new light and envision it as a valuable asset to your crafting endeavours.
Why? Because this humble pasta machine can help you create mesmerizing patterns and textures on polymer clay, transforming it into a canvas for your artistic expressions.
One way to explore this technique is through the fascinating work showcased on the blog “Het Beeld Lokaal.” While the blog’s content might be in a language you’re not familiar with, fear not! A quick run through Google Translator can bridge the language gap and allow you to delve into the inspiring world of polymer clay artistry.
Transferring images onto polymer clay :
Using a pasta machine and ink is a creative technique that can result in stunning and intricate designs on your clay creations. This method allows you to press inked images onto the clay surface, achieving a beautiful and detailed effect. Here’s how to do it:
Materials You’ll Need:
Polymer clay (preconditioned and rolled to desired thickness)
Pasta machine (dedicated for crafting, not for food use)
Inkjet-printed images on regular printer paper (make sure the ink is dry)
Acrylic roller or brayer
Tissue paper or parchment paper
Soft cloth or cotton swabs
Oven for baking polymer clay
Step-by-Step Guide:
Choose Your Image:
Select the image you want to transfer onto the polymer clay. Keep in mind that the image should fit within the dimensions of your clay piece.
Print the Image:
Print the image using an inkjet printer onto regular printer paper. Ensure that the ink is fully dry before proceeding.
Condition and Roll Polymer Clay:
Condition your polymer clay by kneading it until it’s soft and pliable. Roll it out to the desired thickness using an acrylic roller or brayer. The rolled clay should be slightly larger than the image you intend to transfer.
Prepare the Inked Image:
Cut out the printed image, leaving a small margin around the design. Place the cut-out image face down on a piece of tissue paper or parchment paper.
Press the Image onto the Clay:
Lay the polymer clay sheet flat on your work surface. Place the tissue paper or parchment paper with the image face down onto the clay. Gently press the paper with your fingertips to ensure good contact between the ink and the clay.
Pass Through the Pasta Machine:
Carefully run the clay with the image through the pasta machine. The pressure applied by the rollers will help transfer the ink from the paper onto the clay. Make sure the clay goes through the machine evenly to avoid distortion.
Peel Off the Paper:
Gently peel off the tissue paper or parchment paper from the clay. The inked image should be transferred onto the clay’s surface.
Enhance the Image (Optional):
If you want to enhance the image’s clarity, use a soft cloth or cotton swab to gently rub over the transferred image. This can help remove any excess ink and make the design pop.
Bake the Clay:
Follow the baking instructions for your specific brand of polymer clay. Place the clay piece on a baking sheet lined with parchment paper and bake it in a preheated oven. Be careful not to overbake the clay.
Cool and Finish:
Once the clay has cooled after baking, you can finish the piece as desired. Seal the transferred image with a clear varnish or resin to protect the design and give it a glossy finish.
Tips:
Experiment with Different Inks: Not all inks behave the same way on polymer clay. Some may work better than others for image transfers. Experiment with various types of ink to see which gives you the best results.
Test on Scraps: Before transferring an image onto your final clay piece, it’s a good idea to test the process on a small scrap of clay. This allows you to adjust the pressure and technique for optimal results.
Avoid Over-Inking: Too much ink can cause smudging and bleeding. Use a light touch and make sure the paper is fully dry before transferring.
Precision Cutting: When cutting out your image, be precise to avoid any unwanted ink transfer onto the clay surrounding the design.
Practice Patience: Working with polymer clay requires patience. Take your time to ensure each step is done carefully for the best outcome.
This technique offers endless creative possibilities, allowing you to transfer intricate and detailed images onto polymer clay surfaces. Experiment with different images, colors, and clay textures to create unique and personalized pieces of art.





If I put the image face down on the tissue or parchment paper how does it reach the clay??