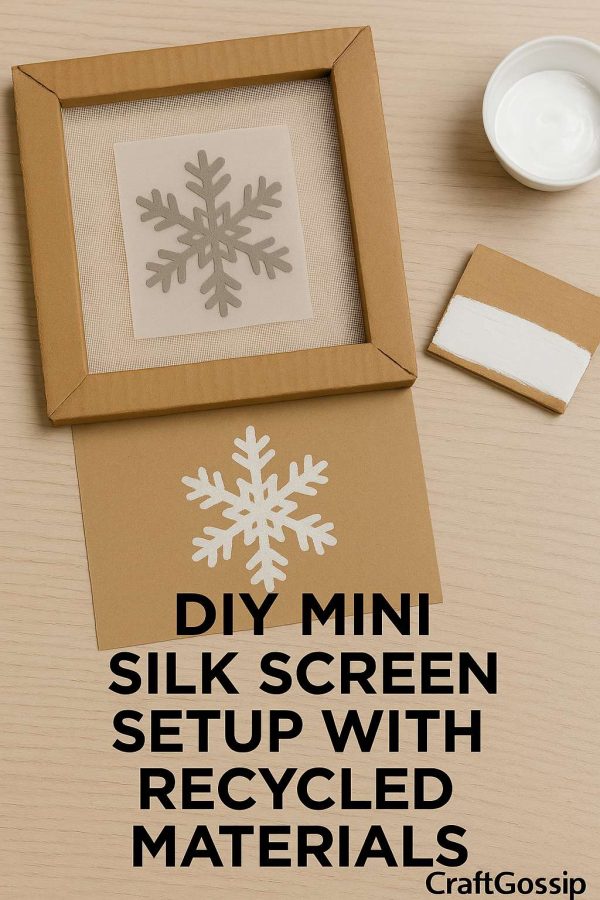
Who knew it could be as simple as a recycled piece of cardboard and a scrap of sheer curtain fabric to make a mini silk screening setup.
Well, it is. Pop on over to the blog Cloth Paper Scissors for the detailed step-by-step tutorial on how to make a mini silk screen set up with recycled materials and start printing your own art.
There’s something magical about seeing your own design printed crisp and clean onto fabric, paper, or even gift wrap. While professional silk screen kits can be expensive, you can actually make a mini silk screen setup at home using recycled materials—yes, even cardboard from your recycling bin.
This simple project is budget-friendly, eco-conscious, and perfect for holiday crafting, gift wrapping, or personalizing textiles.
Materials You’ll Need
- Frame Base: A recycled cardboard frame (you can cut one yourself) OR an old photo frame or embroidery hoop
- Sheer fabric: Recycled nylon tights, organza scraps, or old net curtains
- Stapler, hot glue, or tape to secure the fabric
- Stencil material: Freezer paper, thin cardboard, or contact paper
- Acrylic paint + fabric medium (or screen printing ink if you have it)
- Cardboard strip or old credit card to use as your squeegee
- Scissors, craft knife, and tape
Step 1: Make Your Frame
Cut a rectangle or square frame shape from sturdy cardboard (think cereal box doubled up, or the side of a shipping box). You want the opening in the middle like a picture frame.
Tip: If you’ve got an old photo frame or embroidery hoop lying around, that works beautifully too. But don’t underestimate cardboard—it’s lightweight, easy to cut, and practically free.
Step 2: Stretch the Screen
Lay your sheer fabric over the frame and pull it tight like a drum. Secure it with staples, hot glue, or tape. The tighter the fabric, the sharper your print will be. Trim off the excess around the edges.
Step 3: Create Your Stencil
Choose a simple design—snowflakes, stars, trees, or even your favorite holiday word. Cut your stencil from freezer paper, contact paper, or thin cardboard. Remember: less detail means a cleaner first print.
If using freezer paper, you can iron it onto fabric later for extra stability.
Step 4: Position the Stencil
Tape your stencil on the underside of the screen so the open areas line up where you want the paint to pass through. This makes the design crisp and repeatable.
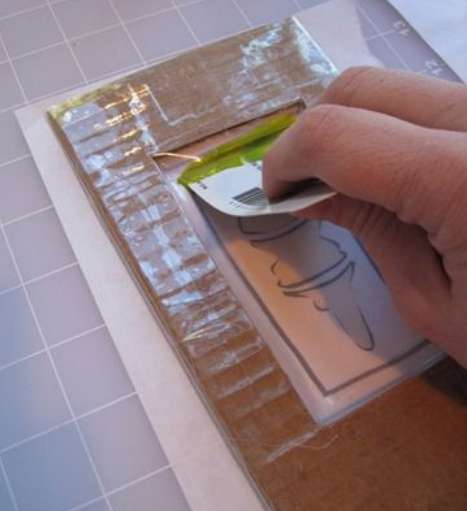
Step 5: Print Your Design
Place your paper, card, or fabric flat on the table. Lay the screen on top. Dab some paint at the top of the stencil and use your cardboard “squeegee” to drag it firmly across. One smooth pass usually works best.
Lift the screen carefully—voilà! Your design is transferred.
Step 6: Play with Variations
- Use metallic paint for holiday sparkle
- Layer two stencils for multi-color prints
- Try printing onto kraft paper for eco-friendly gift wrap
- Print words or names for personalized napkins or stockings
Why This Works
This DIY screen is lightweight, cheap, and surprisingly effective. A cardboard frame might not last forever, but it’s perfect for small seasonal projects. And by reusing old materials—frames, hoops, or fabric—you’re crafting sustainably while keeping costs low.
So before you toss that shipping box or sheer curtain, think: could it become part of your next silk screen masterpiece?
How to make a recycled embroidery hoop silkscreen -Combining the artistry of embroidery hoops and the versatility of silkscreen printing, this innovative technique allows you to create stunning and intricate designs on various surfaces. By repurposing an old embroidery hoop and utilizing a few simple materials, you’ll unlock the potential to produce professional-looking prints with a touch of handmade charm.
This step-by-step tutorial will guide you through the process of transforming an embroidery hoop into a silkscreen frame, allowing you to easily transfer your designs onto fabric, paper, or other mediums. Discover the thrill of experimenting with different inks, colors, and patterns as you bring your imaginative visions to life
Great Image transfer technique with acrylic paint– Unlock the secrets of a fantastic image transfer technique using a medium you probably already have on hand – acrylic paint! This simple yet highly effective method offers a versatile way to transfer images onto various surfaces, allowing you to create personalized artwork, custom designs, or even replicate vintage prints. With just a few basic materials and a bit of patience, you’ll be amazed at the professional-looking results you can achieve.