• Home
  • Suggest A Craft
  • DIY Newsletter

Recycled Crafts

Creative DIY Projects That Turn Trash Into Treasure

  • About CraftGossip
  • Our Network
    • Bath & Body Crafts
    • Candle Making Ideas
    • Crochet Ideas
    • Cross Stitch
    • Edible Crafts
    • Felting Patterns
    • Glass Art
    • Home & Garden Ideas
    • Indie Crafts
    • Jewelry Making
    • Kids Crafts
    • Knitting Patterns
    • Lesson Plans
    • Needlework
    • Party Ideas
    • Polymer Clay
    • Quilting Ideas
    • Recycled Crafts
    • Scrapbooking
    • Sewing Patterns
    • Card Making
    • DIY Weddings
    • Not Craft Ideas
  • Giveaways
  • Roundups
  • Store
  • Search

How to fry marbles and then transform them into jewelry

August 17, 2009 by Stefanie Girard

fried-marbles

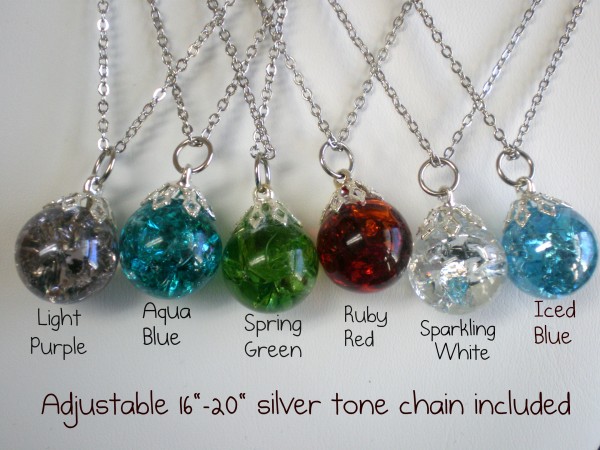
If you’re looking for a fun and unique DIY project, consider frying marbles to create a beautiful, crystallized effect. Not only is it a great way to transform ordinary marbles into stunning pieces of jewelry, but it’s also an interesting science experiment to do with kids.

To fry marbles, all you need is a handful of clear marbles and a frying pan. The process involves heating up the marbles in the pan until they crack and create a crystallized effect. Once the marbles are fried, you can use them to create jewelry, like necklaces or earrings, or even use them to decorate other crafts.

The tutorial linked in the intro provides a step-by-step guide on how to fry the marbles and turn them into jewelry using bell caps. However, if you’re more interested in wire wrapping, another tutorial linked above shows you how to turn a fried marble into a floating pendant for an earring.

Fried marbles make for great conversation pieces, and they’re also a unique way to add a pop of color and texture to any DIY project. With just a few simple materials and a bit of creativity, you can transform plain old marbles into beautiful and one-of-a-kind pieces of art.

Here is a cool tutorial on how to fry marbles. Why you ask would you want to fry marbles? Because when you do they crack and look crystallized. The tutorial over there includes directions on how to turn the marbles into jewelry using bell caps, but if you are more into wire wrapping pop on over here to see a tutorial on how to make a marble float in an old earring.

Looking for jewelry-making supplies? Check out our favorite supplier BeeBeeCraft

Related Posts:

  • Your pasta machine is good for more than pasta or…
  • Upcycled Keyboard Key Crafts: 20+ Clever Ways to…
«
»

Comments

  1. becky freemont says

    August 17, 2009 at 7:46 pm

    I love this idea im gonna go right out and find me some of these marbles. THANKS!

  2. Craftzilla says

    August 18, 2009 at 7:48 am

    I had no idea you could do that! Thanks for pointing out the way!

  3. Alicia says

    July 1, 2011 at 12:24 pm

    what a cool idea — off to check out those tutorials! 🙂

  4. zoe says

    November 11, 2011 at 10:58 am

    wow, we used to do this in the 60’s… it was the COOL thing back then!! i’m so happy to hear some things never die 🙂

  5. Mary Johnson Bees says

    January 11, 2012 at 12:11 pm

    Where can you buy the bell caps for the cracked marbles?

  6. Nikki says

    February 12, 2012 at 4:34 pm

    I was the orginal poster of this craft tutorial. I have since taken it off ehow and transfered it to my own website. If you are looking for it you may find it here: http://www.nikkilynndesign.com/2011/01/how-to-make-fried-marble-necklaces.html/

Have you read?

Crafting the Fourth: Mason Jar Magic with My Cricut

Looking for an easy yet eye-catching way to add a little patriotic charm to your 4th of July decor? This Stars & Stripes Mason Jar Cricut Craft from CraftBits is a festive and fun project that’s perfect for crafters with a Cricut machine on hand.

This DIY features classic red, white, and blue vinyl elements—think stars, stripes, and all the Americana vibes—applied to a simple mason jar. The beauty of this craft is how versatile it is. Whether you’re using it as a lantern with a tea light, a utensil holder for your backyard BBQ, or even a candy jar for your holiday table, it’s a great way to add a personal, handmade touch to your celebration.

We also love how quick and beginner-friendly this project is, making it ideal for anyone looking to create something festive without committing to an all-day crafting session. The clean design means you can easily personalize it with names, dates, or different color combinations too.

This craft is also featured on our sister site, [insert blog name if you’d like], where we highlight holiday Cricut crafts and patriotic decor ideas. Be sure to check it out if you’re building your 4th of July craft list!

Explore

books Christmas CraftGossip Giveaways Craft Inspirations Easter glass halloween Home Decor kid crafts mason jar More Crafts Patterns & Tutorials recycled art Recycled Clothing Recycled Jewelry Recycled Sewing Recycled Tutorials Recycling Ideas Recycling Organizing tin can

RSS More Articles

  • Pet Themed Learning Activities
  • 4 FREE Graduation Pattern Papers to Download
  • A Knit Vest to Get You Ready for Summer
  • Unveiling the Creativity of “Don’t Ruffle My Feathers” Quilt Block
  • Crochet Ruffle Hat
  • Crafting the Fourth: Mason Jar Magic with My Cricut
  • Easy Ways to Make Your Cross Stitch Better
  • 12 Handmade Masculine Card Ideas for Father’s Day
  • The Perfect Sewing Guide for Making Indian Clothes
  • Minecraft Learning Activities

Pick Your Blog

  • Sewing
  • Knitting
  • Quilting
  • Crochet
  • Home & Garden
  • Recycled Crafts
  • Scrapbooking
  • Card Making
  • Polymer Clay
  • Cross-Stitch
  • Edible Crafts
  • Felting
  • Glass Art
  • Indie Crafts
  • Kids Crafts
  • Jewelry Making
  • Lesson Plans
  • Needlework
  • Bath & Body
  • Party Ideas
  • Candle Making
  • DIY Weddings
  • Not Craft
  • Free Craft Projects

Copyright © 2025 · CraftGossip | Start Here | Contact Us | Link to Us | Your Editors | Privacy and affiliate policy