• Home
  • Suggest A DIY
  • DIY Newsletter

Recycled Crafts

Creative DIY Projects That Turn Trash Into Treasure

  • About CraftGossip
  • Our Network
    • Bath & Body Crafts
    • Candle Making Ideas
    • Crochet Ideas
    • Cross Stitch
    • Edible Crafts
    • Felting Patterns
    • Glass Art
    • Home & Garden Ideas
    • Indie Crafts
    • Jewelry Making
    • Kids Crafts
    • Knitting Patterns
    • Lesson Plans
    • Needlework
    • Party Ideas
    • Polymer Clay
    • Quilting Ideas
    • Recycled Crafts
    • Scrapbooking
    • Sewing Patterns
    • Card Making
    • DIY Weddings
    • Not Craft Ideas
  • Giveaways
  • Roundups
  • Store
  • Search

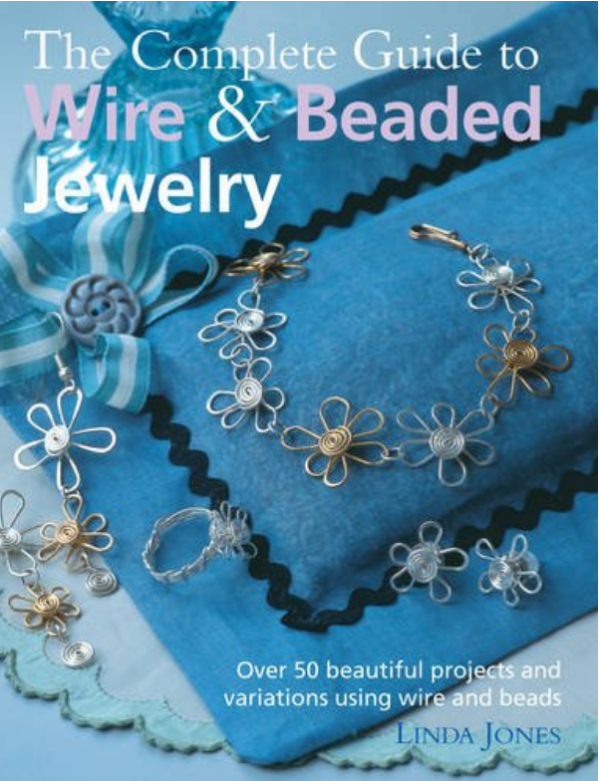
Giveaway- The Complete Guide to Wire and Beaded Jewelry

September 6, 2016 by Stefanie Girard

Screen Shot 2016-09-06 at 5.02.22 PM

Giveaway- The Complete Guide to Wire and Beaded Jewelry

Leave a comment in today’s post by September 15, 2016 and you are in the running for this comprehensive wire jewelry making book.

Open to U. S. residents only please.

More about the book from the publisher:

Packed with designs for daytime, ethnic-inspired necklaces, fun projects for kids, pretty pieces for special occasions, and items suitable for beginners, keen crafters will never need to buy another jewelry book again. You will learn how to combine beads with simple and intricate chain designs, and how to create elegant finishing touches by bringing in tiny shells, leather, and delicate ribbon. Why not try the stunning birthstone bracelet, or make impressive costume jewelry such as the spiral choker and the striking wedding tiara? You don’t need expensive tools and materials, nor any previous experience, as the step-by-step instructions, techniques, and tips will help you to create professional-looking pieces that you will be proud to wear yourself or give as a gift. And if you’re already a jewelry aficionado, you’ll find plenty of ideas and project variations to inspire you to create more designs of your own.
«
»

Comments

  1. terryp58 says

    September 6, 2016 at 9:03 pm

    Would love to have it.

  2. Allison Risner says

    September 6, 2016 at 10:53 pm

    Oooh this would help me out so much!

  3. Ruya says

    September 6, 2016 at 11:17 pm

    This is awesome!

  4. Ann says

    September 7, 2016 at 10:14 am

    This book looks like just what I need!

  5. mlsjewel says

    September 7, 2016 at 11:08 am

    Oh, all the jewelry I could make. Thanks

  6. Susan Perry says

    September 7, 2016 at 11:12 am

    Hope this is where you leave the comment!!

  7. Brenda Ackerman says

    September 7, 2016 at 11:13 am

    I would love to win this book and learn how to make some fun pieces to wear and gift! Thank you for the opportunity! Have a fantastic creative day!

  8. [email protected] says

    September 7, 2016 at 11:16 am

    Wow, I new awesome wire jewellery book. Luv it. Hope it comes my way here in Texas.

  9. Stevii graves says

    September 7, 2016 at 11:27 am

    Im sure the book tells how to be more coordinated… Like holding your mouth in just the right place as you wrap the wire.

  10. Lorraine Mastalski says

    September 7, 2016 at 11:44 am

    The cover is beautiful. I would love to see and do some of the projects inside. Definitely going on my wish list.

  11. Debbie says

    September 7, 2016 at 12:07 pm

    This is something I’ve been wanting to try.

  12. Chris D says

    September 7, 2016 at 12:10 pm

    I’d love to learn more about jewelry making!

  13. Janice M. Salotti says

    September 7, 2016 at 12:14 pm

    I’m a beginner at jewelry making so it would be great to win this book Thanks.

  14. Carla Hundley says

    September 7, 2016 at 12:29 pm

    Looks like a very
    inspiring book. I
    need to learn more
    about making jewelry.
    Carla from Utah

  15. librariall says

    September 7, 2016 at 12:40 pm

    Love to make Jewelry! Always looking for new inspiration and patterns!

  16. spierssusan says

    September 7, 2016 at 12:43 pm

    What a wonderful book!-Looks like something for everyone!

  17. Mary Helene says

    September 7, 2016 at 12:45 pm

    Would love to have this great book

  18. Nancy says

    September 7, 2016 at 12:50 pm

    The book looks GREAT!

  19. Donna H says

    September 7, 2016 at 1:34 pm

    This book looks amazing! Thanks for this great giveaway!

  20. Joan says

    September 7, 2016 at 2:02 pm

    What a great givaway. Joan

  21. Kim says

    September 7, 2016 at 2:09 pm

    Would love this!

  22. Shari Harniss says

    September 7, 2016 at 2:19 pm

    How lovely! Would love to win!

  23. Melinda says

    September 7, 2016 at 2:22 pm

    Would be a great addition to any jewelry makers library.

  24. Amy says

    September 7, 2016 at 2:28 pm

    What a lovely and inspiring way to learn more about jewelry possibilities!

  25. Debbie says

    September 7, 2016 at 2:28 pm

    Would love proper directions to make jewelry my granddaughters would be proud to wear.

  26. Joan Peterson says

    September 7, 2016 at 2:47 pm

    Would be a fabulous resource for my jewelry projects!

  27. Lori Parker says

    September 7, 2016 at 3:18 pm

    What a great book. I would love to have it.

  28. caf12015 says

    September 7, 2016 at 3:56 pm

    WOULD LOVE TO WIN I’M MAKING HOMEMADE BEADS RIGHT NOW WOULD LOVE TO LEARN SOMETHING NEW

  29. Jeano Matters says

    September 7, 2016 at 4:24 pm

    I would love to add this book to my library of DIYs

  30. Janet Pierce says

    September 7, 2016 at 4:39 pm

    Would sure help me out for sure. Would love to win.

  31. Lee says

    September 7, 2016 at 6:48 pm

    This would be so much fun for my daughter and I! thanks!

  32. Marien says

    September 7, 2016 at 9:50 pm

    I would really really REALLY love to win this book!!

  33. Karey says

    September 7, 2016 at 10:04 pm

    I love working with wire and making jewelry!

  34. Denise Bryant says

    September 8, 2016 at 12:00 am

    I’m a beginner in jewelry making, so this book would be an awesome reference and learning tool!

  35. @immelza says

    September 8, 2016 at 1:38 am

    This looks like a great book!

  36. Tonya Muller says

    September 8, 2016 at 6:37 am

    Looks like a great book. Would love to have a copy.

  37. Mickey Allen says

    September 8, 2016 at 8:17 am

    Would love to have this excellent resource as I am just beginning my adventure in wire jewelry! ????????????

  38. Alice C. says

    September 8, 2016 at 8:57 am

    Love the lacey, delicate appearance of wire jewelry! I’d love to try these beautiful designs!

  39. cathe says

    September 8, 2016 at 10:53 am

    I would love to have this book to help perfect my wire wrapping

  40. Beth Sullivan says

    September 9, 2016 at 11:32 am

    This would be an awesome addition to my polymer and jewelry library.

  41. Terry Sanders says

    September 9, 2016 at 10:44 pm

    This would be so so much help to me. Thank you for the chance to get this book.

  42. Marcia Lusk says

    September 9, 2016 at 11:12 pm

    This would be a great place to start making jewelry. Thanks for the opportunity to win.

  43. Lisa Huff says

    September 12, 2016 at 11:56 am

    Thank you for the chance to win! This looks like an amazing book.

Have you read?

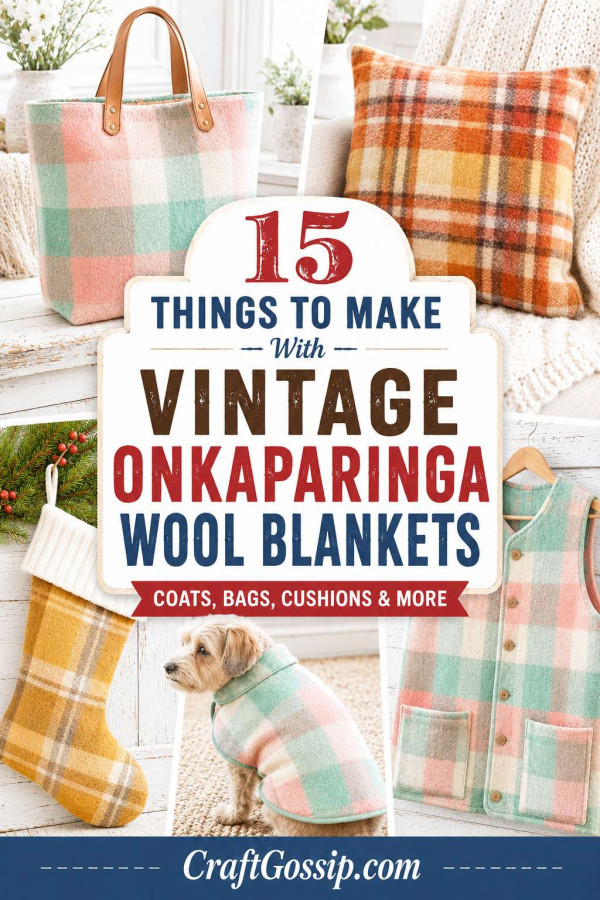
15 Beautiful Things To Make With Vintage Onkaparinga Pure Wool Blankets

There is something rather special about finding a vintage Onkaparinga pure wool blanket tucked away in a linen cupboard or folded beneath a slightly questionable stack of towels at the op shop. These old Australian wool blankets were made to last, and many have survived decades of winter nights, camping trips, spare beds and family moves.

They are also becoming increasingly collectible. Vintage Onkaparinga blankets can still be found through online marketplaces, including Etsy’s Onkaparinga wool blanket listings, where checks, plaids, fringed throws and beautifully muted mid-century colours appear regularly.

Of course, cutting into a beautiful blanket in excellent condition can feel a little like chopping up your grandmother’s best tablecloth. Before reaching for the scissors, check the label, size and overall condition. A rare blanket without stains, moth holes or worn patches may be better preserved and used as it was intended.

But the damaged ones? Those are the treasures for us crafty types.

A moth hole near one corner, a scorched patch or a worn satin binding does not mean the whole blanket has reached the end of its life. Pure wool is warm, naturally textured and wonderfully suited to bags, cushions, winter clothing, pet projects and small homewares.

Here are some of my favourite things to make with vintage Onkaparinga pure wool blankets.

Before Cutting A Vintage Wool Blanket

Gently clean the blanket before turning it into a sewing project. Follow the care instructions on the original label whenever they are still readable. Avoid vigorous washing or sudden temperature changes, which may shrink or felt the wool.

Lay the blanket flat and check it carefully for:

  • Moth holes
  • Thin or worn areas
  • Stains
  • Damaged binding
  • Faded sections
  • Previous repairs

Mark the best areas with safety pins or removable chalk before placing your pattern pieces. Keep the original woven label too. It can be stitched onto the finished project as a lovely little reminder of where the fabric began.

If the blanket is loosely woven, stay-stitch around each pattern piece before cutting it out. You can also use a lightweight fusible interfacing on smaller items such as bags, purses and cases.

Sew An Upcycled Wool Blanket Coat

A vintage blanket coat is probably the most spectacular way to show off a classic Onkaparinga check. The weight and warmth of pure wool make it ideal for a relaxed winter jacket, oversized shacket, hooded coat or sleeveless vest.

Choose a simple sewing pattern with minimal seams so the original plaid remains the star. Line the coat with cotton, flannel or a smooth lining fabric, and use leather, timber or vintage buttons for a beautifully finished look.

Browse upcycled wool blanket coats on Etsy for ideas on colour placement, collars, pockets and blanket-stitched edges. There are some wonderful examples showing how worn vintage textiles can become completely unique winter clothing.

CraftGossip has also featured an Etsy maker creating clothing from vintage wool blankets, which is well worth a look before planning your own version: Handmade With A Past: Recycled Etsy Find.

Make A Warm Wool Blanket Vest

A vest uses considerably less fabric than a full coat, making it a good option when only part of the blanket is usable. A slightly cropped vest looks lovely over jeans and a long-sleeved shirt, while a longer version can be made almost like a sleeveless blanket coat.

Use the original blanket binding around the front opening or hem whenever possible. It saves sewing time and gives the garment a wonderfully authentic vintage finish.

You can find plenty of shape and finishing inspiration among the upcycled wool blanket vests on Etsy.

Turn It Into A Wool Tote Bag

Thick wool blankets make sturdy bags that feel much more luxurious than an ordinary fabric tote. Add cotton webbing, leather handles or straps cut from an old belt.

Line the bag to prevent the wool from stretching and add an internal pocket for keys and phones. Smaller damaged areas can be hidden beneath an appliqué patch, leather corner or external pocket.

Have a look at these upcycled wool blanket bags on Etsy for inspiration. I particularly love the bags that combine checked wool with tweed, leather or visible hand stitching.

Sew Cosy Winter Cushion Covers

Cushion covers are one of the easiest projects for a damaged blanket because you can position the front panel over the prettiest section. Use an envelope-style backing for a beginner-friendly finish or add a concealed zipper for a more tailored look.

A pair of vintage wool cushions looks gorgeous on a leather chair, window seat or timber bench. The old checks also mix beautifully with linen, velvet and neutral upholstery.

For extra character, retain a fringed edge or section of satin binding across the front of the cushion.

Make A Patchwork Wool Throw

When you have several damaged blankets, cut the usable sections into squares or large rectangles and join them into a new patchwork throw.

This is a lovely way to combine several Australian blanket brands, colours and family pieces into one practical heirloom. Keep the blocks fairly large so you are not creating dozens of bulky seams.

Press seams gently with a pressing cloth and finish the outer edge with wool binding, blanket stitch or the salvaged satin binding from one of the original blankets.


Create Vintage Wool Christmas Stockings

Onkaparinga plaids are practically made for old-fashioned Christmas stockings. Red, green, cream, mustard and brown checks all have that cosy Christmas-at-the-farmhouse feel without looking overly shiny or mass-produced.

Line each stocking with cotton and add a sturdy hanging loop. Small pieces of leather, velvet ribbon, embroidered initials or vintage buttons make lovely embellishments.

The stocking cuff is also a clever place to use the blanket’s original fringe or satin edging.


Sew A Custom Wool Dog Coat

A thick pure wool blanket can make a wonderfully warm dog coat, particularly for older dogs or short-haired breeds. Use a washable cotton lining and fasten it beneath the chest with hook-and-loop tape, press studs or adjustable straps.

Because vintage wool may shrink, I would make the outer wool coat removable from the lining where possible, or spot-clean the finished coat rather than tossing it into a hot wash.

Etsy has a lovely collection of upcycled wool blanket dog coats, including made-to-measure designs that are useful for studying strap placement and fit.

Aloo would probably appreciate the warmth, although I suspect he would be more interested in sleeping on the remaining blanket pieces than modelling anything I had sewn from them.

Make Wool Slippers Or Booties

Layered wool makes warm house slippers, especially when combined with an old shearling jacket, felted jumper or a non-slip sole.

Use several layers for the insole and reinforce the bottom with leather, suede or non-slip fabric. Blanket stitch around the upper edge for a simple handmade finish.

CraftGossip has featured a clever pair of slippers made using materials including vintage wool blankets and repurposed shearling: Woolie And Furry Upcycled Slippers.

Sew A Vintage Wool Hot Water Bottle Cover

A wool hot water bottle cover is a manageable project for smaller blanket pieces. Wool adds a comforting layer around the bottle and makes it feel much nicer to tuck into bed on a cold evening.

Line the cover with cotton or flannel and leave an envelope-style opening at the back. Add a small pocket on the front for a lavender sachet if you fancy turning it into a particularly cosy handmade gift.

Take a look at the wool hot water bottle covers on Etsy for inspiration.

Always check hot water bottles for wear, follow the manufacturer’s filling instructions and avoid using boiling water.

Make A Wool Picnic Blanket With A Waterproof Back

A damaged Onkaparinga blanket can still have plenty of life left as a picnic rug. Remove badly worn edges, square up the remaining blanket and add a waterproof backing.

A repurposed shower curtain, coated cotton or purpose-made waterproof fabric can protect the wool from damp grass. Add rolled carry handles made from webbing so the blanket is easy to keep in the car.

This project preserves most of the original blanket rather than cutting it into tiny pieces, making it a good compromise when the design is beautiful but the edges have deteriorated.

Turn Small Pieces Into Zippered Pouches

Cosmetic bags, pencil cases, glasses cases and project pouches are ideal for using the narrow pieces left after cutting larger projects.

Fuse a lightweight interfacing to the back of the wool and add a cotton lining. Chunky metal zippers, leather zipper pulls and visible hand stitching all suit the vintage fabric beautifully.

A small pouch made from a family blanket would make a meaningful gift without using the entire textile.

Make Rustic Wool Christmas Ornaments

Do not throw away the final handful of scraps. Pure wool is perfect for little stars, hearts, trees, mittens, houses and birds.

Cut two matching shapes, stitch around the edge and fill them lightly with wool scraps or toy stuffing. Add embroidery, buttons, bells or scraps of velvet ribbon.

These ornaments would look lovely grouped into a garland or tied onto Christmas gifts. Because the wool is thick, many shapes can also be left unstuffed and finished with a simple blanket stitch.

Sew A Pair Of Wool Mittens

Felted or tightly woven sections of blanket can be turned into wonderfully warm mittens. Use a simple mitten pattern and line them with fleece, flannel or jersey for comfort.

Position the plaid carefully so the two mittens match—or deliberately mismatch them for a more playful scrappy look.

Add ribbed cuffs cut from an old wool jumper to make them easier to pull on and to keep cold air out.


Make A Padded Laptop Or Tablet Sleeve

Dense wool offers useful cushioning for a laptop, tablet or e-reader. Add a layer of foam or batting between the wool and cotton lining, then finish the case with a zipper, buttoned flap or leather strap.

This is another project where the original Onkaparinga label can become part of the design. Stitch it onto the front like a maker’s label rather than hiding it inside.

CraftGossip also has an older recycled sweater tablet-cover idea that can be adapted for wool blanket fabric: How To Sew A Recycled Sweater iPad Cozy.

Sew A Wool Draught Stopper

A draught stopper is not the most glamorous sewing project in the cupboard, but it is one of the most practical. Cut a long rectangle, sew it into a tube and fill it with fabric scraps, polyester filling or a combination of stuffing and dried rice.

Do not overfill it, particularly if you use rice, as it will become surprisingly heavy. A removable outer cover is useful if the stopper will be placed near an external door.

The weight and texture of wool make it far prettier than the average draught snake, particularly in a classic brown, green or orange check.

Create A Small Keepsake Teddy Or Soft Toy

A teddy, rabbit or little stuffed dog made from an old family blanket can become a beautiful keepsake. This is particularly meaningful when the blanket belonged to a parent or grandparent but is too damaged to use on a bed.

Use the strongest sections for the body, reinforce the reverse with interfacing and avoid weak or threadbare areas around seams. For a child’s toy, use securely attached embroidered features rather than buttons.

For an adult keepsake, the original label can be sewn onto the toy’s back, foot or little jacket.

Browse memory bears made from blankets on Etsy for inspiration.

Using Every Last Scrap Of A Vintage Onkaparinga Blanket

The beauty of working with vintage wool is that very little needs to be wasted. Large sections can become coats, bags and cushions. Medium pieces can become stockings, mittens and pouches. The tiny scraps can be used as toy filling, appliqué patches, gift tags or Christmas decorations.

Even the original fringe, satin binding and woven Onkaparinga label can be reused.

There are still vintage Onkaparinga blankets appearing on Etsy Australia, although availability changes as individual vintage pieces sell. Some are in beautiful usable condition, while others are ideal candidates for restoration or thoughtful upcycling.

My best advice is to pause before cutting. Photograph the blanket, save its label and consider whether it can still be used whole. But when moths, stains or years of wear have already had their turn, transforming the sound fabric into something useful is not ruining a vintage blanket.

It is allowing a beautifully made Australian textile to begin another chapter.

Explore

books Christmas CraftGossip Giveaways Craft Inspirations Easter glass halloween Home Decor kid crafts More Crafts Patterns & Tutorials Recycled and Thrifted Ideas recycled art Recycled Clothing Recycled Jewelry Recycled kids crafts Recycled Sewing Recycling Ideas Recycling Organizing tin can

Featured Posts

Recycle those old nylons into a DIY Chia Pet

50 ideas to make with an unexpected item

How to fold little origami gems perfect to embellish with all sorts of goodies

TerraCycle’s upcycled soda can Halloween luminaries

How to recycle a zippered rice sack into a cute tote bag

RSS More Articles

  • Designer Spotlight: Works by ABC
  • DMC Pomegranates Intermediate Embroidery Kit Review
  • 15 Unique And Snarky Embroidered Patches To Sew Onto Your Clothes
  • How to Make a Back to School Shaker Scrapbook Layout
  • Knit Back at AI Patterns with the AIlephant
  • 10 Ice Cubes That Instantly Elevate Prosecco
  • Celebrate National Sewing Month With AccuQuilt’s September Offers
  • Learning about Germany for Kids
  • 15 Beautiful Things To Make With Vintage Onkaparinga Pure Wool Blankets
  • 20 FREE Witch Coloring Pages and Digital Images

Copyright © 2026 · CraftGossip | Start Here | Contact Us | Link to Us | Your Editors | Privacy and affiliate policy