• Home
  • Suggest A Craft
  • DIY Newsletter

Recycled Crafts

Creative DIY Projects That Turn Trash Into Treasure

  • About CraftGossip
  • Our Network
    • Bath & Body Crafts
    • Candle Making Ideas
    • Crochet Ideas
    • Cross Stitch
    • Edible Crafts
    • Felting Patterns
    • Glass Art
    • Home & Garden Ideas
    • Indie Crafts
    • Jewelry Making
    • Kids Crafts
    • Knitting Patterns
    • Lesson Plans
    • Needlework
    • Party Ideas
    • Polymer Clay
    • Quilting Ideas
    • Recycled Crafts
    • Scrapbooking
    • Sewing Patterns
    • Card Making
    • DIY Weddings
    • Not Craft Ideas
  • Giveaways
  • Roundups
  • Store
  • Search

Giveaway of a Walnut Hollow wood round and how to make a shot glass tray

June 15, 2015 by Stefanie Girard

walnut-hollow-wood-shot-glass-tray 
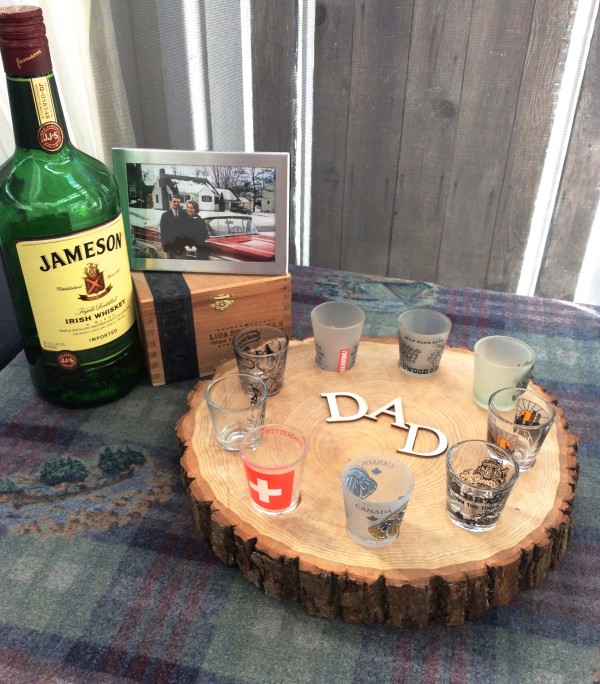
Do you like to make things with wood? Do you (or your dad) have a shot glass collection? Over at the Walnut Hollow blog there is a tutorial on how to drill perfect holes in wood that make this rustic style slice of wood a great tray to feature a collection of shot glasses or little bowls. Pop on over to see the correct drill bit and tutorial on how to make a wood shot glass tray.

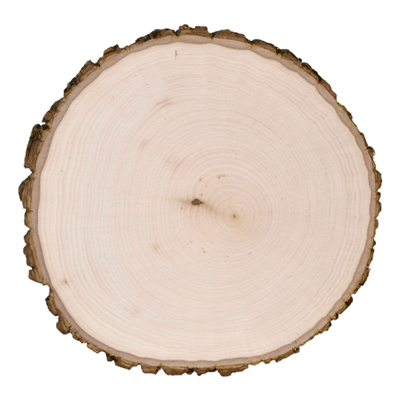
If you would like to win a Walnut Hollow Basswood Country Round leave a comment in today’s post here by Tuesday June 23, 2015 and you are in the running. Open to U.S. residents only please.

Basswood-Country-Round-Thick-Wood-Burn-39750


Related Posts:

  • 35 Rolled Magazine Crafts -You’ll Never Throw Away a…
  • How to drill holes in pebbles and pretty projects…
«
»

Comments

  1. Mary Helene says

    June 15, 2015 at 11:19 am

    My husband would love this in his Man-Cave.

  2. crowleylynne says

    June 15, 2015 at 11:34 am

    Super happy you chose Jamison’s! No longer have a husband to give it to if I won it, but heck, being a single mom I think I deserve it for Father’s Day. LOL

  3. Melody Stewart says

    June 15, 2015 at 11:52 am

    I love the shot glass tray, but I keep thinking of all the Wood-burning possibilities I could try if I had that round…

  4. craftilady says

    June 15, 2015 at 11:57 am

    This is a great idea. My son collects shot glasses

  5. mjmarmo says

    June 15, 2015 at 12:18 pm

    This is so cool! Would love to win this!

  6. Debby says

    June 15, 2015 at 12:20 pm

    This is such a cool idea. Love homemade gifts!

  7. Marie says

    June 15, 2015 at 12:56 pm

    This is lovely!

  8. Sue Kracker says

    June 15, 2015 at 1:16 pm

    Wonderful project, thanks for the ideas.
    Sue
    http://suek86401.blogspot.com/

  9. Karen Kingsbury says

    June 15, 2015 at 1:31 pm

    Fun and rustic. Perfect gift! Would love to win one!

  10. petoskeystone says

    June 15, 2015 at 1:34 pm

    Basswood is a lovely wood! Neat idea for a tray as well.

  11. Lynne Florig- says

    June 15, 2015 at 2:29 pm

    Wonderful giveaway!

  12. Anne Marie says

    June 15, 2015 at 3:25 pm

    I would love to win this wood round.

  13. Karey says

    June 15, 2015 at 4:47 pm

    Wow, cool giveaway! There is so much you can do with that!!

  14. Jennifer Reynolds says

    June 15, 2015 at 6:00 pm

    I would love to add lazy Susan parts to this and create a table topper for my Dad or my husband

  15. Lee says

    June 15, 2015 at 6:43 pm

    This is very awesome! Thank you!

  16. Dennis Mullins Sr says

    June 15, 2015 at 7:29 pm

    I would love to win this to go with all my shot glasses. Thank you for the giveaway and have a great week.

  17. cwknitnut says

    June 15, 2015 at 9:22 pm

    My brother has just started hand crafting bowls out of burls. Wonder what he’d do with this? Sure like to give it to him and see! Thanks for the opportunity.

  18. shari harniss says

    June 16, 2015 at 7:20 am

    So beautiful! I would love to win this!

  19. Nancy Lewis says

    June 16, 2015 at 8:52 am

    This is a great craft and one I would love to make. Thanks for the great giveaway.

  20. Mary Gontjes says

    June 16, 2015 at 9:50 am

    So many super cool things I could do with this wooded round…Good luck to me…

  21. Desta says

    June 16, 2015 at 12:55 pm

    That would look great in the house!

  22. Lucy A says

    June 16, 2015 at 8:04 pm

    Great Giveaway 🙂

  23. Diana Lyons says

    June 17, 2015 at 5:52 am

    Awesome idea!!

  24. Solducky says

    June 17, 2015 at 11:17 pm

    What a neat idea!

  25. Colleen says

    June 18, 2015 at 2:46 am

    This is Swweeeeeett………

  26. Marlene says

    June 18, 2015 at 6:41 pm

    Sorry honey, this one is for Mama

  27. Holly says

    June 22, 2015 at 11:17 am

    I already have tons of ideas for how to use this!

  28. Lauren maedge says

    June 22, 2015 at 11:46 pm

    This is beautiful!!

  29. kim says

    June 23, 2015 at 8:17 am

    I found an old wood burning tool at a garage sale , we could really decorate this

  30. Kristine R. says

    June 23, 2015 at 11:17 am

    I love this! thanks for the chance.

  31. Becky Calderman says

    June 23, 2015 at 1:18 pm

    my Son Clark would be quite surprised with this shot glass display

  32. Carla Hundley says

    June 23, 2015 at 2:36 pm

    Oh this looks like a
    great idea and would
    be fun to use!
    Carla from Utah

Have you read?

How To Make A Milk Carton Village – A Recycled Craft for Kids

Ready to turn your recycling bin into a colorful, miniature village? Grab those empty milk cartons and let’s create a town filled with tiny houses, shops, and even a school or bakery! This craft is perfect for kids of all ages and encourages imagination, storytelling, and eco-friendly creativity.

 What You’ll Need:

  • Empty milk or juice cartons (washed and dried)

  • Paints or markers

  • Paintbrushes

  • Craft glue or glue stick

  • Scissors (adult supervision recommended)

  • Colored paper or old magazines

  • Bottle caps, buttons, or plastic lids (for windows or decorations)

  • Sticks, straws, or skewers (for flag poles or chimneys)

  • Optional: glitter, stickers, washi tape, cotton balls (for snow or clouds!)

 Step-by-Step Instructions:

Step 1: Clean and Prep the Cartons
Make sure your milk or juice cartons are washed and completely dry. Remove any plastic lids or caps and keep them for decorations!

Step 2: Plan Your Village
Decide how many buildings you want to make. Each milk carton becomes a house, shop, or whatever your imagination dreams up. Arrange them side by side or in a circle like a real village square.

Step 3: Cut Out Doors and Windows
With the help of an adult, carefully cut small door and window shapes into your cartons. You can also glue cut-out shapes from colored paper if you’d rather not cut into the carton.

Step 4: Paint and Decorate
Use paint or markers to bring your buildings to life. Make brick patterns, colorful siding, or roof tiles. Let each child choose their own theme – rainbow bakery, monster house, fairy home, or tiny fire station!

Step 5: Add the Roofs
You can paint the top pointy part of the carton like a roof, or glue on cardboard triangles to create overhangs. Want to add a chimney? Glue a straw or cardboard roll on top!

Step 6: Make Flags and Signs
Cut small flags from recycled plastic or paper and tape them to straws or sticks. Glue your flags to the rooftops. You can even create tiny signs for each building – “Toy Store,” “Library,” or “Super Cat’s House.”

Step 7: Build Your Village
Place all the finished buildings together on a large piece of cardboard, tray, or table. Use bottle caps for stepping stones, cotton balls for bushes or clouds, and draw roads with marker.

Step 8: Play!
Now that your village is built, use little toys, action figures, or LEGO people to live in your new town. Create stories and adventures—your Milk Carton Village is officially open!

 Learning Bonus:

This craft is not just fun—it also teaches recycling, fine motor skills, creative thinking, and storytelling. Plus, it’s a great group activity for playdates, classrooms, or family craft nights.

Let your kids’ imaginations run wild—and remember, no two villages need to look the same. Each one tells its own story!

Explore

books Christmas CraftGossip Giveaways Craft Inspirations Easter glass halloween Home Decor kid crafts More Crafts Patterns & Tutorials recycled art Recycled Clothing Recycled Jewelry Recycled kids crafts Recycled Sewing Recycled Tutorials Recycling Ideas Recycling Organizing tin can

RSS More Articles

  • How to Make a Hooded Cape for Kids and Adults – Easy Sewing Tutorial
  • Designer Spotlight: Murder Puffin
  • DMC Striker Embroidery Pattern – A Free Football-Themed Stitch for Sports Fans
  • Knits to Make for Your Labubu
  • Little Birds: 26 Handmade Projects to Sew, Stitch, Quilt and Love
  • Stenciling Like a Pro? You NEED These Must-Have Supplies
  • 15 Highland Cows You Can Crochet
  • Etsy Spotlight – The Thomas Boys Shirt Sewing Pattern
  • 7 FREE Back to School SVG Cut Files
  • How to Make a Sticks and Stones Quilt – Free Quilting Tutorial

Copyright © 2025 · CraftGossip | Start Here | Contact Us | Link to Us | Your Editors | Privacy and affiliate policy