• Home
  • Suggest A Craft
  • DIY Newsletter

Recycled Crafts

Creative DIY Projects That Turn Trash Into Treasure

  • About CraftGossip
  • Our Network
    • Bath & Body Crafts
    • Candle Making Ideas
    • Crochet Ideas
    • Cross Stitch
    • Edible Crafts
    • Felting Patterns
    • Glass Art
    • Home & Garden Ideas
    • Indie Crafts
    • Jewelry Making
    • Kids Crafts
    • Knitting Patterns
    • Lesson Plans
    • Needlework
    • Party Ideas
    • Polymer Clay
    • Quilting Ideas
    • Recycled Crafts
    • Scrapbooking
    • Sewing Patterns
    • Card Making
    • DIY Weddings
    • Not Craft Ideas
  • Giveaways
  • Roundups
  • Store
  • Search

How To use cling wrap to Transfer an image

January 20, 2020 by Stefanie Girard

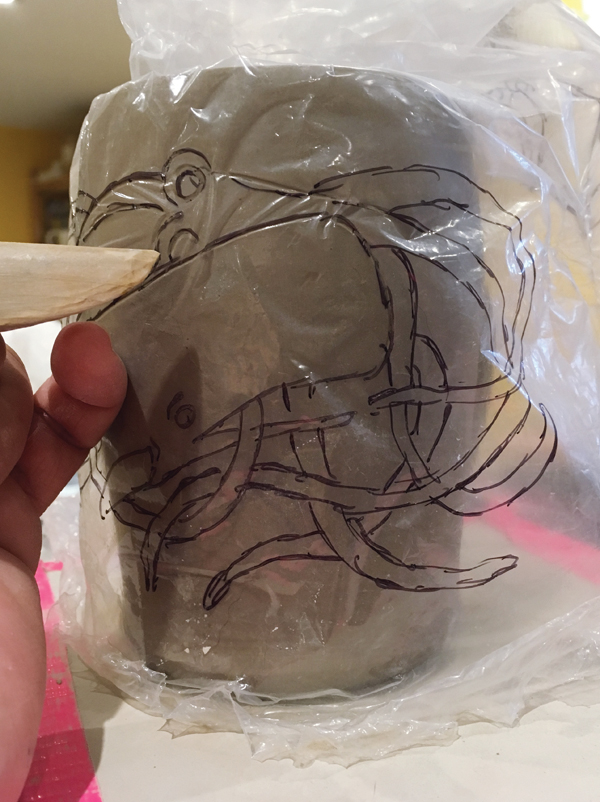
In a previous post, I shared a link that explains you to use cling wrap to add an image to fabric.

Here is one that shows how to use it to carve an image into a soft surface. I have used cling wrap to soften an impression using a cookie cutter but tracing an image and then using the cling wrap as a drawing guide is cool! I bet it would work on lots of surfaces.

Pop on over to the blog Ceramics Monthly for more about cling wrap embossing and image transfer.

Cling wrap embossing is a fun and easy technique for transferring images and adding a personal touch to your crafts and DIY projects. With just a few simple supplies, you can create unique and eye-catching designs for a variety of surfaces.

One of the best things about cling wrap embossing is that it’s so versatile. You can use any image or design you like, whether it’s a photo, illustration, or text, and you can transfer it onto almost any surface, including paper, wood, fabric, and more. The clear plastic wrap creates a raised, textured effect, which adds depth and dimension to your projects.

Here’s a step-by-step guide for how to do cling wrap embossing:

Gather your supplies: You’ll need a printed image, some clear plastic wrap, and a tool with a smooth, hard surface (such as a rolling pin or brayer).

Place the image face down: Find a clean, flat surface to work on, and place your printed image face down.

Lay the plastic wrap over the image: Make sure the plastic wrap is smooth and wrinkle-free, and carefully lay it over the top of the image.

Press down with the tool: Using your rolling pin or brayer, apply even pressure to the entire surface of the plastic wrap. You may need to apply a little more pressure to certain areas, depending on the size of your tool and the surface you’re working on.

Remove the wrap: Once you’ve applied enough pressure, you should be able to lift the plastic wrap from the surface and see the image transferred onto the wrap.

Now that you’ve got the hang of cling wrap embossing, you can experiment with different images, colors, and surfaces to create unique and personalized projects. You can also try combining this technique with other image transfer methods, such as heat or water, to create even more interesting and varied effects.

Whether you’re a seasoned crafter or a beginner, cling wrap embossing is a fun and rewarding technique that’s sure to inspire your creativity.
 

Related Posts:

  • Your pasta machine is good for more than pasta or…
  • How to make a mini silk screen set up to make little art
«
»

Have you read?

This DIY Board Game Table Made Me Want to Dust Off My Cricut

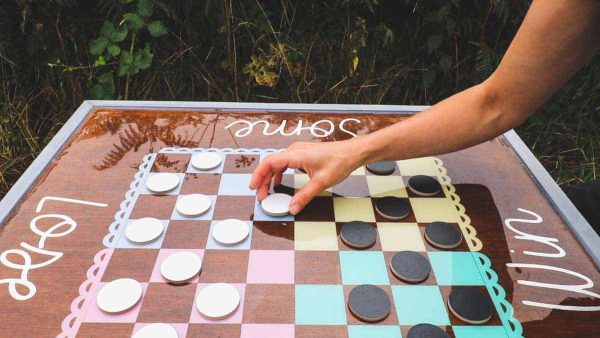
You know that feeling when you see a project and instantly start mentally rearranging your whole weekend to fit it in? That was me with The Carpenter’s Daughter’s DIY Board Game Table tutorial. I mean, it’s so good. Functional, stylish, and honestly—such a conversation starter.

It’s the kind of piece that looks high-end, but she breaks it down step-by-step in a way that makes it totally achievable, even if you’re not a woodworking wizard. And if you’ve got a Cricut machine (like I do, gathering dust in the corner), this is your cue to plug it in and actually use it. She used hers to create the game board top, and it adds such a clean, custom finish.

I never really thought about how handy a built-in game board could be—no more shuffling Monopoly pieces off the kitchen table when it’s time for dinner! It’s perfect for families, game nights with friends, or even just a cool coffee table alternative with a little hidden fun.

What I Love About This Project:

  • It doubles as a gorgeous piece of furniture.

  • You can totally customize the games—checkers, chess, tic-tac-toe, you name it.

  • It’s an awesome way to up your Cricut game (seriously, I’ve been inspired).

  • And let’s be honest—it’s a great excuse to get crafty and competitive.

If you’re looking for a project with style and function, check out the full tutorial here. Fair warning though—you’ll probably end up wanting to make more than one.

Now if you’ll excuse me, I’m off to charge my Cricut and pretend I know how to play chess again…

Explore

books Christmas CraftGossip Giveaways Craft Inspirations Easter glass halloween Home Decor kid crafts More Crafts Patterns & Tutorials recycled art Recycled Clothing Recycled Jewelry Recycled kids crafts Recycled Sewing Recycled Tutorials Recycling Ideas Recycling Organizing tin can

RSS More Articles

  • Spooky Crochet Skull Scarf – Free Pattern
  • How to Make a Half-Square Triangle Surprise Quilt – Free Quilting Tutorial
  • Clay Studio Series – YouTube Video Review: DIY Stoneware Plates
  • This DIY Board Game Table Made Me Want to Dust Off My Cricut
  • Clay Studio Series – YouTube Video Review: What type of clay should I use?
  • Cross Stitch the National Parks in Tiny Form
  • DMC Punch Needle Wall Hanging – A Bold and Modern Statement Stitch
  • Turtle Memory Game – Crochet Pattern
  • How to Make a Fall Squirrel Birthday Card
  • Create a Giant Halloween Decoration That Will Leave Everyone Spooked – DIY Big Guy Tutorial

Copyright © 2025 · CraftGossip | Start Here | Contact Us | Link to Us | Your Editors | Privacy and affiliate policy