• Home
  • Suggest A Craft
  • DIY Newsletter

Recycled Crafts

Creative DIY Projects That Turn Trash Into Treasure

  • About CraftGossip
  • Our Network
    • Bath & Body Crafts
    • Candle Making Ideas
    • Crochet Ideas
    • Cross Stitch
    • Edible Crafts
    • Felting Patterns
    • Glass Art
    • Home & Garden Ideas
    • Indie Crafts
    • Jewelry Making
    • Kids Crafts
    • Knitting Patterns
    • Lesson Plans
    • Needlework
    • Party Ideas
    • Polymer Clay
    • Quilting Ideas
    • Recycled Crafts
    • Scrapbooking
    • Sewing Patterns
    • Card Making
    • DIY Weddings
    • Not Craft Ideas
  • Giveaways
  • Roundups
  • Store
  • Search

Giveaway- Airbrainz airbrush kit and how to airbrush solar light covers

July 26, 2016 by Stefanie Girard

First up I have a super-fun giveaway to tell you about and then scroll down to see the fun airbrushed solar light sign I made using the Testors AirBrainz Airbrush Kit and their acrylic paint.

Screen Shot 2016-07-18 at 3.57.50 PM

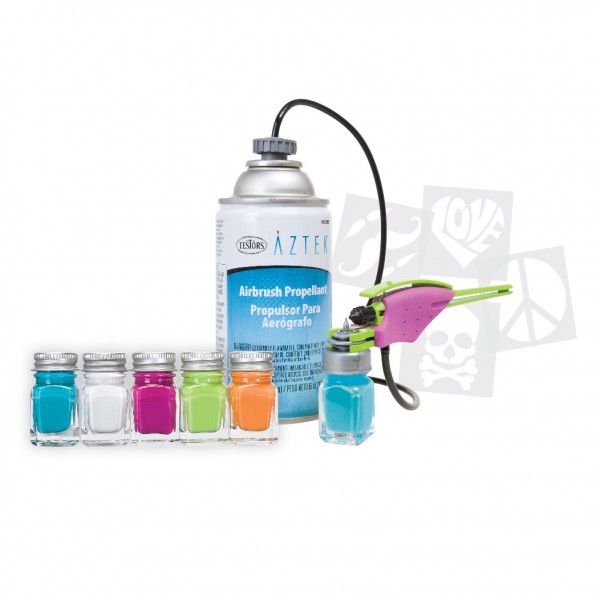
Leave a comment in today’s post by August 4th, 2016 and you are in the running for Testors AirBrainz Airbrush Kit that paint set, the airbrush, stencils and canned air.

Open to U. S. residents only please.

Airbrainz_set-02 (2)

Now onto the fun solar light sign tutorial.

Rainbow painted solar lights plastic cups
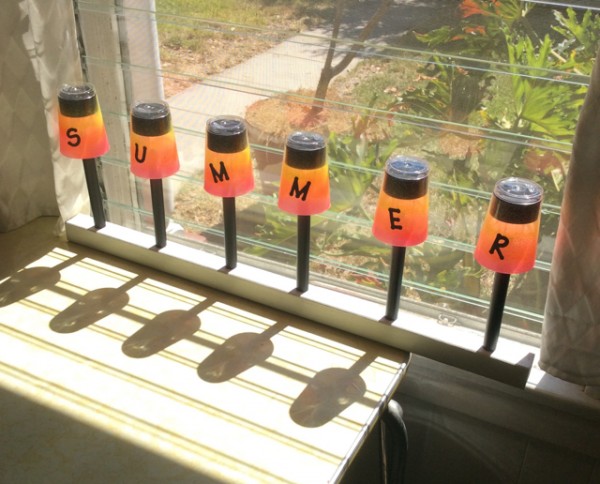
These lights look festive and pretty during the day as they are charging.
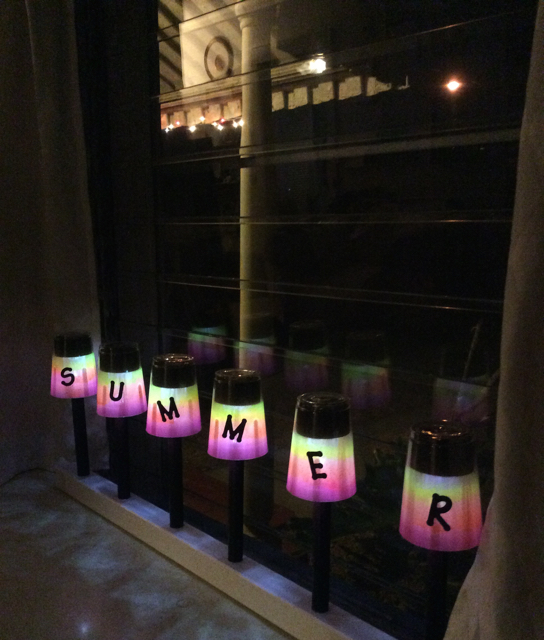
And at night they light up and look so pretty!
IMG_4073
I had so much fun painting these cups and playing with colors.
Testors Airbrainz solar airbrush lights stefanie girard
 
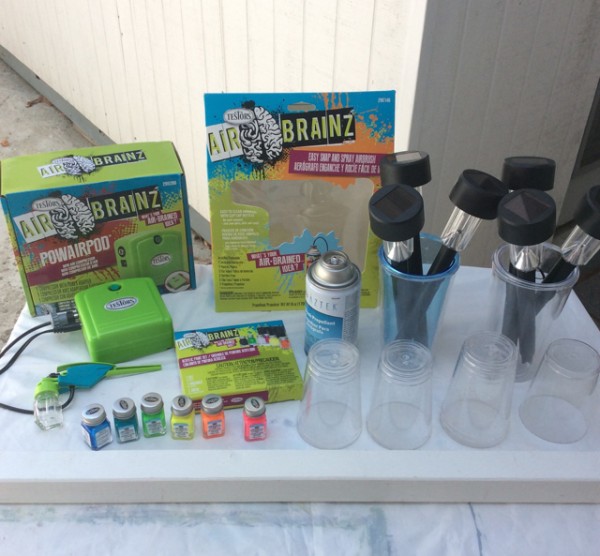
In addition to the Airbrush kit Testors also makes a great Mini Powairpod AirBrainz Air Compressor which I opted to use for this project.
Also needed are recycled plastic cups that fit over solar lights. I got mine at the 99 cents store but I bet recycled plastic cups or containers would work great too. All that you need do is make sure the bottom of the container is clear so the solar panel is still exposed to sun light.
How to rainbow airbrush solar lights
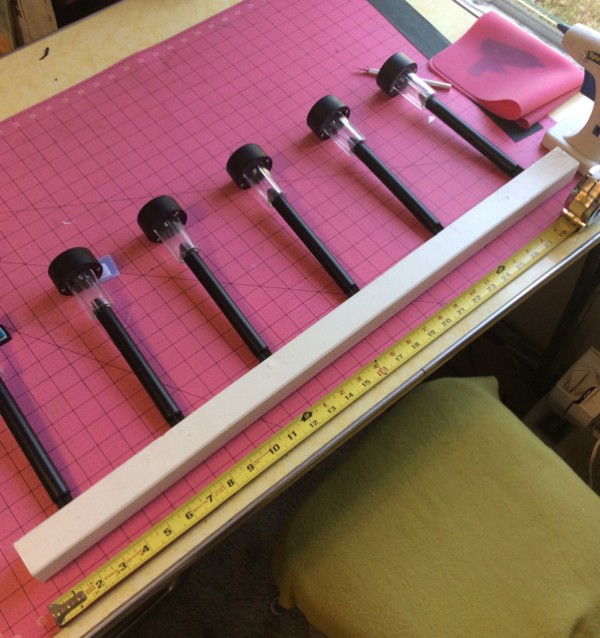
For the base I used a scrap of wood. I measured the strip of wood to equally space out the solar lights.
IMG_4001
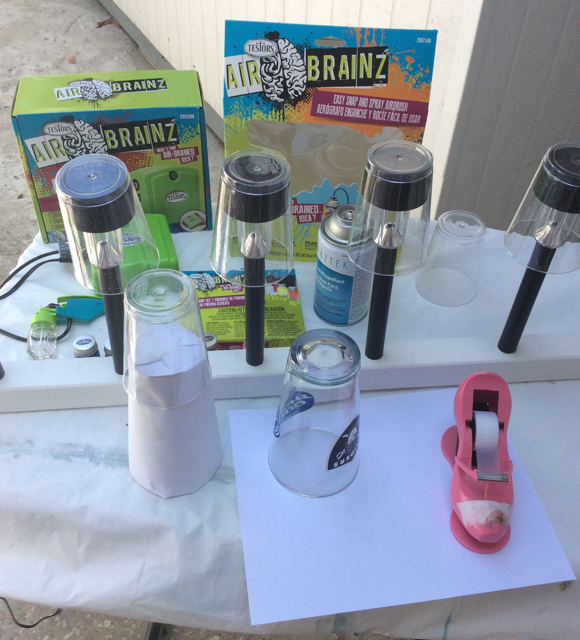
I wanted to do a test cup or two so I covered glasses in white paper to protect them and keep the cups in place. This also made it easy to spin the cups while painting them.
IMG_4004
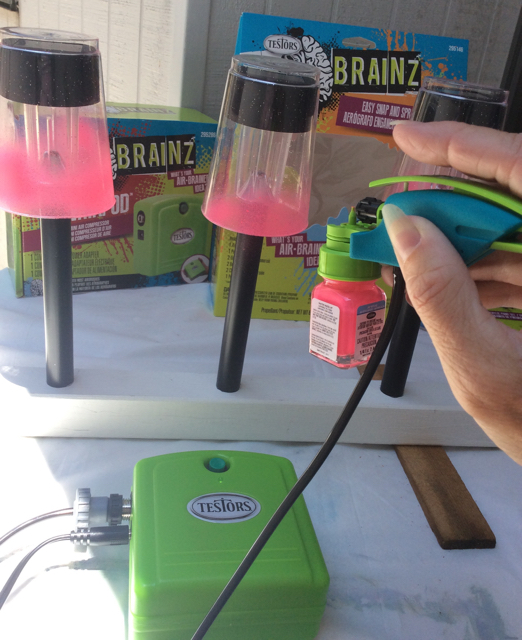
This was so easy and fun!! I started with the pink along the bottom (top) edge of the plastic cup.
I simply sprayed the paint around each cup. I did do two light rounds so the paint wouldn’t run.
How to airbrush solar lights
Then I did a stripe of orange and then yellow.
Recycled plastic cup rainbow airbrush solar lights
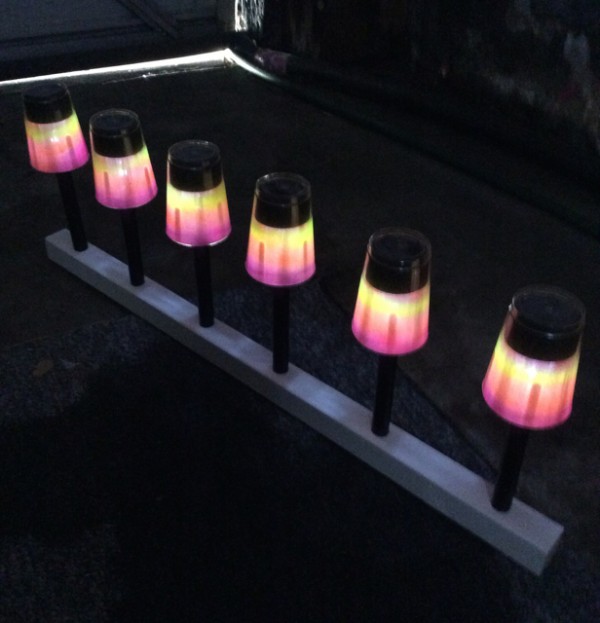
I brought the strip of lights into my garage to see how they looked. So colorful!
Summer airbrushed rainbow solar lights
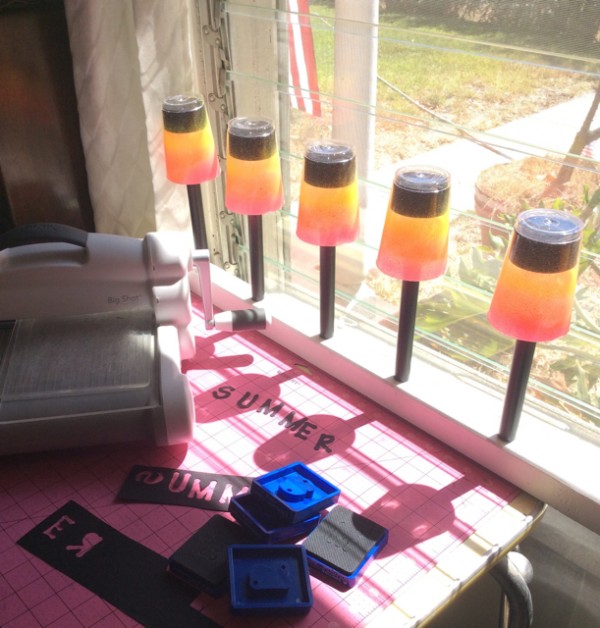
 I wanted to add one more element to my rainbow solar lights a word. SUMMER felt like the appropriate word for these festive lights. I simply used my Sizzix die cutter with a bit of black paper to cut the letters. I used temporary glue dots to attach them to the cups. I plan on switching out my letters to other words as my mood and the seasons change.


Related Posts:

  • Your pasta machine is good for more than pasta or…
  • Upcycled Glass Solar Garden Mushrooms – A Whimsical…
«
»

Comments

  1. Carla Hundley says

    July 26, 2016 at 2:11 pm

    How cute and a
    fun idea! Would
    love the airbrush
    kit to use.
    Carla from Utah

  2. jennieandtim says

    July 26, 2016 at 3:05 pm

    This airbrush kit looks like it would be a lot of fun!

  3. gypsyanna says

    July 26, 2016 at 3:35 pm

    This would be a wonderful prize to win. Airbrushing is something I’ve always wanted to learn.

  4. Erin Ellis says

    July 26, 2016 at 3:50 pm

    How awesome! I could do so many cool things with this kit! Thank you for the wonderful giveaway.
    Erin
    ErinLoves2Run at gmail dot com

  5. Tara D. says

    July 27, 2016 at 12:28 am

    What an awesome project! I have been interested in learning more about airbrushing ever since I had make-up applied with one for a play I was in. I can imagine all kinds of things to do with this great giveaway.

  6. Jennifer Johnston says

    July 27, 2016 at 1:10 am

    This looks like it would be fun to learn and use! Lots of creativity.

  7. shari harniss says

    July 27, 2016 at 7:41 am

    How cool would this be to play with?!
    Thanks for the chance to win!

  8. Kelly Hall says

    July 27, 2016 at 3:18 pm

    this looks like just what I need for a new addition to my crafting supplies. I can think of tons of great projects this air brushing kit would be GREAT for , I hope I Win.

  9. Victoria Canman says

    July 27, 2016 at 8:04 pm

    Looks like fun. I’ve always wanted to try it

  10. jenny stratton says

    July 28, 2016 at 12:46 am

    I would love to learn to airbrush it looks like such fun.

  11. Dana Charlton says

    July 29, 2016 at 2:56 am

    That looks so cool! Would love to win so I can do something like that. Good luck everyone.

  12. spierssusan says

    July 30, 2016 at 7:23 am

    i love your solar lights, great idea! So many other apps too-great giveaway!

  13. Chris says

    July 30, 2016 at 11:00 pm

    This looks like fun. You have my brain thinking now of all kinds of things.

  14. luluvision says

    July 31, 2016 at 11:24 am

    Super cool! What a great project! The airbrush kit would be great in my arsenal of creative tools! Thanks for the chance!

  15. Carmen N says

    July 31, 2016 at 4:47 pm

    What a fun project! I would love to try thi

  16. Cindy Dahlgren says

    August 5, 2016 at 10:29 am

    This is an excellent product! I would love to have a chance to do this with my husband. Jadahlgr at Yahoo dot Com

  17. cdahlgren2013 says

    August 15, 2016 at 7:10 pm

    Thanks so much for picking my number! We’re going to have a great time with this!

  18. Barbara Sullivan says

    August 31, 2016 at 1:35 pm

    This look’s real simple I think lol,be fun try Thank’s..

  19. Christi says

    March 1, 2018 at 1:45 am

    I would give this to a friend who would love to have this one.

  20. D. Dewey says

    April 8, 2018 at 8:00 am

    what a nifty machine!

  21. Rose Scott says

    May 3, 2018 at 5:54 pm

    What a fun giveaway. Oh so many uses for this fun machine.

Have you read?

Green Gifting: Sustainable Gift Wrap Ideas Using What You Already Have

Let’s be honest—nothing beats the joy of giving a beautifully wrapped gift. But the mountain of shredded wrapping paper that follows? Not exactly festive, especially when you realize most of it can’t be recycled. Glitter, foil, and laminated finishes might look pretty, but they’re headed straight for landfill. The good news? You don’t need to give up gorgeous presentation to be eco-friendly. In fact, some of the most charming and creative gift wrap ideas are hiding in plain sight—right in your home.

If you’re ready to wrap more mindfully this season (or any time of year), check out these sustainable gift wrap ideas using things you already have on hand. They’re budget-friendly, planet-friendly, and totally unique.

Brown Paper Bags or Parcel Paper

Those humble brown paper grocery bags that tend to collect under your sink? They’re basically wrapping paper in disguise. Just cut them open along the seams and lay them flat to create a rustic, blank canvas that you can dress up however you like. Add hand-drawn designs, rubber stamps, washi tape, or even sprigs of greenery to give your package a custom touch. Pair it with twine or yarn instead of plastic ribbon for that perfectly imperfect, homespun look.

Old Maps, Sheet Music, or Book Pages

Got an old road atlas collecting dust on a shelf? What about torn sheet music from a piano book that’s seen better days? These seemingly outdated items make for incredibly stylish, one-of-a-kind gift wrap. Use maps to wrap travel-themed gifts or repurpose yellowed book pages for a vintage aesthetic. You can even layer the pages for a patchwork effect or fold them into envelopes for small items. It’s thoughtful, artistic, and an instant conversation starter.

Fabric Scraps or Scarves

If you’ve got a stash of leftover fabric from sewing projects or old scarves that no longer spark joy, they’re perfect for gift wrapping. The traditional Japanese method of Furoshiki wrapping involves folding and knotting cloth into beautiful, functional packages. It works for almost any shape, and the best part? No tape required! Use silky scarves for elegant gifts or cozy flannel scraps for a more rustic feel. The fabric becomes part of the gift, making it extra special and zero-waste.

Tins, Jars, and Containers

Don’t toss that empty cookie tin or leftover mason jar—turn it into a beautiful, reusable gift container. Tins are perfect for baked goods, craft kits, jewelry, or even small toys. Jars can be filled with homemade treats, bath salts, or tiny trinkets. Add a label, decorate the lid with fabric or twine, and you’ve got a gift that looks like it came straight from a boutique. Best of all, the recipient can reuse the container long after the gift is gone.

Newspaper and Magazines

Newspapers might be old-fashioned, but they’re still surprisingly chic when used as gift wrap. Choose interesting pages like crosswords, comics, or lifestyle sections for a personalized touch. Glossy magazine pages work well for smaller gifts, especially when you pick bold images or fashion spreads. Add a ribbon made from fabric or twine, and suddenly yesterday’s news becomes today’s eco-friendly gift wrap.

Reused Gift Bags and Wrapping Paper

We all have that drawer (or overflowing bin) of used gift bags and slightly crinkled wrapping paper from past holidays and birthdays. Instead of letting them sit, give them another round of life! Smooth out wrinkles, trim rough edges, and refresh them with new tags or a creative embellishment. No one will know the difference, and you’re saving perfectly good materials from ending up in the bin.

Tea Towels or Cloth Napkins

Wrapping a gift in a tea towel or cloth napkin is not only charming but practical too. These items become a bonus gift themselves, especially when chosen with care to match the recipient’s taste. Wrap a cookbook in a linen dish towel or use a bold printed napkin to bundle up homemade cookies. Secure the bundle with ribbon, string, or even a reusable hair tie for a thoughtful, waste-free presentation.

Old Calendars or Posters

That oversized calendar from last year may be out of date, but its pages are still brimming with wrapping potential. Large-format images from travel calendars, art prints, or inspirational quotes can make each gift feel personalized and elevated. Posters, damaged prints, or even your child’s old artwork can also be transformed into unique gift wrap that adds character and charm to your package

Recycled Envelopes and DIY Gift Tags

Think twice before tossing out those junk mail envelopes or cereal boxes—they’re prime material for crafty wrapping extras. Cut envelopes into pouches for flat items like gift cards, tickets, or stickers. Use thin cardboard (like from a cereal or pasta box) to make DIY gift tags. You can paint them, cover them in fabric, or write a personal note with a metallic marker for a handmade finish that feels more personal than store-bought.

Nature’s Touch: Pinecones, Twigs, and Dried Flowers

Skip the plastic bows and top your gifts with a little something from nature. A sprig of rosemary, a bundle of dried lavender, a cinnamon stick, or a pinecone adds texture, scent, and seasonal flair to your wrapping. Not only is it beautiful, but it’s also biodegradable and compostable. Head to your backyard, garden, or local park for inspiration, and bring a little bit of the outdoors into your gift presentation.

Sustainable gift wrapping doesn’t have to be complicated or boring—in fact, it opens the door to more creativity and heart. When you use what you already have, your gift becomes more than just the item inside—it’s a story, a sentiment, and a gentle nudge toward a greener future.

So next time you’re wrapping a gift, skip the trip to the store and raid your drawers, closets, and recycling bin instead. You’ll be surprised by how beautiful, meaningful, and eco-friendly your wrapping can be. Happy green gifting!

Explore

books Christmas CraftGossip Giveaways Craft Inspirations Easter glass halloween Home Decor kid crafts More Crafts Patterns & Tutorials recycled art Recycled Clothing Recycled Jewelry Recycled kids crafts Recycled Sewing Recycled Tutorials Recycling Ideas Recycling Organizing tin can

RSS More Articles

  • Meet Mr. Boo – The Ultimate Halloween Decoration That Will Steal the Show
  • Book Review: Cross Stitch Alphabet and Number Patterns
  • Knit a Jacket Inspired by an Iconic Coco Chanel Look
  • Learning about Côte D’ivoire for Kids
  • 12 Autumn Botanical Scrapbook Layout Ideas
  • Green Gifting: Sustainable Gift Wrap Ideas Using What You Already Have
  • Midnight Skulls Halloween Scarf – Free Crochet Pattern
  • Book Review: The Green Witch: Your Complete Guide to the Natural Magic of Herbs, Flowers, Essential Oils, and More
  • Pottery Clay – DIY Divided Tapas Serving Platter with Illustrated Sections
  • Rosh Hashanah Cross Stitch Patterns

Copyright © 2025 · CraftGossip | Start Here | Contact Us | Link to Us | Your Editors | Privacy and affiliate policy