
five lucky poker chip brooches
Originally uploaded by KisforCalligraphy
these gorgeous brooches are made on poker chips! i wonder if the images are vintage as well?
Creative DIY Projects That Turn Trash Into Treasure
five lucky poker chip brooches
Originally uploaded by KisforCalligraphy
these gorgeous brooches are made on poker chips! i wonder if the images are vintage as well?
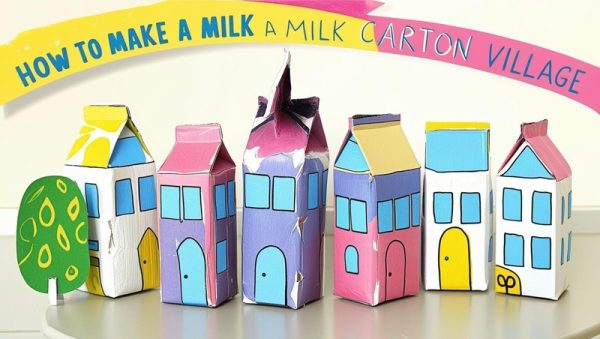
Ready to turn your recycling bin into a colorful, miniature village? Grab those empty milk cartons and let’s create a town filled with tiny houses, shops, and even a school or bakery! This craft is perfect for kids of all ages and encourages imagination, storytelling, and eco-friendly creativity.
Empty milk or juice cartons (washed and dried)
Paints or markers
Paintbrushes
Craft glue or glue stick
Scissors (adult supervision recommended)
Colored paper or old magazines
Bottle caps, buttons, or plastic lids (for windows or decorations)
Sticks, straws, or skewers (for flag poles or chimneys)
Optional: glitter, stickers, washi tape, cotton balls (for snow or clouds!)
Step 1: Clean and Prep the Cartons
Make sure your milk or juice cartons are washed and completely dry. Remove any plastic lids or caps and keep them for decorations!
Step 2: Plan Your Village
Decide how many buildings you want to make. Each milk carton becomes a house, shop, or whatever your imagination dreams up. Arrange them side by side or in a circle like a real village square.
Step 3: Cut Out Doors and Windows
With the help of an adult, carefully cut small door and window shapes into your cartons. You can also glue cut-out shapes from colored paper if you’d rather not cut into the carton.
Step 4: Paint and Decorate
Use paint or markers to bring your buildings to life. Make brick patterns, colorful siding, or roof tiles. Let each child choose their own theme – rainbow bakery, monster house, fairy home, or tiny fire station!
Step 5: Add the Roofs
You can paint the top pointy part of the carton like a roof, or glue on cardboard triangles to create overhangs. Want to add a chimney? Glue a straw or cardboard roll on top!
Step 6: Make Flags and Signs
Cut small flags from recycled plastic or paper and tape them to straws or sticks. Glue your flags to the rooftops. You can even create tiny signs for each building – “Toy Store,” “Library,” or “Super Cat’s House.”
Step 7: Build Your Village
Place all the finished buildings together on a large piece of cardboard, tray, or table. Use bottle caps for stepping stones, cotton balls for bushes or clouds, and draw roads with marker.
Step 8: Play!
Now that your village is built, use little toys, action figures, or LEGO people to live in your new town. Create stories and adventures—your Milk Carton Village is officially open!
This craft is not just fun—it also teaches recycling, fine motor skills, creative thinking, and storytelling. Plus, it’s a great group activity for playdates, classrooms, or family craft nights.
Let your kids’ imaginations run wild—and remember, no two villages need to look the same. Each one tells its own story!
Yes, four of the five images are vintage paper ephemera hand punched from from “The Treasury of Little Golden Books” published by Golden Press. The cherries are hand punched from a cool piece of gift wrap I had saved.
Thank for this lovely post! Great site full of inspiration!