• Home
  • Suggest A Craft
  • DIY Newsletter

Recycled Crafts

Creative DIY Projects That Turn Trash Into Treasure

  • About CraftGossip
  • Our Network
    • Bath & Body Crafts
    • Candle Making Ideas
    • Crochet Ideas
    • Cross Stitch
    • Edible Crafts
    • Felting Patterns
    • Glass Art
    • Home & Garden Ideas
    • Indie Crafts
    • Jewelry Making
    • Kids Crafts
    • Knitting Patterns
    • Lesson Plans
    • Needlework
    • Party Ideas
    • Polymer Clay
    • Quilting Ideas
    • Recycled Crafts
    • Scrapbooking
    • Sewing Patterns
    • Card Making
    • DIY Weddings
    • Not Craft Ideas
  • Giveaways
  • Roundups
  • Store
  • Search

Transforming an IKEA Shelf into a Rustic Farmhouse Beauty

August 17, 2025 by Shellie Wilson

Looking to add some rustic charm to your space without breaking the bank? Donna from Funky Junk Interiors has shared a brilliant DIY hack that turns a standard IKEA storage shelf into a stunning farmhouse-style piece.

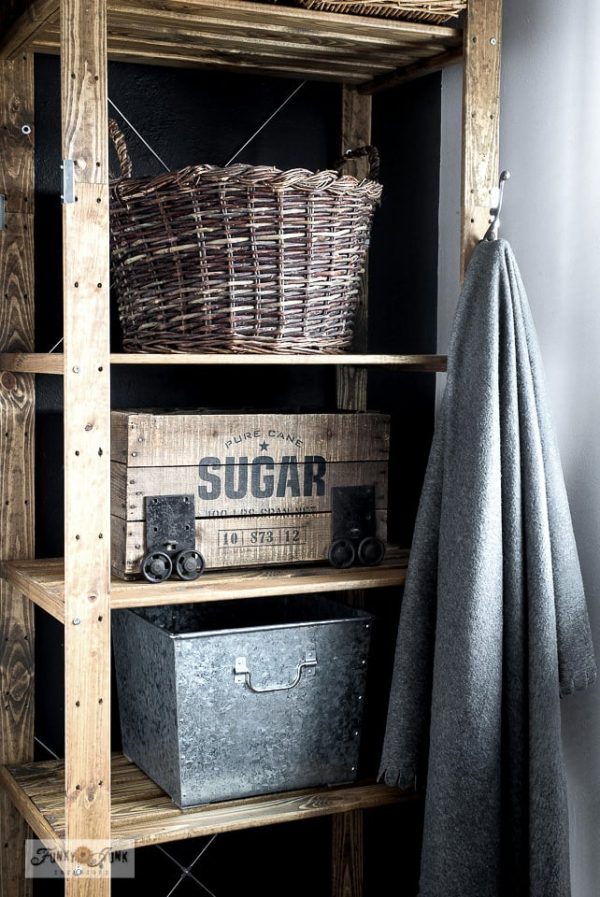
Donna started with the basic IKEA HENJNE shelving unit, which is functional but lacks character. To infuse it with rustic appeal, she stained the wood to deepen its tone and added vintage baskets and a stenciled crate labeled “Pure Cane Sugar” for a nostalgic touch. This clever combination not only enhanced the shelf’s aesthetic but also increased its storage capacity, making it both beautiful and practical.?

This project is a perfect example of how a little creativity can transform everyday furniture into something special. By incorporating vintage elements and a touch of DIY flair, Donna elevated a simple storage unit into a statement piece that complements various interior styles, from farmhouse to industrial.?

If you’re looking for an easy and affordable way to upgrade your home decor, this IKEA hack is a fantastic option. With just a few materials and some elbow grease, you can create a unique piece that adds character and functionality to your space.?

For a detailed guide and more inspiration, check out the full tutorial on Funky Junk Interiors 

Related Posts:

  • DIY Upcycled Fabric Bowls and Baskets: A Fun and…
  • Upcycling or Hoarding? Why Your DIY Projects Could…
«
»

Have you read?

DIY Paper Bag Mushrooms – A Creative Upcycled Craft for Kids and Nature Lovers

There’s something magical about mushrooms — maybe it’s the fairy-tale vibes or their cozy woodland charm. Either way, turning ordinary brown paper bags into mushrooms is a fun, hands-on craft project that kids (and adults) will enjoy. The best part? You’re reusing materials that might otherwise go to waste. Win-win!

This easy tutorial walks you through making your very own forest of recycled mushrooms using simple supplies you likely already have around the house.

What You’ll Need:

  • Brown paper lunch bags (you can even use grocery bags cut to size)

  • Scrap paper or newspaper for stuffing

  • String, yarn, or twine

  • Scissors

  • Paints (acrylic or tempera work best)

  • Paintbrushes or sponges

  • Optional extras: markers, stickers, googly eyes, craft glue

Step-by-Step: How to Make Your Mushrooms

Step 1: Create the Mushroom Top
Start by opening your paper bag and gently crumpling up some newspaper or scrap paper. Stuff it into the bottom of the bag — not too tight, just enough to give it a rounded shape that will form the mushroom cap.

Step 2: Form the Stem
Once the top is nice and puffy, hold the bag just underneath the stuffed section and twist it lightly to shape the stem. Tie a piece of twine or string around this part to hold the form. You’ll now have a mushroom top with a long paper bag hanging down — that’s your stem.

Step 3: Trim to Size
If the stem looks too long or uneven, grab your scissors and snip it down to your preferred height. You can even experiment with making some taller and some short and chubby for a little mushroom variety.

Step 4: Paint and Decorate
Time for the fun part — painting! Flip the mushroom cap upright and paint it any way you like. Classic red with white spots? Go for it. Bright blue with glitter? Why not! Use brushes or dabbers to add spots, swirls, or patterns. Let kids express their creativity — there’s no wrong way to decorate a magic mushroom!

Step 5: Let It Dry
Place your mushrooms somewhere safe to dry. You can use a sheet of newspaper or cardboard to avoid mess. Once dry, they’ll stiffen a little and hold their shape nicely.

Step 6: Display Your Mushroom Garden
Line them up on a windowsill, add them to a play area, or build a fairy village in the corner of a room. You can even glue them to a cardboard base and add moss, pebbles, and tiny paper critters for a full scene.

Extra Ideas:

  • Add flags or tiny doors to make mushroom homes.

  • Draw faces or names on the stems to turn them into characters.

  • Use cotton balls or pom-poms for fluffy mushroom spots.

Why This Project Rocks:

This is one of those crafts that doesn’t need a trip to the store or fancy tools — just a little time, a few basic supplies, and a bit of imagination. Plus, it encourages kids to see the creative potential in everyday materials — a great step toward more mindful, eco-conscious crafting.

So go ahead, raid the recycling bin and bring a mini mushroom forest to life.

How to make giant toadstools out of recycled tires

How to make champagne cork toadstools

How to make recycled Easter egg mushrooms

How to make recycled toilet paper tube mushrooms

How to make a rainbow forest of adorable recycled mushrooms

Explore

books Christmas CraftGossip Giveaways Craft Inspirations Easter glass halloween Home Decor kid crafts More Crafts Patterns & Tutorials recycled art Recycled Clothing Recycled Jewelry Recycled kids crafts Recycled Sewing Recycled Tutorials Recycling Ideas Recycling Organizing tin can

RSS More Articles

  • Cross Stitch the National Parks in Tiny Form
  • DMC Punch Needle Wall Hanging – A Bold and Modern Statement Stitch
  • Turtle Memory Game – Crochet Pattern
  • How to Make a Fall Squirrel Birthday Card
  • Create a Giant Halloween Decoration That Will Leave Everyone Spooked – DIY Big Guy Tutorial
  • Combine Knit and Crochet with this Cute Checkers Set
  • Rosh Hashanah Coloring Sheets and Other Activities for Kids
  • Cassette Tape Shaped Mini Album
  • Free Crochet Pattern – Chunky Rib Tunisian Hat and Cowl
  • What is Silver Art Clay or Precious Metal Clay (PMC) and How Do You Work With It (and Fire It!)

Copyright © 2025 · CraftGossip | Start Here | Contact Us | Link to Us | Your Editors | Privacy and affiliate policy