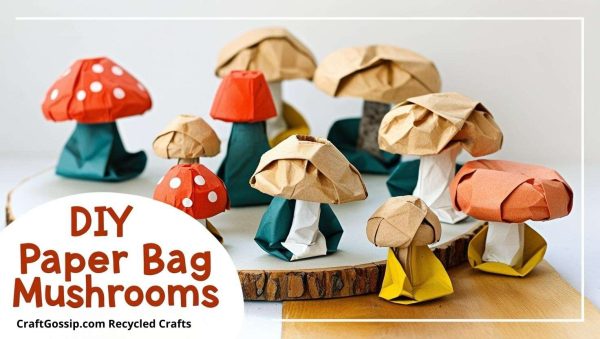
There’s something magical about mushrooms — maybe it’s the fairy-tale vibes or their cozy woodland charm. Either way, turning ordinary brown paper bags into mushrooms is a fun, hands-on craft project that kids (and adults) will enjoy. The best part? You’re reusing materials that might otherwise go to waste. Win-win!
This easy tutorial walks you through making your very own forest of recycled mushrooms using simple supplies you likely already have around the house.
What You’ll Need:
Brown paper lunch bags (you can even use grocery bags cut to size)
Scrap paper or newspaper for stuffing
String, yarn, or twine
Scissors
Paints (acrylic or tempera work best)
Paintbrushes or sponges
Optional extras: markers, stickers, googly eyes, craft glue
Step-by-Step: How to Make Your Mushrooms
Step 1: Create the Mushroom Top
Start by opening your paper bag and gently crumpling up some newspaper or scrap paper. Stuff it into the bottom of the bag — not too tight, just enough to give it a rounded shape that will form the mushroom cap.
Step 2: Form the Stem
Once the top is nice and puffy, hold the bag just underneath the stuffed section and twist it lightly to shape the stem. Tie a piece of twine or string around this part to hold the form. You’ll now have a mushroom top with a long paper bag hanging down — that’s your stem.
Step 3: Trim to Size
If the stem looks too long or uneven, grab your scissors and snip it down to your preferred height. You can even experiment with making some taller and some short and chubby for a little mushroom variety.
Step 4: Paint and Decorate
Time for the fun part — painting! Flip the mushroom cap upright and paint it any way you like. Classic red with white spots? Go for it. Bright blue with glitter? Why not! Use brushes or dabbers to add spots, swirls, or patterns. Let kids express their creativity — there’s no wrong way to decorate a magic mushroom!
Step 5: Let It Dry
Place your mushrooms somewhere safe to dry. You can use a sheet of newspaper or cardboard to avoid mess. Once dry, they’ll stiffen a little and hold their shape nicely.
Step 6: Display Your Mushroom Garden
Line them up on a windowsill, add them to a play area, or build a fairy village in the corner of a room. You can even glue them to a cardboard base and add moss, pebbles, and tiny paper critters for a full scene.
Extra Ideas:
Add flags or tiny doors to make mushroom homes.
Draw faces or names on the stems to turn them into characters.
Use cotton balls or pom-poms for fluffy mushroom spots.
Why This Project Rocks:
This is one of those crafts that doesn’t need a trip to the store or fancy tools — just a little time, a few basic supplies, and a bit of imagination. Plus, it encourages kids to see the creative potential in everyday materials — a great step toward more mindful, eco-conscious crafting.
So go ahead, raid the recycling bin and bring a mini mushroom forest to life.
How to make giant toadstools out of recycled tires
How to make champagne cork toadstools
How to make recycled Easter egg mushrooms