One of the many things I love about this blog is the reader suggestions I get in my e-mail. This great candle holder (and many like it) come to me from Yessy Art Gallery … apparently the art of recycling tin cans into light holders is a dying art, and so this spotlight will hopefully help to keep it going a bit longer. Head on over to the gallery to see the wide variety of light holders available!
Comments
Have you read?
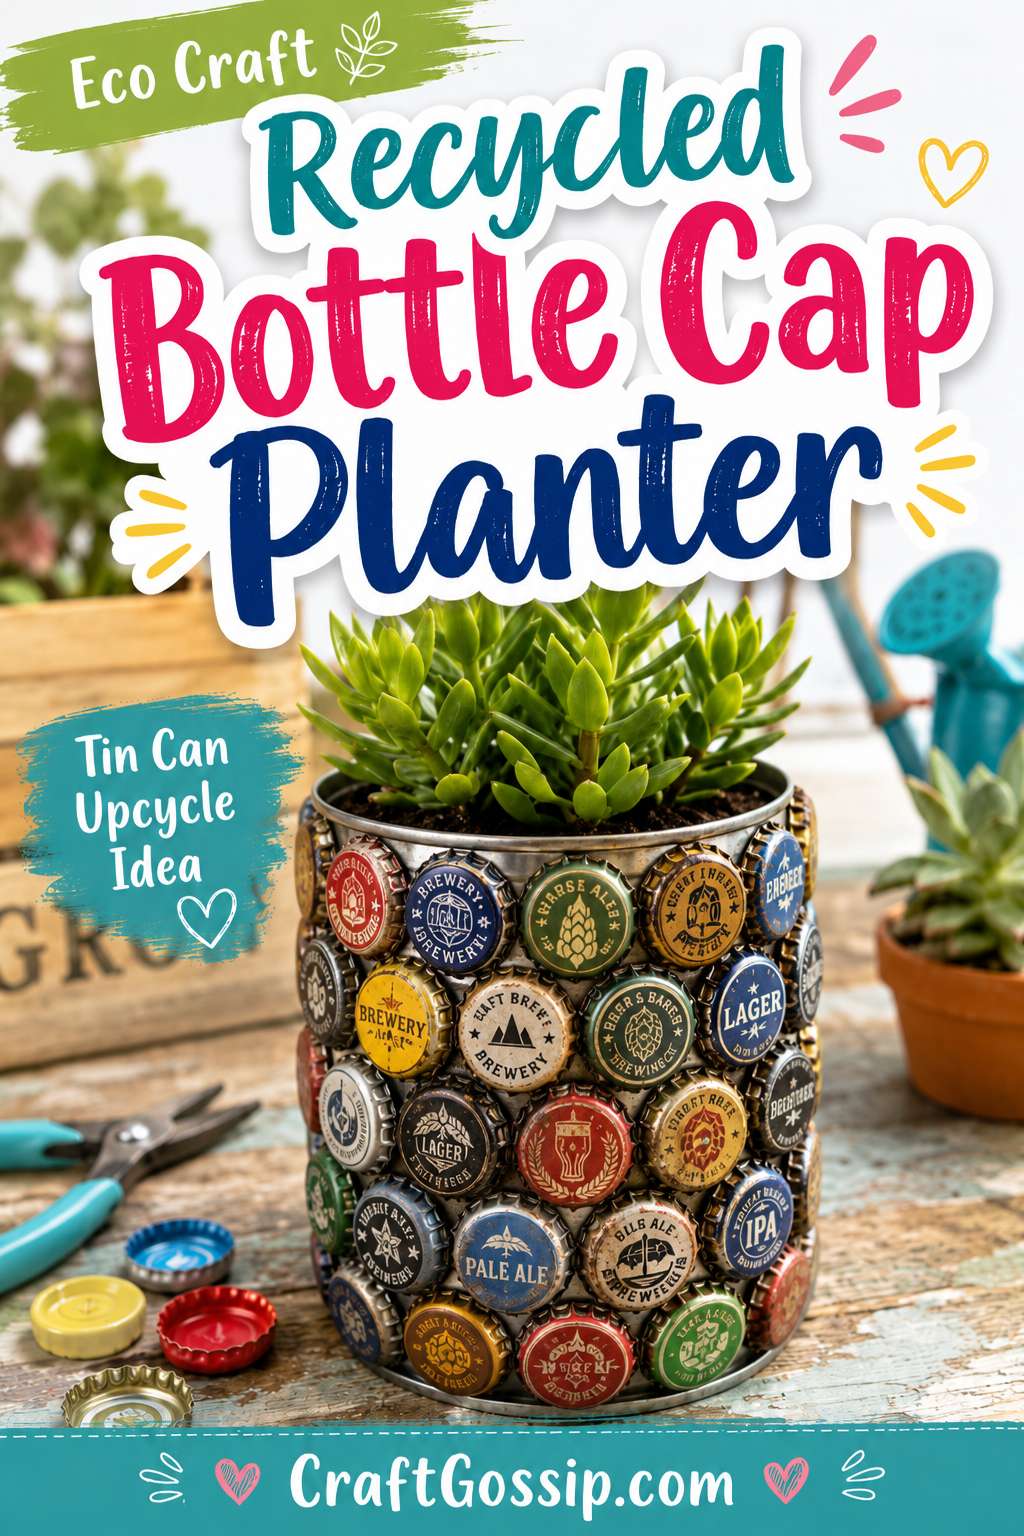
How To Make A Recycled Bottle Cap Planter From An Empty Tin Can
There are two types of people in this world: people who throw bottle caps straight into the bin, and crafters who look at them and think, “Hmm… I could probably make something with those.”
This recycled bottle cap planter is exactly that kind of project. It takes an empty tin can, a handful of bottle caps, a little glue, paint, and turns the whole thing into a cheerful upcycled plant pot for herbs, succulents, kitchen windowsills, patios, craft rooms or kids’ garden projects.
It is bright, thrifty, a little bit quirky, and very satisfying if you love trash-to-treasure crafts. It is also a great excuse to save those colourful metal caps from soft drinks, soda bottles, kombucha bottles or bottled drinks. Finally, a reason for the little pile on the kitchen bench.
If you love recycled garden ideas, you might also enjoy browsing the Recycled Crafts section on CraftGossip or the recycled crafts on CraftBits for more projects using jars, tins, bottles, lids and packaging. CraftBits also has a cute recycled planter project if you like giving odd found objects a second life as plant pots.
Why Bottle Caps Make Great Craft Supplies
Bottle caps are small, sturdy, colourful and easy to collect. They work beautifully for mosaic-style crafts because they create texture and pattern without needing expensive supplies.
You can leave them as they are for a bright recycled look, or paint over the whole planter for a more coordinated finish. That makes this project easy to style in different ways — colourful and playful for kids, metallic and modern for adults, rustic for garden décor, or pastel for a cottage-style windowsill.
This is also a good craft for using an empty coffee can, tomato tin, soup can or powdered drink tin. The bottle caps cover the surface and turn something plain into something that looks handmade and intentional.
And let’s be honest, there is something very pleasing about making a plant pot out of things that were headed for the bin.
Supplies You Will Need
Empty clean tin can
Metal bottle caps
Strong glue or hot glue
Spray paint or acrylic paint
Primer, optional but helpful
Clear sealer, especially for outdoor use
Potting mix
Small plant, herb or succulent
Hammer and nail or drill for drainage holes
Sandpaper or metal file
Protective gloves
Drop cloth or newspaper
If you are making several planters, Amazon is handy for basics like glue sticks, spray paint, clear sealer, craft gloves, mini succulents, potting tools and small bags of cactus mix. For extra embellishments, Etsy can be lovely for vintage-style plant markers or handmade garden labels, but you definitely do not need anything fancy for this one.
Choosing The Right Can
A tin can with straight sides is easiest to cover with bottle caps. Coffee cans, large tomato tins and food tins all work well.
Before you begin, wash the can thoroughly and remove the label. If there is sticky residue, soak it in warm soapy water, then use a little oil or adhesive remover to clean it off.
Check the top edge of the can carefully. If it is sharp, smooth it with a metal file or cover the edge with strong tape, folded fabric, twine, rope or a strip of felt. This is especially important if children will be helping.
A larger can works well for herbs, while a smaller tin is perfect for succulents. If you are using the planter indoors, place it on a saucer or inside a waterproof tray to protect your windowsill.
Add Drainage Holes
Plants do not enjoy sitting in soggy soil, so drainage matters.
Turn the can upside down and use a hammer and nail, awl, or drill to make several drainage holes in the base. Four to six small holes are usually enough for a small tin.
If you cannot add holes because the planter will sit indoors on furniture, keep the plant in a small nursery pot and use the decorated tin as a cover pot instead. That way you can remove the plant for watering and avoid surprise puddles. Ask me how I know.
For succulents, drainage is especially important because they dislike wet roots. CraftGossip has a useful roundup of small DIY planters and plant pots for succulents if you want more small planter inspiration.
Prepare The Bottle Caps
Give your bottle caps a quick wash and dry before gluing. Sticky caps will not hold paint or glue as well.
You can use all one colour, arrange them in stripes, make a rainbow, create a random mosaic, or paint them all the same colour after they are attached.
If some of the caps are slightly bent, flatten them gently with a hammer. Place them on a scrap piece of wood first so you do not damage your table.
For a neater look, sort the caps by colour before you start. For a more playful recycled look, use them completely randomly.
CraftBits has a fun bottle cap daisy garden wall art project if you are looking for another colourful bottle cap craft to link from this article or pair with the planter.
How To Make The Bottle Cap Planter
Start with a clean, dry tin can.
If you are painting the can first, apply a coat of primer or base paint and let it dry. This helps hide any branding or marks that might show between the bottle caps.
Lay the can on its side and begin gluing bottle caps around the bottom edge. Work in rows, keeping the caps close together. You can place them flat-side down for a raised circular texture, or open-side down if you prefer a smoother look.
Continue gluing bottle caps around the can until the outside is covered. Let the glue dry completely before moving to the next step.
If you want a bright recycled look, leave the bottle caps as they are. If you want a more polished look, spray paint the entire planter once the glue has cured.
Let the paint dry fully, then add a clear sealer if the planter will be used outdoors or near water.
Fill the can with potting mix and add your plant. Water lightly and place it somewhere bright and cheerful.
Paint Options
You can take this project in several different directions depending on your paint choice.
For a bright garden planter, paint each cap a different colour or use colourful caps as they are.
For a modern look, spray the whole planter matte black, white, sage green or soft terracotta.
For a metallic finish, use copper, gold, bronze or hammered metal spray paint.
For a cottage garden feel, paint the planter cream or pastel blue, then lightly dry-brush the raised bottle caps to bring out the texture.
For kids’ crafts, let children paint the caps before gluing them on. It is messier, but it gives them more ownership of the finished planter.
Best Plants For A Recycled Tin Can Planter
Because tin cans are usually small, choose plants that do not need deep roots.
Good options include:
Succulents
Cress
Chives
Parsley
Mint
Thyme
Small basil plants
Baby spider plants
Pothos cuttings
Small ferns
Mini flowers
Wheatgrass
Succulents are a great option if you want a low-maintenance planter. Herbs are lovely for a kitchen windowsill, especially if you are using larger coffee tins.
If you are making this with children, fast-growing seeds like cress or wheatgrass are satisfying because kids can see results quickly.
Indoor Or Outdoor Use
This planter can be used indoors or outdoors, but the finish matters.
For indoor use, a basic painted finish is fine. Just keep the planter on a saucer if you have drainage holes.
For outdoor use, seal the finished planter with a clear weather-resistant spray. This helps protect the paint and glue from moisture.
If your climate is very wet or humid, keep the planter under cover on a porch, patio table or sheltered windowsill. Tin cans can eventually rust, which can look charming in a rustic garden but less charming on a white windowsill.
Make It A Kids’ Craft
This project can be adapted for kids, but an adult should handle sharp edges, drainage holes and hot glue.
Children can help collect caps, sort colours, paint the tin, paint the caps, choose the plant and decorate plant labels.
For younger children, use a strong tacky glue instead of hot glue and allow extra drying time. The caps may slide a little while drying, so work with the can lying on its side and let one section dry before turning it.
This would make a sweet Earth Day craft, school garden activity, holiday project or rainy-day recycled craft.
For more eco-friendly kids’ project ideas, CraftGossip has a roundup of sustainable activities to teach kids about going green.
Make It More Decorative
Once the bottle caps are attached, you can keep embellishing if you like.
Add a chalkboard plant label
Tie twine around the top edge
Add a wooden plant marker
Glue on small beads or buttons
Paint a simple pattern across the caps
Use metallic wax to highlight texture
Add a saucer painted to match
Make three planters in different heights
A row of three bottle cap planters looks lovely on a windowsill, especially if each one holds a different herb.
If you like recycled garden décor, CraftGossip also has ideas for DIY garden glass art and an upcycled gin bottle terrarium that would pair nicely with this sort of project.
Troubleshooting
If the bottle caps keep sliding, the glue may not be strong enough or the can may be too glossy. Rough up the can lightly with sandpaper before gluing.
If the paint does not stick well, use primer first. Metal and glossy caps can be fussy without it.
If the planter feels too heavy on one side, check that the caps are evenly spaced. A larger can is easier to balance than a very narrow one.
If water leaks onto furniture, use the decorated tin as a cover pot instead of planting directly into it.
If the top edge is sharp, do not ignore it. Cover it with rope, felt, tape, folded fabric or a strip of cork before using.
More Bottle Cap Craft Ideas
Once you start saving bottle caps, one planter may not be enough.
Bottle caps can also be used for garden art, magnets, wreaths, mosaics, flowers, ornaments, jewellery, kids’ crafts and mini frames.
CraftBits has a recycled bottle cap pocket mirror listed in its recycled crafts collection, and the site also features bottle cap projects in its broader craft categories. There is also a recycled bottle cap people project idea in the group crafts section if you want something more kid-friendly.
And if you are building a recycled craft cluster for CraftGossip, this bottle cap planter would sit beautifully alongside recycled jar crafts, tin can crafts, garden upcycles and Earth Day projects.
Why This Project Is Worth Making
A recycled bottle cap planter is cheerful, practical and wonderfully thrifty. It uses materials most people throw away, it is easy to customise, and it gives you a finished project you can actually use.
It is also a nice reminder that recycled crafts do not have to look dull or worthy. They can be bright, useful, colourful and full of personality.
So next time you open a bottle, save the cap. Add it to a jar, wait until you have a good handful, and turn that little pile of metal into something lovely for your windowsill or garden table.
And if anyone asks why you are saving bottle caps again, just point at your planter and say, “See? I had a plan.”
Those are great…love them. Enjoy your blog…
I WOULD LOVE TO SEE THE LIGHT FIXTURES AT “YESSY” BUT ITS NOT A VALID WEBSITE!
ON “YESSY” LIGHTS. NOT A VALID SITE!
Amazing idea!! Looking forward to some more interesting ideas from you.
I would really really like to have these kind of candle holders as part of the table decorations at my wedding. Can you tell me where besides Yessy Art Gallery that I might be able to purchase such an item? thank you
Great work on candle holder. It’s looking simply great. I like it.
Thanks for posting this blog.ihis blog explains how we may make candle holders.i like this candle holders.
how do you make these? I have tried and can’t seem to figure it out.