One of the many things I love about this blog is the reader suggestions I get in my e-mail. This great candle holder (and many like it) come to me from Yessy Art Gallery … apparently the art of recycling tin cans into light holders is a dying art, and so this spotlight will hopefully help to keep it going a bit longer. Head on over to the gallery to see the wide variety of light holders available!
Comments
Have you read?
DIY Review: Upcycled Vintage Book Flower Press – A Thoughtful Keepsake Gift
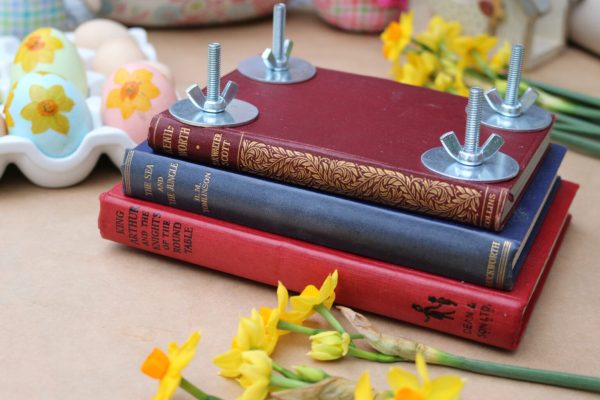
Looking for a heartfelt, handmade gift that combines nostalgia with nature? Cassie Fairy’s tutorial on transforming old, damaged books into a vintage-style flower press is a charming and practical project that makes for a perfect keepsake gift.?
Why It’s a Great Gift Idea
This DIY flower press is not just a functional item; it’s a sentimental treasure. By upcycling a vintage book, you’re preserving memories and giving a nod to the past. It’s ideal for nature lovers, gardeners, or anyone who appreciates the art of preserving flowers. The pressed flowers can be used in various crafts, such as creating bookmarks, greeting cards, or framed art, allowing the recipient to cherish the blooms long after they’ve been pressed.?
What’s Involved in the Project
Cassie provides a step-by-step guide, making it accessible even for beginners. The process involves selecting a sturdy, hardcover book, adding spacers like cardboard or chipboard, and securing everything with bolts and wing nuts. This setup allows for even pressure, ensuring that flowers are pressed flat and dry without damage. The vintage book cover adds an aesthetic touch, making the flower press not only functional but also a decorative piece.?
Final Thoughts
This upcycled flower press is more than just a gift; it’s a way to share the beauty of nature and the joy of crafting. It’s a thoughtful, sustainable, and creative present that will be appreciated for years to come. Whether you’re giving it as a gift or making one for yourself, it’s a delightful project that brings a touch of vintage charm into the modern world.?
For a detailed guide on creating your own, visit Cassie Fairy’s blog: How to Upcycle Old, Damaged Books into a Vintage-Style Flower Press.
Those are great…love them. Enjoy your blog…
I WOULD LOVE TO SEE THE LIGHT FIXTURES AT “YESSY” BUT ITS NOT A VALID WEBSITE!
ON “YESSY” LIGHTS. NOT A VALID SITE!
Amazing idea!! Looking forward to some more interesting ideas from you.
I would really really like to have these kind of candle holders as part of the table decorations at my wedding. Can you tell me where besides Yessy Art Gallery that I might be able to purchase such an item? thank you
Great work on candle holder. It’s looking simply great. I like it.
Thanks for posting this blog.ihis blog explains how we may make candle holders.i like this candle holders.
how do you make these? I have tried and can’t seem to figure it out.