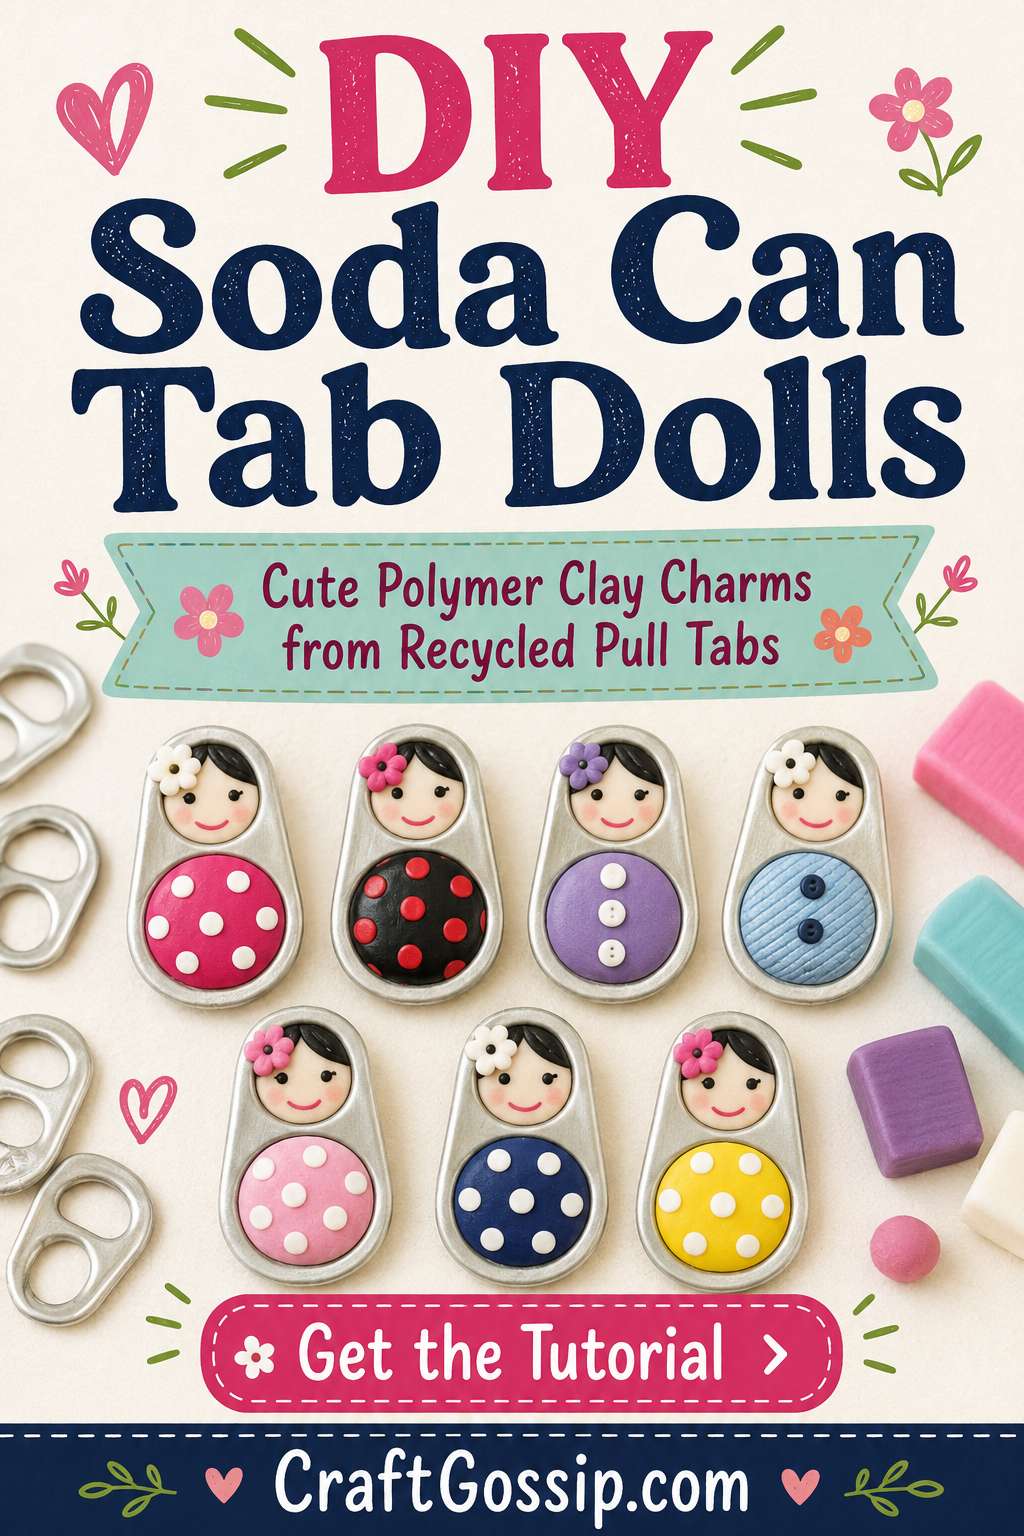
Before you toss the pull tabs from your next fizzy drink, take another look at them. That little piece of aluminium already has the perfect shape for a miniature doll body, complete with openings that can be used for hanging, threading and adding tiny embellishments.
These recycled soda can tab dolls remind me of little Matryoshka nesting dolls, with their rounded faces, colourful clothing and sweet painted details. They can be turned into pendants, keychains, bag charms, Christmas ornaments, brooches or tiny handmade gifts.
The original CraftGossip post shared these charming tab-top dolls back in 2015, but the linked instructions were not in English, and several readers understandably asked how to make them. So, here is a complete English-language tutorial using polymer clay and ordinary soda can pull tabs.
What Are Soda Can Tab Dolls?
Soda can tab dolls are miniature charms made by covering part of an aluminium drink-can tab with polymer clay.
The rounded top opening becomes the doll’s face or head area, while the wider lower section forms the body. Polymer clay is pressed around the metal tab, shaped, decorated and baked according to the clay manufacturer’s instructions.
Because the metal tab remains inside the clay, it gives the doll some structure and provides a ready-made opening for attaching cord, ribbon or a jump ring.
They are a lovely example of turning something tiny and disposable into a genuinely useful little craft.
Supplies You Will Need
- Clean aluminium soda can pull tabs
- Polymer clay in several colours
- Flesh-toned, cream, tan or brown clay for the faces
- Small clay roller or smooth glass bottle
- Craft knife or polymer clay blade
- Needle tool, toothpick or fine clay tool
- Baking paper or a ceramic tile
- Fine permanent markers or acrylic paint pens
- Small paintbrushes
- Clear polymer clay glaze, optional
- Strong jewellery adhesive, optional
- Jump rings
- Jewellery pliers
- Cord, ribbon, chain or keyring findings
- Small beads, rhinestones or miniature flowers, optional
A basic polymer clay starter set is useful for this project because the tiny dolls only require small amounts of each colour. It is also worth having a set of fine clay tools rather than sacrificing another perfectly good sewing needle to the craft drawer.
Preparing the Soda Can Tabs
Wash the pull tabs in warm, soapy water and rinse them thoroughly.
Check every tab for sharp edges, bends or rough pieces of metal. Discard any damaged tabs. The edges should feel smooth before you begin covering them with clay.
Dry the tabs completely. Moisture or greasy residue can stop the clay from sitting neatly against the metal.
If the tab has a particularly sharp inner edge, use a small metal file or fine sandpaper to smooth it gently.
Children can help decorate the finished dolls, but removing and preparing aluminium tabs should be handled by an adult.
Step 1: Condition the Polymer Clay
Choose the main colour for the doll’s dress and knead the clay until it feels soft, flexible and easy to shape.
Polymer clay that has not been properly conditioned may crack, crumble or separate after baking.
Roll the clay into a thin sheet approximately 2–3 mm thick. It should be thick enough to cover the metal but not so thick that the finished charm becomes bulky.
Step 2: Cover the Lower Section of the Tab
Place the soda tab onto the clay and cut a piece large enough to cover the lower half of the tab.
Press the clay gently over the front and around the edges. Add another small piece to the back if you want the metal completely enclosed.
Smooth the front and back pieces together around the outside edge of the tab.
Leave the top opening visible, as this will form the doll’s head or face area.
You can also leave part of the bottom opening uncovered if you would like to thread ribbon, beads or a small tassel through it later.
Step 3: Shape the Doll’s Dress
Use your fingers or a small clay tool to shape the lower clay section into a rounded dress.
Matryoshka dolls traditionally have a slightly curved, bell-shaped body, but the shape does not need to be perfectly symmetrical. Handmade dolls look much sweeter when they each have a little personality.
Smooth away fingerprints using a silicone-tipped clay tool or the side of your finger.
If the clay becomes too soft while you work, place it in the refrigerator for a few minutes before continuing.
Step 4: Add the Face
Roll a tiny ball of face-coloured clay and flatten it into a small oval or circle.
Position it over the top section of the tab, covering part of the upper opening while leaving enough exposed metal for a jump ring if you plan to hang the doll from the top.
Press the face gently into place.
Add a narrow strip or curved piece of coloured clay around the face to create a scarf, hood or hairline.
For a traditional nesting-doll look, frame the face with a hood that matches the body.
Step 5: Add Decorative Clay Details
Now comes the enjoyable part: giving every doll her own outfit.
Try adding:
- Tiny clay flowers
- Small dots
- Leaves
- Hearts
- Apron shapes
- Buttons
- Lace-style borders
- Miniature bows
- A contrasting headscarf
- Rolled clay roses
- Textured patterns
Use a toothpick or needle tool to add small indented dots and lines.
For tiny flowers, roll several minuscule balls of clay and arrange them around a centre dot. You may need more patience than clay for this stage, especially if one of those dots launches itself across the room.
Keep embellishments thin and press them down securely so they do not fall off after baking.
Step 6: Create the Facial Features
You can add the face before or after baking.
For clay features, use extremely small pieces of black, brown or pink polymer clay to form eyes, a mouth and rosy cheeks.
For easier and more precise details, leave the face blank and draw it after baking with a fine permanent marker or acrylic paint pen.
Simple features usually work best:
- Two tiny dots for eyes
- A small curved smile
- Two pink dots for cheeks
- A few fine lines for hair or eyelashes
These dolls are very small, so there is no need to attempt a miniature Renaissance portrait. Two dots and a smile will do the job beautifully.
Step 7: Prepare the Doll for Hanging
Before baking, decide how the finished doll will be used.
For a pendant or charm, keep one of the tab openings clear so a jump ring can be attached later.
You can also make a small hole through the clay with a needle tool. Check the hole after shaping because soft clay can partially close again.
For a brooch, the back can remain flat so a brooch finding can be glued on after baking.
For a Christmas ornament, leave enough space to thread narrow ribbon or cord through the upper opening.
Step 8: Bake the Polymer Clay
Place the finished dolls on a ceramic tile or a baking tray lined with baking paper.
Bake the clay according to the temperature and timing instructions printed on the packet. Different polymer clay brands can require different temperatures, so always follow the directions for the exact product you are using.
Do not increase the oven temperature to speed up the process. Polymer clay can darken, scorch or produce unpleasant fumes if overheated.
A separate oven thermometer is useful because household ovens are not always as accurate as they claim. Mine has certainly told a few lies over the years.
Allow the dolls to cool completely before handling or decorating.
Step 9: Paint the Details
Once cool, use fine acrylic paint pens, permanent markers or a tiny brush to add the facial features and decorative details.
You can outline flowers, add small dots to the dress or paint a fine border around the headscarf.
Test markers on a spare piece of baked clay first. Some inks can remain sticky or react with certain sealers.
Acrylic paint is generally a safer choice when you plan to apply a polymer-clay-compatible glaze.
Step 10: Seal the Doll, If Desired
Polymer clay does not always need sealing, but a compatible glaze can protect painted details and add a finished appearance.
Choose a sealer specifically recommended for polymer clay. Some ordinary aerosol varnishes and nail polishes can become sticky over time.
Apply a thin coat and let it dry fully.
A matte finish gives the dolls a soft folk-art look, while a gloss finish makes the colours brighter and more jewellery-like.
Step 11: Add the Jewellery Findings
Use jewellery pliers to open a jump ring sideways rather than pulling it apart.
Thread it through the exposed opening in the soda tab or through the hole you made in the clay.
Close the jump ring securely, then attach the doll to:
- A necklace chain
- Waxed cotton cord
- A keyring
- A bracelet
- A zipper pull
- A bag clasp
- An ornament hanger
For a brooch, use strong jewellery adhesive to secure a brooch pin to the flat back.
Allow the glue to cure fully before wearing or gifting the doll.
Soda Tab Doll Design Ideas
Once you have made the first little doll, you can adapt the idea in all sorts of ways.
Traditional Matryoshka Dolls
Use red, navy, yellow, green and floral details. Add a matching clay scarf around the face and paint simple rosy cheeks.
Christmas Doll Ornaments
Use red, white and green clay, then add tiny snowflakes, holly leaves or metallic details. Thread ribbon through the top and hang them on the Christmas tree.
Angel Charms
Add small white clay wings to the back and use gold clay or a fine wire ring for the halo.
Miniature Bride Dolls
Use white or ivory clay for the dress, add a tiny flower and attach a scrap of tulle as a veil after baking.
Family Portrait Dolls
Create one charm for each member of the family using different hair colours, outfits and tiny accessories.
Scrapbook and Journal Charms
Attach the dolls to elastic closures, ribbon bookmarks or planner clips.
Brooches
Keep the back flat, glue on a brooch finding and wear one on a denim jacket, scarf or craft apron.
CraftBits has another clever way to turn drink tabs into wearable accessories in its soda-can pop-top brooch tutorial.
Tips for Working with Polymer Clay and Metal Tabs
Use only clean, undamaged tabs with smooth edges.
Condition the clay thoroughly before shaping.
Do not make the clay layers excessively thick.
Keep attachment holes clear before baking.
Support delicate decorations so they do not snap.
Follow the clay manufacturer’s baking temperature exactly.
Let the dolls cool before testing their strength.
Use only polymer-clay-compatible glazes and adhesives.
Add jump rings rather than threading rough metal chain directly through the clay.
If you enjoy making recycled charms, you may also like these soda-tab-filled charms, which use the same humble drink-can tab in a completely different way.
Can You Make These Without Polymer Clay?
Yes. The tab can also be wrapped with embroidery thread, crochet cotton, narrow ribbon or fabric scraps.
A small wooden bead can be glued near the top for the head, while thread or fabric covers the lower portion.
However, polymer clay gives you the most control over the shape and allows you to add the tiny floral details that make these dolls resemble traditional Matryoshka charms.
A Tiny Recycled Craft with Plenty of Personality
These soda can tab dolls are exactly the sort of recycled craft I love: inexpensive, cheerful and small enough to make without clearing the entire dining table.
They are also a good excuse to keep a jar of pull tabs in the craft room, although perhaps label the jar so nobody mistakes it for a very disappointing snack.
Make them as necklaces, ornaments, brooches or little gifts, and try creating each one in a different colour combination. No two need to be the same, and the smallest scraps of polymer clay are often enough to make the prettiest details.
These little tab top doll charms are available over at Clafoutine. They remind me of the Matryoshka nesting dolls. There is also a really cool bracelet made of bobbins and cord. For a tutorial on how to make these little tab top dolls pop on over to the blog El Rincon de Fri-Frri.
Check out these ready-made clay face canes for creating the faces



My mom loves matryoshka dolls. This will make for a fun gift for an upcoming birthday or Christmas. Thank you.
how can i get this in english
How to get in English instructions please?
how can you get the directions in English?
https://translate.google.com/translate?sl=auto&tl=en&js=y&prev=_t&hl=en&ie=UTF-8&u=http%3A%2F%2Fwww.elrincondefrifri.com%2F2014%2F03%2Fminitutorial-haz-figuras-con-arcilla.html%3Fm%3D1&edit-text=
if this link doesn’t directly work put the original link through Google translator
https://translate.google.com/translate?sl=auto&tl=en&js=y&prev=_t&hl=en&ie=UTF-8&u=http%3A%2F%2Fwww.elrincondefrifri.com%2F2014%2F03%2Fminitutorial-haz-figuras-con-arcilla.html%3Fm%3D1&edit-text=
if this link doesn’t directly work put the original link through Google translator
https://translate.google.com/translate?sl=auto&tl=en&js=y&prev=_t&hl=en&ie=UTF-8&u=http%3A%2F%2Fwww.elrincondefrifri.com%2F2014%2F03%2Fminitutorial-haz-figuras-con-arcilla.html%3Fm%3D1&edit-text=
if this link doesn’t directly work put the original link through Google translator
Hi, I’m Laura from El Rincón de Fri Fri. Thanks so much for sharing