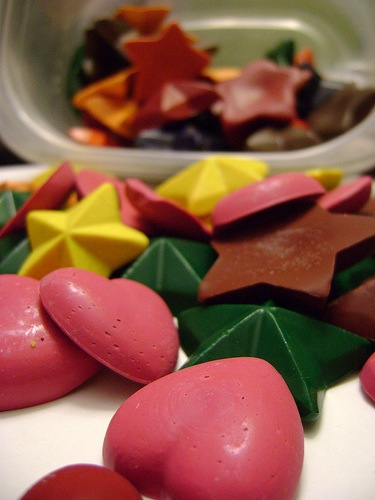
Recycling crayons is one of the easiest things you can do, and will instantly breathe new life into all those half-crayons and bits of crayons all parents know infiltrate every corner of the home. Instructables shows you a great way to recycle them, giving them new life and maybe even some fun shapes as well!
Comments
Have you read?
How To Make A Milk Carton Village – A Recycled Craft for Kids
Ready to turn your recycling bin into a colorful, miniature village? Grab those empty milk cartons and let’s create a town filled with tiny houses, shops, and even a school or bakery! This craft is perfect for kids of all ages and encourages imagination, storytelling, and eco-friendly creativity.
What You’ll Need:
Empty milk or juice cartons (washed and dried)
Paints or markers
Paintbrushes
Craft glue or glue stick
Scissors (adult supervision recommended)
Colored paper or old magazines
Bottle caps, buttons, or plastic lids (for windows or decorations)
Sticks, straws, or skewers (for flag poles or chimneys)
Optional: glitter, stickers, washi tape, cotton balls (for snow or clouds!)
Step-by-Step Instructions:
Step 1: Clean and Prep the Cartons
Make sure your milk or juice cartons are washed and completely dry. Remove any plastic lids or caps and keep them for decorations!
Step 2: Plan Your Village
Decide how many buildings you want to make. Each milk carton becomes a house, shop, or whatever your imagination dreams up. Arrange them side by side or in a circle like a real village square.
Step 3: Cut Out Doors and Windows
With the help of an adult, carefully cut small door and window shapes into your cartons. You can also glue cut-out shapes from colored paper if you’d rather not cut into the carton.
Step 4: Paint and Decorate
Use paint or markers to bring your buildings to life. Make brick patterns, colorful siding, or roof tiles. Let each child choose their own theme – rainbow bakery, monster house, fairy home, or tiny fire station!
Step 5: Add the Roofs
You can paint the top pointy part of the carton like a roof, or glue on cardboard triangles to create overhangs. Want to add a chimney? Glue a straw or cardboard roll on top!
Step 6: Make Flags and Signs
Cut small flags from recycled plastic or paper and tape them to straws or sticks. Glue your flags to the rooftops. You can even create tiny signs for each building – “Toy Store,” “Library,” or “Super Cat’s House.”
Step 7: Build Your Village
Place all the finished buildings together on a large piece of cardboard, tray, or table. Use bottle caps for stepping stones, cotton balls for bushes or clouds, and draw roads with marker.
Step 8: Play!
Now that your village is built, use little toys, action figures, or LEGO people to live in your new town. Create stories and adventures—your Milk Carton Village is officially open!
Learning Bonus:
This craft is not just fun—it also teaches recycling, fine motor skills, creative thinking, and storytelling. Plus, it’s a great group activity for playdates, classrooms, or family craft nights.
Let your kids’ imaginations run wild—and remember, no two villages need to look the same. Each one tells its own story!
I LOVE recycling crayons. I just purchased a few molds in the heart shapes as well.
these are mixed up colors from a muffin tin
Sorry I forgot the link in the above post
OnOurWayOnline.com
I LOVE this. My daughters crayons are everywhere! Broken and all over the house. 🙂
I’ve recently started recycling crayons and I’ve gotta say that it’s so much fun!! I love finding different things to use as molds.
I heart upcycling!