• Home
  • Suggest A Craft
  • DIY Newsletter

Recycled Crafts

Creative DIY Projects That Turn Trash Into Treasure

  • About CraftGossip
  • Our Network
    • Bath & Body Crafts
    • Candle Making Ideas
    • Crochet Ideas
    • Cross Stitch
    • Edible Crafts
    • Felting Patterns
    • Glass Art
    • Home & Garden Ideas
    • Indie Crafts
    • Jewelry Making
    • Kids Crafts
    • Knitting Patterns
    • Lesson Plans
    • Needlework
    • Party Ideas
    • Polymer Clay
    • Quilting Ideas
    • Recycled Crafts
    • Scrapbooking
    • Sewing Patterns
    • Card Making
    • DIY Weddings
    • Not Craft Ideas
  • Giveaways
  • Roundups
  • Store
  • Search

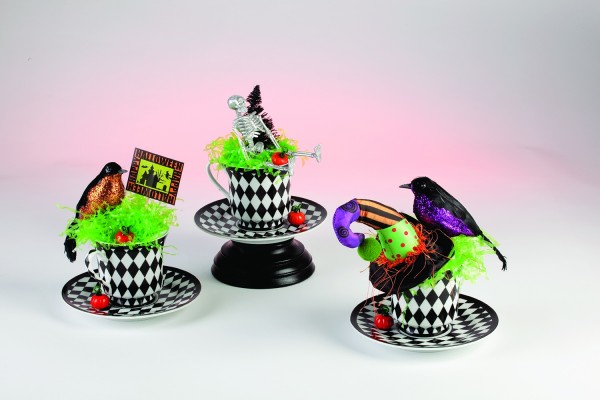
Recycled Cup and pumpkin bat Halloween decorations

October 14, 2014 by Stefanie Girard

recycled cup Halloween decorationsOctober 31st falls on a weekend this year, so you finally have an excuse to throw a Halloween bash without worrying about waking up the kids for school the next day. Whether you’re hosting a family fright fest or a glamorous masquerade ball, pumpkin-prepping should be fun – not time consuming. Here are five Halloween pumpkin hacks for a spooky success:

1)      If you’ve ever wanted to try carving some of the intricate pumpkin designs you’ve seen on Pinterest or your kids have sliced and diced a few pumpkins more than you’d like, it’s time to equip yourself with a pumpkin-carver’s secret weapon: Krazy Glue. Yes, the famous instant adhesive is actually perfect for repairing pumpkins that may have lost a few too many chunks during the carving process. The glue can bind pieces back into quickly, letting you get back to your masterpiece.
2)      Tired of the fuss and mess of carving? Put a contemporary spin on the old jack-o-lantern by using Krazy Glue to attach gems and create dazzling, sparkling designs, such as rhinestone cobwebs, monograms or fun chevron patterns.

3)      Personalize pumpkins to represent different members of your family by gluing on accessories and adding each person’s name with wood letters. An added perk of leaving the carving knife in the drawer this year is that your pumpkins may last through November, so say goodbye to decorating on your Thanksgiving to-do list.

4)      Adults deserve Halloween treats too. Turn your holiday decoration into a pumpkin spiked punch bowl or cooler by simply carving out the insides and placing a plastic bowl inside. Fill the bowl with ice and your favorite punch recipe, or use it as a festive cooler to arrange beer bottles and sodas.

5)      After gutting your pumpkin, put the knife down and “carve” with a drill instead. This trick takes the hassle out of carving smaller pumpkins. Drill holes around the pumpkin to create elaborate patterns that will glow when you place a light inside.

——————————

This one-of-a-kind bat pumpkin is sure to turn heads in the neighborhood this Halloween. All you need is some black paint and Krazy Glue® to create a spooky pumpkin without worrying about picking up a knife or cleaning up a mess.
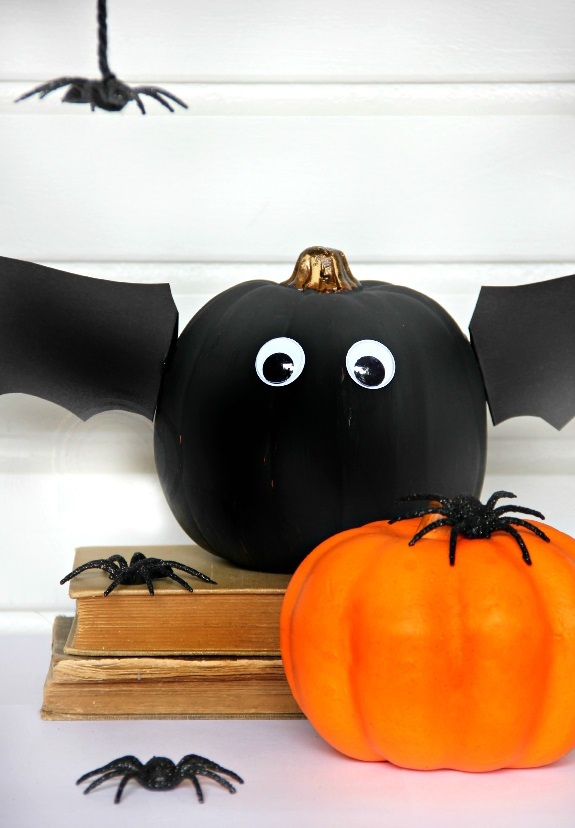
bat pumpkin

Photo credit: KariAnne Wood, ThistlewoodFarms.com

Supplies:
•    Pumpkin
•    black cardstock
•    black craft paint
•    foam paint brush
•    googly eyes
•    Krazy Glue

Step 1:  Paint the pumpkin black with black craft paint and a foam brush. Let dry. Repeat with a second coat. Let dry.

Step 2:  Trace bat wings on black cardstock with a pencil. Cut out bat wings.

Step 3:  Fold end of bat wings to create a tab. Using Krazy Glue, glue the wings to the sides of the pumpkin.

Step 4:  Using Krazy Glue, glue the googly eyes to the center of the pumpkin.

Step 5: Place near your front door for Halloween!
Related Posts:

  • Perfect recycled tea cup for a Barbie party
  • Your pasta machine is good for more than pasta or…
«
»

Have you read?

Making Popsicle Stick Playing Cards – Surprisingly Fun and Totally Charming!

Okay, I’ll be honest — when I first saw the Popsicle Stick Playing Cards project floating around on Instructables, I wasn’t entirely sold. Popsicle sticks and playing cards? Sounds like a summer camp throwback, right? But curiosity got the best of me (as it usually does with anything slightly crafty and slightly quirky), and I decided to give it a whirl.

And let me just say: I loved this project way more than I expected to.

At its core, this DIY is super simple. You’re basically fusing old playing cards with humble craft sticks to create chunky, tactile “cards” that are durable enough for little hands — or just to enjoy as a cool novelty set. The end result? A full deck that feels a little bit rustic, a little bit retro, and totally unique.

What I really appreciated about this project was how accessible it was. You don’t need anything fancy to get started — just some basic glue, scissors, popsicle sticks (standard size worked fine for me), and of course, a deck of cards that’s either past its prime or missing a few members. We all have one of those lying around somewhere, right?

I ended up using an old UNO deck that was looking pretty rough around the edges, and it turned out great. The cards stick well to the wood, and once everything’s dry, you get these sturdy, chunky pieces that have such a fun hand-feel. It almost reminds me of vintage tile games or big wooden dominoes.

This would be such a great project for kids — whether it’s as a rainy-day craft, a classroom activity, or even as part of a DIY learning game (think memory matching or number recognition). I can see this also being a hit with older adults or people who need cards with a little more grip or visual clarity.

Plus, if you’re a DIY gift-giver like I am, imagine pairing these with a handmade fabric pouch or wooden box for a personalized twist. It would make a really thoughtful and low-cost present for a game lover or nostalgic friend.

Now, one tiny tip: make sure to let everything dry completely before stacking or using them. I rushed a bit on my first batch and ended up with a few cards stuck together. A bit of sanding or sealing would probably help prevent that too, especially if you want them to last.

Overall, this craft hit all the right notes — easy, upcycled, fun, and surprisingly satisfying to hold in your hands when they’re done. It’s a fantastic way to breathe new life into something old, and I honestly can’t wait to make a few themed sets as gifts.

So if you’re on the fence, give it a try. It’s playful, it’s practical, and hey, it might just be your new favorite weekend project.

Explore

books Christmas CraftGossip Giveaways Craft Inspirations Easter glass halloween Home Decor kid crafts mason jar More Crafts Patterns & Tutorials recycled art Recycled Clothing Recycled Jewelry Recycled Sewing Recycled Tutorials Recycling Ideas Recycling Organizing tin can

RSS More Articles

  • Quick Tip: How to Keep Cross Stitch Fabric from Fraying
  • Cute Donut Monkey Crochet Kit
  • FREE Beautiful Mermaid Digital Stamp Download
  • Making Popsicle Stick Playing Cards – Surprisingly Fun and Totally Charming!
  • Book Review: Sewing Made Simple: Craft Your Own Clothes with Confidence
  • 12 Scrapbook Layouts with Lots of Layers
  • Cat Themed Learning Activities
  • The Panel Quilting Workshop: 12 Quick-and-Easy Quilting Ideas
  • DIY Beaded Garden Stakes
  • Free Jelly Fish Crochet Pattern

Pick Your Blog

  • Sewing
  • Knitting
  • Quilting
  • Crochet
  • Home & Garden
  • Recycled Crafts
  • Scrapbooking
  • Card Making
  • Polymer Clay
  • Cross-Stitch
  • Edible Crafts
  • Felting
  • Glass Art
  • Indie Crafts
  • Kids Crafts
  • Jewelry Making
  • Lesson Plans
  • Needlework
  • Bath & Body
  • Party Ideas
  • Candle Making
  • DIY Weddings
  • Not Craft
  • Free Craft Projects

Copyright © 2025 · CraftGossip | Start Here | Contact Us | Link to Us | Your Editors | Privacy and affiliate policy

Copyright © 2025 · Sprinkle Theme on Genesis Framework · WordPress · Log in