Isn’t it amazing how simple materials can be transformed into something so charming and unique? This little snail made from recycled marbles is a prime example of that. It’s not just a cute decor piece, but it’s also an environmentally friendly one too, made from repurposed materials.
I love how the smooth and glossy marbles add a touch of shine to the snail, giving it an eye-catching and playful appearance. I can already picture it in a sun-filled windowsill, adding a touch of whimsy to any room. The step-by-step tutorial on The Very Best Top 10 is clear and easy to follow, and it’s a great project for both kids and adults to tackle.
And let’s be real, who doesn’t love a good recycled craft project? It’s a great way to put those pretty marbles to use and also add some personality and charm to your home. Plus, it’s an excellent opportunity to spend some quality time with your little ones or friends, bonding over crafting and creating something together. So, go ahead, gather your marbles and get to crafting!
I found this recycled marble snail on Etsy, but we have added a tutorial here. Now off to go find my marbles-as usual, I have lost my marbles 🙂
Creating a snail from a glass marble and polymer clay can be a fun and creative project. Here’s a step-by-step guide to help you make one:
Materials you’ll need:
- Glass marble
- Polymer clay in desired colors (e.g., brown, green, or any other snail color you prefer)
- Sculpting tools (such as a sculpting knife or toothpicks)
- Baking tray
- Oven or toaster oven
- Acrylic paints (optional)
- Varnish or glaze (optional)
Prepare your workspace Clear an area to work on and cover it with wax paper or a smooth surface like a ceramic tile. This will prevent the clay from sticking to your work surface.
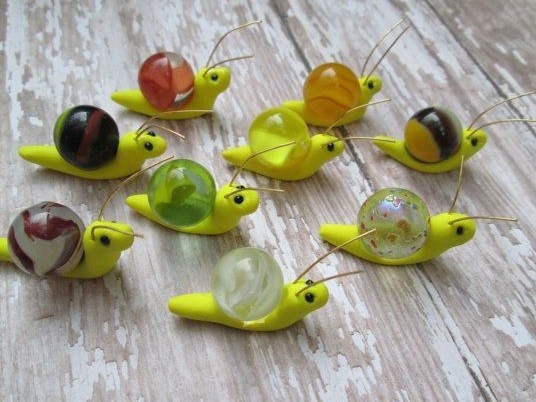
Shape the snail’s body Take a portion of the polymer clay in the color you want for the snail’s body. Roll it into oblong shape, use the image as a guide. It should be fatter at one end for the head, and pointy at the other for the tail and flatten it slightly. Place the glass marble on top of the clay and gently press it down to create an impression, the marble becomes the shell.. This impression will help the clay adhere to the marble once baked.
Define the snail’s features Use sculpting tools or toothpicks to create indentations and texture on the snail’s shell. You can make lines to represent growth rings or add tiny dots for added detail.
Shape the snail’s head and eyes Take a small amount of clay in a different color and shape it into a small, tapered cone for the snail’s head. Attach it to the front of the snail’s body. Use a toothpick or sculpting tool to create two small indentations for the eyes. If you prefer, you can also use small glass beads or tiny plastic eyes instead of clay for a more realistic look. Push to wire lengths into the head for the feelers
Bake the clay Follow the instructions on your polymer clay package for baking. Preheat your oven or toaster oven to the recommended temperature. Place the snail on a baking tray lined with parchment paper or aluminum foil. Bake the clay according to the instructions, usually for about 15-30 minutes. Allow the clay to cool completely before proceeding.
Optional: Paint and seal If desired, you can paint the snail with acrylic paints to add more color and detail. Use small brushes to apply paint to the shell and head, mimicking the patterns and colors of a snail. Once the paint has dried, you can seal the clay with a varnish or glaze to protect the finish and give it a glossy appearance.
And there you have it—a snail made from a glass marble and polymer clay! Enjoy your creation and feel free to experiment with different colors and designs to make it your own. If your marble has not adhered use a strong craft glue like E6000 to adhere the parts to the snail.


I cannot find the directions for this marble snail anywhere on this site!!!