• Home
  • Suggest A Craft
  • DIY Newsletter

Recycled Crafts

Creative DIY Projects That Turn Trash Into Treasure

  • About CraftGossip
  • Our Network
    • Bath & Body Crafts
    • Candle Making Ideas
    • Crochet Ideas
    • Cross Stitch
    • Edible Crafts
    • Felting Patterns
    • Glass Art
    • Home & Garden Ideas
    • Indie Crafts
    • Jewelry Making
    • Kids Crafts
    • Knitting Patterns
    • Lesson Plans
    • Needlework
    • Party Ideas
    • Polymer Clay
    • Quilting Ideas
    • Recycled Crafts
    • Scrapbooking
    • Sewing Patterns
    • Card Making
    • DIY Weddings
    • Not Craft Ideas
  • Giveaways
  • Roundups
  • Store
  • Search

DIY – Recycled Magazine Wreath

May 17, 2009 by robyn charles

wreath

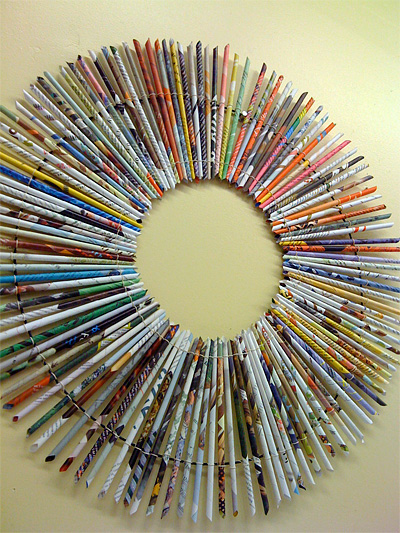
Looking for a unique statement art piece to add to your home? Grab some magazines and roll up the pages to make a piece similar to this one, from Rag and Bone!

Looking for something a little smaller, but still want to use up some magazine pages? Check out some of their other ideas.

Looking for more Wreath ideas? Check out these Wreath making books.

Related Posts:

  • 35 Rolled Magazine Crafts -You’ll Never Throw Away a…
  • Thrift Your Way to Sustainable Crafting: 10 Flea…
«
»

Comments

  1. Heather - Dollar Store Crafts says

    May 17, 2009 at 1:05 pm

    That’s so cool!!

  2. CatnipLemon says

    March 22, 2010 at 11:26 am

    Yes, really cool, but they never posted the instructions like they said they would after their trip back from N.Y. Did they ever make it back?! 🙁

  3. jane fonouni says

    July 14, 2010 at 9:47 am

    where are the instructions for the rag and bone rolled paper wreath?

  4. Kelsey says

    July 5, 2011 at 7:54 pm

    This is soooo cool! I am going to take and use this idea for my dorm room 🙂 Thanks!

Have you read?

DIY Paper Bag Mushrooms – A Creative Upcycled Craft for Kids and Nature Lovers

There’s something magical about mushrooms — maybe it’s the fairy-tale vibes or their cozy woodland charm. Either way, turning ordinary brown paper bags into mushrooms is a fun, hands-on craft project that kids (and adults) will enjoy. The best part? You’re reusing materials that might otherwise go to waste. Win-win!

This easy tutorial walks you through making your very own forest of recycled mushrooms using simple supplies you likely already have around the house.

What You’ll Need:

  • Brown paper lunch bags (you can even use grocery bags cut to size)

  • Scrap paper or newspaper for stuffing

  • String, yarn, or twine

  • Scissors

  • Paints (acrylic or tempera work best)

  • Paintbrushes or sponges

  • Optional extras: markers, stickers, googly eyes, craft glue

Step-by-Step: How to Make Your Mushrooms

Step 1: Create the Mushroom Top
Start by opening your paper bag and gently crumpling up some newspaper or scrap paper. Stuff it into the bottom of the bag — not too tight, just enough to give it a rounded shape that will form the mushroom cap.

Step 2: Form the Stem
Once the top is nice and puffy, hold the bag just underneath the stuffed section and twist it lightly to shape the stem. Tie a piece of twine or string around this part to hold the form. You’ll now have a mushroom top with a long paper bag hanging down — that’s your stem.

Step 3: Trim to Size
If the stem looks too long or uneven, grab your scissors and snip it down to your preferred height. You can even experiment with making some taller and some short and chubby for a little mushroom variety.

Step 4: Paint and Decorate
Time for the fun part — painting! Flip the mushroom cap upright and paint it any way you like. Classic red with white spots? Go for it. Bright blue with glitter? Why not! Use brushes or dabbers to add spots, swirls, or patterns. Let kids express their creativity — there’s no wrong way to decorate a magic mushroom!

Step 5: Let It Dry
Place your mushrooms somewhere safe to dry. You can use a sheet of newspaper or cardboard to avoid mess. Once dry, they’ll stiffen a little and hold their shape nicely.

Step 6: Display Your Mushroom Garden
Line them up on a windowsill, add them to a play area, or build a fairy village in the corner of a room. You can even glue them to a cardboard base and add moss, pebbles, and tiny paper critters for a full scene.

Extra Ideas:

  • Add flags or tiny doors to make mushroom homes.

  • Draw faces or names on the stems to turn them into characters.

  • Use cotton balls or pom-poms for fluffy mushroom spots.

Why This Project Rocks:

This is one of those crafts that doesn’t need a trip to the store or fancy tools — just a little time, a few basic supplies, and a bit of imagination. Plus, it encourages kids to see the creative potential in everyday materials — a great step toward more mindful, eco-conscious crafting.

So go ahead, raid the recycling bin and bring a mini mushroom forest to life.

How to make giant toadstools out of recycled tires

How to make champagne cork toadstools

How to make recycled Easter egg mushrooms

How to make recycled toilet paper tube mushrooms

How to make a rainbow forest of adorable recycled mushrooms

Explore

books Christmas CraftGossip Giveaways Craft Inspirations Easter glass halloween Home Decor kid crafts More Crafts Patterns & Tutorials recycled art Recycled Clothing Recycled Jewelry Recycled kids crafts Recycled Sewing Recycled Tutorials Recycling Ideas Recycling Organizing tin can

RSS More Articles

  • Create a Giant Halloween Decoration That Will Leave Everyone Spooked – DIY Big Guy Tutorial
  • Combine Knit and Crochet with this Cute Checkers Set
  • Rosh Hashanah Coloring Sheets and Other Activities for Kids
  • Cassette Tape Shaped Mini Album
  • Free Crochet Pattern – Chunky Rib Tunisian Hat and Cowl
  • What is Silver Art Clay or Precious Metal Clay (PMC) and How Do You Work With It (and Fire It!)
  • Learn How to Sew Potholders with Creativebug’s Online Class!
  • Pumpkin Pie Melt and Pour Soap: A Cozy Fall Soap Recipe That Smells Good Enough to Eat
  • DIY Tablet Pouch Tutorial: A Stylish and Practical Craft
  • Designer Spotlight: Embrovia

Copyright © 2025 · CraftGossip | Start Here | Contact Us | Link to Us | Your Editors | Privacy and affiliate policy