• Home
  • Suggest A Craft
  • DIY Newsletter

Recycled Crafts

Creative DIY Projects That Turn Trash Into Treasure

  • About CraftGossip
  • Our Network
    • Bath & Body Crafts
    • Candle Making Ideas
    • Crochet Ideas
    • Cross Stitch
    • Edible Crafts
    • Felting Patterns
    • Glass Art
    • Home & Garden Ideas
    • Indie Crafts
    • Jewelry Making
    • Kids Crafts
    • Knitting Patterns
    • Lesson Plans
    • Needlework
    • Party Ideas
    • Polymer Clay
    • Quilting Ideas
    • Recycled Crafts
    • Scrapbooking
    • Sewing Patterns
    • Card Making
    • DIY Weddings
    • Not Craft Ideas
  • Giveaways
  • Roundups
  • Store
  • Search

How To Make Faux Fake Driftwood

August 3, 2011 by Stefanie Girard

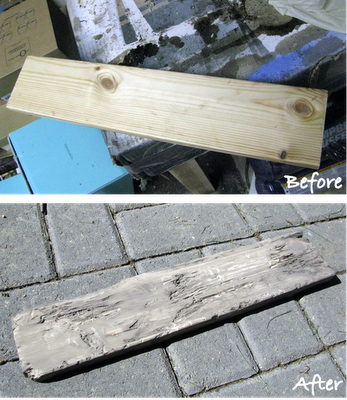
Over at the blog Stephanie @ Home there was a great tutorial on how to make faux driftwood (link dead).

If you’re looking to create a coastal vibe in your home or add some natural elements to your decor, driftwood can be a great option. However, finding real driftwood can be difficult or costly. Fortunately, with a few materials and some patience, you can create your own faux driftwood at home.

Here’s what you’ll need:

Eye protection and rubber gloves
Sticks and small logs that are at least partially dry
Hammer and other tools for distressing the wood
Arm & Hammer Super Washing Soda (MSDS)
Hot water
Container large enough to hold the wood
Wire brush
Optional: oven for drying the wood, sandpaper or sander power tool
Here are the steps to follow:

Collect dry sticks and small logs. Make sure they’re partially dry to ensure they’re able to absorb the solution.

Use a hammer and other tools to beat up your wood. This will give it a more natural, distressed look.

Fill a container with hot water and add washing soda while stirring. Be sure to wear rubber gloves and eye protection as the solution is caustic. Add washing soda until it no longer dissolves.

Place your wood in the solution and let it soak for 12-24 hours or longer. Use a rock to keep the logs submerged.

A few times during the soaking period, use a wire brush to scrub off softened bark. This can take a few rounds of scrubbing depending on the amount of bark.

Rinse your logs well with water and dry them. You can air dry them in the sun or use an oven at 250°F for an hour.

Use sandpaper or a sander power tool to round out sharp edges and create a more realistic driftwood look.

Now you have your very own faux driftwood to decorate your home with. The active ingredient in washing soda is sodium carbonate which breaks down lignin in wood. Lignin is a component of plant cell walls that gives them strength and rigidity. By breaking it down, the bark softens and can be easily scraped off.

In addition, the wood’s natural colors are released, lightening the surface. With this easy and affordable method, you can bring the beauty of driftwood into your home without the high cost or difficulty of finding the real thing.

I hope this works for you all, you driftwood-making peeps!

Looking for more Driftwood ideas? Check out these handmade crafts on Etsy.
Related Posts:

  • Teaching Kids About Recycling: Fun Activities to…
  • Your pasta machine is good for more than pasta or…
«
»

Comments

  1. bridget says

    August 3, 2011 at 8:02 am

    Looks great, you should check out a new show called “Sister Pickers” they picked then bought old items to start a business. I love the stuff you link. Keep on keeping on!

  2. Katie Smith says

    November 15, 2013 at 10:04 am

    I would LOVE to see this DIY but the blog is blocked (?) Is there a way to request permission from the blogger to view this tutorial? My husband is building us a farmhouse table and I wanted to find a good way to PHYSICALLY distress the wood (besides just distressing with paints and stains…)

  3. Stefanie Girard says

    November 15, 2013 at 10:29 am

    When you click on the download for the tutorial at the site simply fill in the two blanks and the tutorial will be sent to you. I hope this helps,
    Stef

  4. michelle says

    January 25, 2014 at 3:19 pm

    When I click on the link you provide, it does not allow me to see it. It says only people invited by the blogger can access the site 🙁

  5. Becky Dicke says

    March 11, 2014 at 11:18 pm

    Would like to be invited to read your blog and see the tutorial on how to turn wood into driftwood…. thank you

  6. Shelby Honeycutt says

    May 31, 2014 at 5:03 pm

    This looks so interesting. Thank you for sharing.

Have you read?

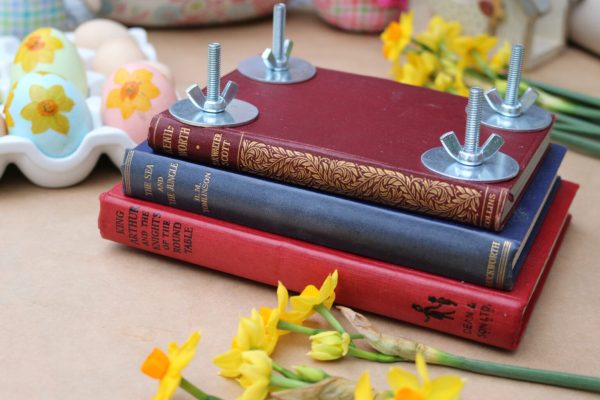
DIY Review: Upcycled Vintage Book Flower Press – A Thoughtful Keepsake Gift

Looking for a heartfelt, handmade gift that combines nostalgia with nature? Cassie Fairy’s tutorial on transforming old, damaged books into a vintage-style flower press is a charming and practical project that makes for a perfect keepsake gift.?

Why It’s a Great Gift Idea

This DIY flower press is not just a functional item; it’s a sentimental treasure. By upcycling a vintage book, you’re preserving memories and giving a nod to the past. It’s ideal for nature lovers, gardeners, or anyone who appreciates the art of preserving flowers. The pressed flowers can be used in various crafts, such as creating bookmarks, greeting cards, or framed art, allowing the recipient to cherish the blooms long after they’ve been pressed.?

What’s Involved in the Project

Cassie provides a step-by-step guide, making it accessible even for beginners. The process involves selecting a sturdy, hardcover book, adding spacers like cardboard or chipboard, and securing everything with bolts and wing nuts. This setup allows for even pressure, ensuring that flowers are pressed flat and dry without damage. The vintage book cover adds an aesthetic touch, making the flower press not only functional but also a decorative piece.?

Final Thoughts

This upcycled flower press is more than just a gift; it’s a way to share the beauty of nature and the joy of crafting. It’s a thoughtful, sustainable, and creative present that will be appreciated for years to come. Whether you’re giving it as a gift or making one for yourself, it’s a delightful project that brings a touch of vintage charm into the modern world.?

For a detailed guide on creating your own, visit Cassie Fairy’s blog: How to Upcycle Old, Damaged Books into a Vintage-Style Flower Press.


Explore

books Christmas CraftGossip Giveaways Craft Inspirations Easter glass halloween Home Decor kid crafts More Crafts Patterns & Tutorials recycled art Recycled Clothing Recycled Jewelry Recycled kids crafts Recycled Sewing Recycled Tutorials Recycling Ideas Recycling Organizing tin can

RSS More Articles

  • Etsy Spotlight Series – Boho Magic: Bell Sleeves, Autumn Air, and a Dress That Transforms Seasons
  • 4 FREE Crafty Frames Printables
  • Witch’s Brew Halloween Body Scrub – A Spooky DIY for Glowing Halloween Skin
  • Crochet Kit – Colorstripe Cardi
  • Scrappy Strip Pillow – Free Quilting Pattern
  • Etsy Feature – Spooky Round Mug Template – Halloween Pottery Project
  • DIY Review: Upcycled Vintage Book Flower Press – A Thoughtful Keepsake Gift
  • Corn Learning Activities
  • Frosty Flower Top- Free Crochet Pattern
  • DIY Menopause Bath Bombs for Hot Flashes and Hormone Support

Copyright © 2025 · CraftGossip | Start Here | Contact Us | Link to Us | Your Editors | Privacy and affiliate policy