• Home
  • Suggest A Craft
  • DIY Newsletter

Recycled Crafts

Creative DIY Projects That Turn Trash Into Treasure

  • About CraftGossip
  • Our Network
    • Bath & Body Crafts
    • Candle Making Ideas
    • Crochet Ideas
    • Cross Stitch
    • Edible Crafts
    • Felting Patterns
    • Glass Art
    • Home & Garden Ideas
    • Indie Crafts
    • Jewelry Making
    • Kids Crafts
    • Knitting Patterns
    • Lesson Plans
    • Needlework
    • Party Ideas
    • Polymer Clay
    • Quilting Ideas
    • Recycled Crafts
    • Scrapbooking
    • Sewing Patterns
    • Card Making
    • DIY Weddings
    • Not Craft Ideas
  • Giveaways
  • Roundups
  • Store
  • Search

How to melt recycled glass bottles in a microwave to make jewelry

January 4, 2023 by Stefanie Girard

melt glass bottles in microwave

I’ve always been interested in learning new things and expanding my skills, so when I received a microwave kiln as a gift, I knew I wanted to try my hand at fusing recycled glass into jewelry. I was a bit intimidated at first because I had never tried anything like this before, but I was also really excited to give it a go. I’ve always been interested in upcycling and finding new ways to create beautiful items from what would normally be considered waste, so this seemed like the perfect opportunity to combine my interests and try something new.

I started by gathering up all the recycled glass I could find. I rummaged through thrift stores, checked local recycling centers, and even asked friends and family if they had any unwanted glass they’d like to donate. Once I had a good collection, I was ready to start my first project.

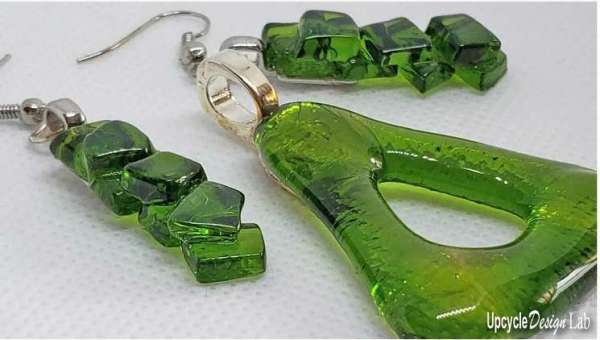
To offer some guidance on how to fuse recycled glass into jewelry, I decided to watch the videos posted on the blog Upcycle Design Lab. This blog is all about upcycling and repurposing, and they have a great section on fusing glass into jewelry. I was really impressed by the quality of the videos and how easy they made the process seem. The instructions were clear and easy to follow, and the end results were stunning.

I was so eager to try it for myself, so I set up my workspace and got to work. I started with a simple project, just to get the hang of it, and was pleasantly surprised at how quickly and easily the process came together. Before I knew it, I had created my first piece of jewelry from recycled glass, and I was so proud of myself.

I’ve been hooked ever since and have been experimenting with different techniques and designs. I’ve even started to make gifts for friends and family, and they’ve been amazed at what I’ve been able to create with just a microwave kiln and some recycled glass. I’m so grateful to have found this new hobby and to have the resources and guidance available to me through the Upcycle Design Lab blog. I’m looking forward to seeing where this journey takes me and what new and exciting creations I’ll be able to make in the future!

How to dip paint recycled glass bottles

7 Things to Make With an Old Window Shutter

How to make faux beach glass bottles


Related Posts:

  • Cool way to combine weaving and clay
  • Who knew you could make a cool coffee table from…
«
»

Have you read?

Turn That Old Fridge Into a Backyard Showstopper – Just in Time for Cookout Season!

Got an old fridge gathering dust in the garage or sitting sadly by the curb? Before you send it off to the dump, here’s a genius idea that’s perfectly timed for cookout season — transform it into a DIY cold smoker!

That’s right — instead of shelling out hundreds on fancy smokers, you can upcycle a clunky old refrigerator into a fully functional cold smoker. And thanks to this clever tutorial from Dengarden, the whole process is surprisingly straightforward. With cookout season knocking on the backdoor, now’s the perfect time to turn that junker into your new backyard MVP.

Cold smoking isn’t just for pros. If you’ve ever dreamed of infusing your own cheese, salmon, or jerky with smoky goodness, this DIY project makes it accessible and affordable. Summer is the time for laid-back BBQs, slow-smoked meats, and impressive foodie feats — and this upcycled fridge-turned-smoker is just the ticket.

The tutorial walks you through removing the interior shelves and parts of a non-working fridge (tall, older models work best), cutting in some ventilation, and hooking up a small smoke generator. Throw in a thermometer, and you’re good to go. It’s all done with basic tools and a little bit of sweat equity.

Besides the obvious culinary payoff, this project gets serious points for sustainability. Instead of tossing your old appliance, you’re giving it a new purpose — and one that your neighbors will definitely be jealous of.

With warm weekends ahead and grill-outs on the horizon, there’s no better time to try this out. Whether you’re a smokehouse newbie or a backyard BBQ boss, a DIY fridge smoker is a brilliant, budget-friendly addition to your outdoor cooking lineup.

Ready to impress your guests? Head over to the full tutorial on Dengarden and get smoking!

 Classic Smoky BBQ Rub

Perfect for: Pork, chicken, or even smoked cheese.

Ingredients:

  • 2 tbsp brown sugar

  • 1 tbsp smoked paprika

  • 1 tbsp sea salt

  • 1 tsp black pepper

  • 1 tsp garlic powder

  • 1 tsp onion powder

  • ½ tsp mustard powder

  • ¼ tsp cayenne pepper (optional for a kick)

Tip: Pat meat dry and apply the rub generously. Let it sit for a few hours (or overnight) in the fridge before smoking.


 Herb & Peppercorn Cold Smoke Rub

Perfect for: Turkey, chicken, fish (especially salmon).

Ingredients:

  • 2 tsp cracked black pepper

  • 2 tsp dried rosemary

  • 1 tsp dried thyme

  • 1 tsp lemon zest (optional but amazing on fish)

  • 1 tsp sea salt

  • 1 tsp garlic powder

Tip: This rub is light but aromatic — perfect for delicate meats or anything you’re planning to serve chilled.


 Sweet & Savory Maple Rub

Perfect for: Bacon, ham, or any pork cut.

Ingredients:

  • 2 tbsp maple sugar (or brown sugar + a few drops of maple extract)

  • 1 tsp ground allspice

  • 1 tsp black pepper

  • 1 tsp sea salt

  • ½ tsp nutmeg

  • 1 tsp paprika

Tip: Use sparingly — a little goes a long way. Let it rest at least 6 hours to absorb those sweet-spice notes.


 Garlic Mustard Rub

Perfect for: Beef, venison, or lamb.

Ingredients:

  • 2 tsp dry mustard

  • 1 tbsp garlic powder

  • 1 tsp cracked black pepper

  • 1 tsp salt

  • 1 tsp coriander

  • 1 tsp smoked paprika

Tip: This rub works especially well on red meats and adds depth during the slow smoke infusion.

Explore

books Christmas CraftGossip Giveaways Craft Inspirations Easter glass halloween Home Decor kid crafts mason jar More Crafts Patterns & Tutorials recycled art Recycled Clothing Recycled Jewelry Recycled Sewing Recycled Tutorials Recycling Ideas Recycling Organizing tin can

RSS More Articles

  • The Best Lightweight Yarn for Summer Crochet (No Sweaty Hands!)
  • Etsy Spotlight – Create a Cherished Memory Bear with This Easy Sewing Pattern
  • How to Create a Polaroid Photo Greeting Card
  • Turn That Old Fridge Into a Backyard Showstopper – Just in Time for Cookout Season!
  • Sunday Spotlight – Boat Day Quilt Pattern
  • Cute Father’s Day Crafts Kids Can Make
  • Book Review: Building with Secondhand Stuff – A Must-Have Guide for Upcyclers, DIYers and Eco-Minded Makers
  • Hexi Honey Bunny Solid – Cardigan
  • How to Make a Cute Gatefold Card
  • Master the Art of a Perfectly-Fitting Wrap Skirt: A Must-Try Sewing Tutorial

Pick Your Blog

  • Sewing
  • Knitting
  • Quilting
  • Crochet
  • Home & Garden
  • Recycled Crafts
  • Scrapbooking
  • Card Making
  • Polymer Clay
  • Cross-Stitch
  • Edible Crafts
  • Felting
  • Glass Art
  • Indie Crafts
  • Kids Crafts
  • Jewelry Making
  • Lesson Plans
  • Needlework
  • Bath & Body
  • Party Ideas
  • Candle Making
  • DIY Weddings
  • Not Craft
  • Free Craft Projects

Copyright © 2025 · CraftGossip | Start Here | Contact Us | Link to Us | Your Editors | Privacy and affiliate policy