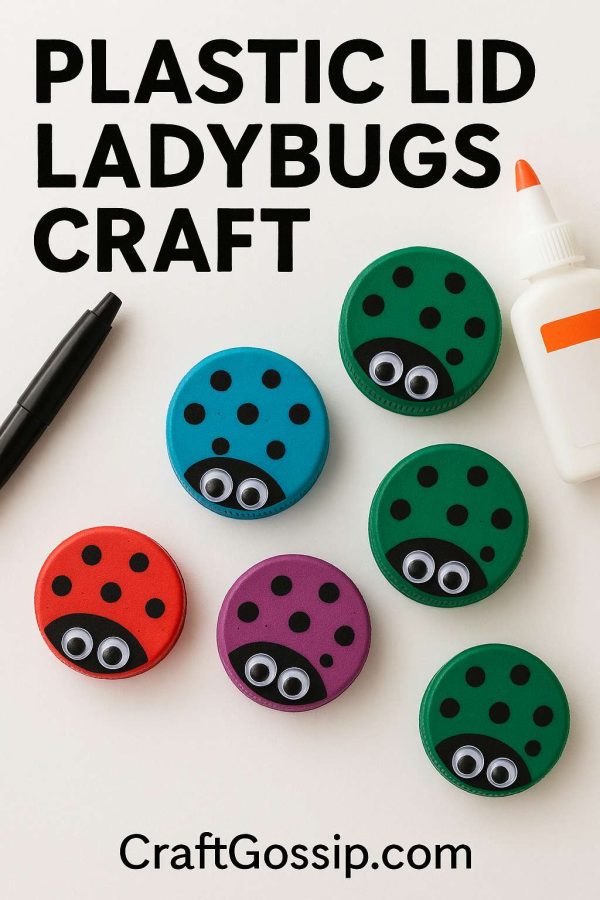
Oh, ladybugs are everywhere lately, aren’t they? And honestly, I’m not mad about it. I seem to spot a new ladybug craft every time I open Pinterest—and let’s be real, they’re hard to resist with those sweet spots and cheerful vibes. Are you loving them as much as I am? Because if you are, you’re going to adore these colorful little critters made from recycled plastic lids!
They’re not just cute—they’re ridiculously easy to make, too. And of course, they feature the ultimate craft MVP: googly eyes. Honestly, anything with wiggly eyes instantly wins my heart. These little ladybugs make a perfect quick craft with the grandkids or a no-stress weekend project when you’re feeling a little crafty but not up for a big production.
And here’s a fun idea: why not leave them out in the world like kindness rocks? Tuck them into a park bench, hide one in a friend’s mailbox, or pop one on a coworker’s desk. It’s like a ladybug version of spreading a little handmade joy—no wings required.
Let’s dive into this cheerful, upcycled craft and make something that’ll bring a smile to someone’s day (even if that someone is you!).
Materials Needed:
- Plastic lids (milk, juice, or soda bottle tops – any colors)
- Black acrylic paint or black permanent marker
- Small paintbrush or cotton swab
- Googly eyes (or make your own with paper)
- Craft glue or hot glue
- Marker pen (for dots and details)
- White paper or newspaper (to work on)
- Optional: magnets or craft sticks (for fridge/garden use)
Instructions:
Step 1: Clean and Choose Your Lids
Give the plastic lids a good wash and dry. Pick a variety of colors—red, blue, purple, green, or even neon! Each lid will be a different “ladybug”.
Tip: If your lids are all the same color, you can paint them first using acrylic paint.
Step 2: Paint the Head
Using black paint or a marker, paint a small semi-circle at the edge of the lid. This will be the ladybug’s head. Don’t worry about being perfectly round—wonky = charming!
Step 3: Add the Dots
Dip a cotton swab or the end of a paintbrush into black paint and dot the rest of the lid with “ladybug spots.” 5–8 dots per lid looks balanced, but do what feels fun!
You can also use a black marker for this step if you prefer.
Step 4: Glue on the Eyes
Attach two googly eyes to the head using craft glue or hot glue. Press firmly and let dry. No googly eyes? Cut small white paper circles and draw black pupils.
Step 5: Add Optional Backings
- Fridge Magnets: Stick a round magnet on the back of the lid.
- Garden Markers: Glue a craft stick to the bottom.
- Gift Tags: Punch a small hole and tie with twine.
- Write names or words on the ladybug backs to personalize them.
- Add glitter or rhinestones if you’re feeling fancy.
- These make cute counting tools for preschoolers too!
Love working with recycled items? Check out this amazing recycled Crafts book.