• Home
  • Suggest A Craft
  • DIY Newsletter

Recycled Crafts

Creative DIY Projects That Turn Trash Into Treasure

  • About CraftGossip
  • Our Network
    • Bath & Body Crafts
    • Candle Making Ideas
    • Crochet Ideas
    • Cross Stitch
    • Edible Crafts
    • Felting Patterns
    • Glass Art
    • Home & Garden Ideas
    • Indie Crafts
    • Jewelry Making
    • Kids Crafts
    • Knitting Patterns
    • Lesson Plans
    • Needlework
    • Party Ideas
    • Polymer Clay
    • Quilting Ideas
    • Recycled Crafts
    • Scrapbooking
    • Sewing Patterns
    • Card Making
    • DIY Weddings
    • Not Craft Ideas
  • Giveaways
  • Roundups
  • Store
  • Search

How to make recycled cd weaving art

February 26, 2021 by Stefanie Girard

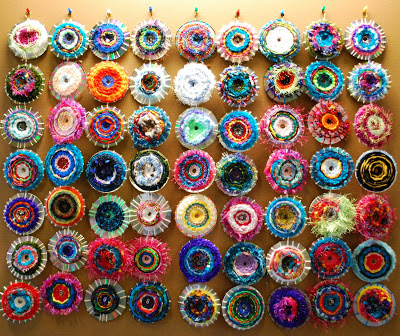
Wow! Isn’t this spectacular?! I scored a bunch of old cd’s to use the cases for a project. Now I have a use for all the cd’s!

Pop on over to the blog Make it A Wonderful Life for lot’s of great photo of these woven recycled cd’s. There is also a tutorial on how to weave on recycled cd’s with scrap yarn.

30+ Ways To Teach Weaving To Kids– These engaging and hands-on projects offer a perfect introduction to the art of weaving while nurturing important developmental skills. From simple and beginner-friendly activities to more intricate projects, this diverse assortment covers a wide range of techniques and materials. Through these weaving crafts, children will learn the fundamentals of threading, pattern creation, and texture exploration. They will develop fine motor skills, hand-eye coordination, and patience as they manipulate colorful yarns, ribbons, or even natural materials like twigs and leaves. As they weave, they will discover the joy of creating their own unique designs, fostering their creativity and imagination.

Weaving Projects to Make With Kids These crafts offer a perfect opportunity to introduce children to the art of weaving while igniting their imagination and fine-tuning their motor skills. From simple paper weavings to colorful yarn creations, each project is thoughtfully crafted to engage children in a hands-on and enjoyable experience. So gather your young artists, grab some materials, and get ready to weave together unforgettable memories and beautiful creations that will make you all proud!

Cool way to combine weaving and clay This innovative project opens up a world of possibilities as you bring together two art forms to create something truly extraordinary. Let your imagination run wild as you incorporate woven elements into your clay creations, adding texture, depth, and a touch of artistic magic


Adorable Llama Weaving Project Experience the irresistible charm of llamas as you delve into a weaving project that will make your heart skip a beat! Craft an adorable llama-inspired weaving using vibrant yarns, and watch as your creation comes to life with personality and whimsy. This project is a perfect blend of textile art and the enchantment of these beloved animals. Whether you’re a llama enthusiast, a fan of fiber crafts, or simply looking for a fun and engaging project, this adorable llama weaving will bring joy and a sense of accomplishment. 

Cardboard circle weaving tutorial Learn the fundamentals of setting up a circular loom, selecting the perfect yarns, and mastering various weaving patterns that will result in breathtaking textures and captivating colors. This project is a gateway to a calming and meditative crafting experience that yields stunning results. 


Related Posts:

  • Cool way to combine weaving and clay
  • Teaching Kids About Recycling: Fun Activities to…
«
»

Have you read?

DIY Paper Bag Mushrooms – A Creative Upcycled Craft for Kids and Nature Lovers

There’s something magical about mushrooms — maybe it’s the fairy-tale vibes or their cozy woodland charm. Either way, turning ordinary brown paper bags into mushrooms is a fun, hands-on craft project that kids (and adults) will enjoy. The best part? You’re reusing materials that might otherwise go to waste. Win-win!

This easy tutorial walks you through making your very own forest of recycled mushrooms using simple supplies you likely already have around the house.

What You’ll Need:

  • Brown paper lunch bags (you can even use grocery bags cut to size)

  • Scrap paper or newspaper for stuffing

  • String, yarn, or twine

  • Scissors

  • Paints (acrylic or tempera work best)

  • Paintbrushes or sponges

  • Optional extras: markers, stickers, googly eyes, craft glue

Step-by-Step: How to Make Your Mushrooms

Step 1: Create the Mushroom Top
Start by opening your paper bag and gently crumpling up some newspaper or scrap paper. Stuff it into the bottom of the bag — not too tight, just enough to give it a rounded shape that will form the mushroom cap.

Step 2: Form the Stem
Once the top is nice and puffy, hold the bag just underneath the stuffed section and twist it lightly to shape the stem. Tie a piece of twine or string around this part to hold the form. You’ll now have a mushroom top with a long paper bag hanging down — that’s your stem.

Step 3: Trim to Size
If the stem looks too long or uneven, grab your scissors and snip it down to your preferred height. You can even experiment with making some taller and some short and chubby for a little mushroom variety.

Step 4: Paint and Decorate
Time for the fun part — painting! Flip the mushroom cap upright and paint it any way you like. Classic red with white spots? Go for it. Bright blue with glitter? Why not! Use brushes or dabbers to add spots, swirls, or patterns. Let kids express their creativity — there’s no wrong way to decorate a magic mushroom!

Step 5: Let It Dry
Place your mushrooms somewhere safe to dry. You can use a sheet of newspaper or cardboard to avoid mess. Once dry, they’ll stiffen a little and hold their shape nicely.

Step 6: Display Your Mushroom Garden
Line them up on a windowsill, add them to a play area, or build a fairy village in the corner of a room. You can even glue them to a cardboard base and add moss, pebbles, and tiny paper critters for a full scene.

Extra Ideas:

  • Add flags or tiny doors to make mushroom homes.

  • Draw faces or names on the stems to turn them into characters.

  • Use cotton balls or pom-poms for fluffy mushroom spots.

Why This Project Rocks:

This is one of those crafts that doesn’t need a trip to the store or fancy tools — just a little time, a few basic supplies, and a bit of imagination. Plus, it encourages kids to see the creative potential in everyday materials — a great step toward more mindful, eco-conscious crafting.

So go ahead, raid the recycling bin and bring a mini mushroom forest to life.

How to make giant toadstools out of recycled tires

How to make champagne cork toadstools

How to make recycled Easter egg mushrooms

How to make recycled toilet paper tube mushrooms

How to make a rainbow forest of adorable recycled mushrooms

Explore

books Christmas CraftGossip Giveaways Craft Inspirations Easter glass halloween Home Decor kid crafts More Crafts Patterns & Tutorials recycled art Recycled Clothing Recycled Jewelry Recycled kids crafts Recycled Sewing Recycled Tutorials Recycling Ideas Recycling Organizing tin can

RSS More Articles

  • Cross Stitch the National Parks in Tiny Form
  • DMC Punch Needle Wall Hanging – A Bold and Modern Statement Stitch
  • Turtle Memory Game – Crochet Pattern
  • How to Make a Fall Squirrel Birthday Card
  • Create a Giant Halloween Decoration That Will Leave Everyone Spooked – DIY Big Guy Tutorial
  • Combine Knit and Crochet with this Cute Checkers Set
  • Rosh Hashanah Coloring Sheets and Other Activities for Kids
  • Cassette Tape Shaped Mini Album
  • Free Crochet Pattern – Chunky Rib Tunisian Hat and Cowl
  • What is Silver Art Clay or Precious Metal Clay (PMC) and How Do You Work With It (and Fire It!)

Copyright © 2025 · CraftGossip | Start Here | Contact Us | Link to Us | Your Editors | Privacy and affiliate policy