• Home
  • Suggest A DIY
  • DIY Newsletter

Recycled Crafts

Creative DIY Projects That Turn Trash Into Treasure

  • About CraftGossip
  • Our Network
    • Bath & Body Crafts
    • Candle Making Ideas
    • Crochet Ideas
    • Cross Stitch
    • Edible Crafts
    • Felting Patterns
    • Glass Art
    • Home & Garden Ideas
    • Indie Crafts
    • Jewelry Making
    • Kids Crafts
    • Knitting Patterns
    • Lesson Plans
    • Needlework
    • Party Ideas
    • Polymer Clay
    • Quilting Ideas
    • Recycled Crafts
    • Scrapbooking
    • Sewing Patterns
    • Card Making
    • DIY Weddings
    • Not Craft Ideas
  • Giveaways
  • Roundups
  • Store
  • Search

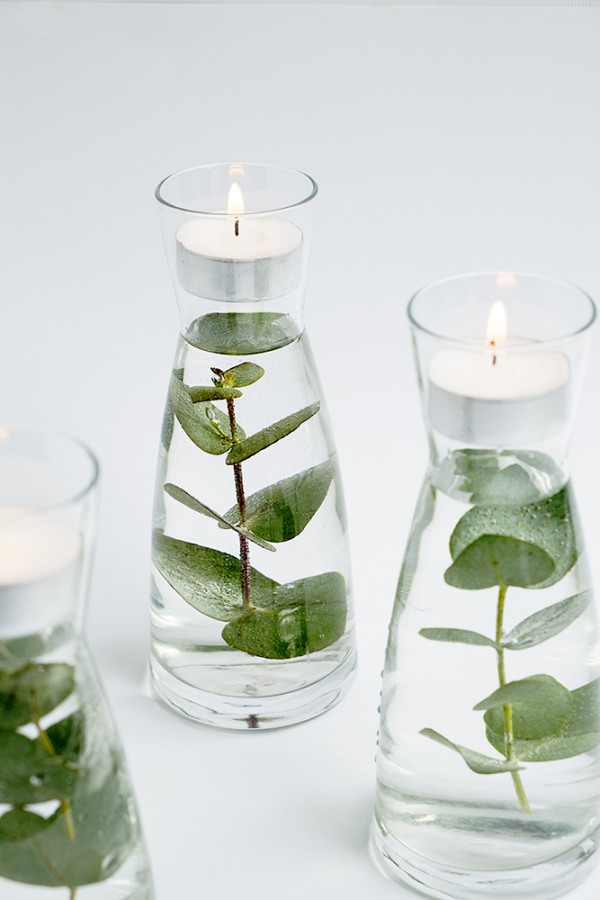
How to make floating greenery votives

April 17, 2019 by Stefanie Girard

Hey there! I just discovered a new crafting project and I’m so excited to share it with you. Have you heard of floating greenery votive holders? They’re these amazing little candle holders that have floating greenery inside, and they look so fancy! But the best part is, they’re super easy to make. I’ve been wanting to try my hand at making some, and I recently got gifted a microwave kiln so I’m all set to go. I found a tutorial over on the blog Do It and How and I can’t wait to get started.

I love the idea of using different materials in my yard to create the greenery, or even using sprigs from my neighbor’s yard if they don’t mind (wink, wink). I’m thinking pine would be perfect for the holiday season, and maybe adding some rosemary sprigs for a dinner party would be really festive. Speaking of rosemary, it’s one of the only herbs I can actually keep alive and not only does it smell amazing, but it looks pretty too!

Another cool thing about this project is that you can make the glass vases from upcycled jars, mason jars, or even juice bottles. I’ve even seen some beautiful glass vases for sale online that would work perfectly for this project. So, if you’re looking for a fun and simple crafting project to try out, be sure to check out the tutorial on Do It and How. Let’s get crafting!

Pop on over to the blog Do It and How for the tutorial on how to make floating greenery votive holders.


«
»

Comments

  1. Julie Wiechmann says

    October 1, 2022 at 1:50 pm

    These are gorgeous! Desperately seeking those vases! By any chance are you interested in selling yours?

  2. Stefanie Girard says

    October 5, 2022 at 9:12 am

    try looking for avocado seed starter vases

Have you read?

DIY Review: Giving a Vintage Milk Can New Life as a Charming Outdoor Side Table

Ever stumbled upon a piece of decor that instantly transports you back in time? That’s exactly how I felt when I came across Cindy’s tutorial on transforming a vintage milk can into the most delightful outdoor side table. It’s one of those projects that blends nostalgia and functionality in a way that just makes your heart smile.

Cindy starts the tutorial with a bit of backstory on old milk cans—those heavy-duty relics of rural life that once carried fresh milk from farm to table. It’s kind of poetic, turning something that was once a workhorse on the farm into a centerpiece on your patio.

The steps she outlines are clear and totally approachable. You’ll need a vintage milk can, a wooden round (for the tabletop), a few basic tools like a drill and wood glue, and your favorite paint. What I appreciated most was how she kept the instructions flexible. Her husband welded a steel bar to the can to hold the tabletop in place (which is super sturdy), but she also offers a no-welding alternative that uses a snug-fitting piece of wood inside the opening. Perfect for folks like me who aren’t exactly on a first-name basis with a welder.

The painting part is where things get extra fun. Cindy uses mineral paint for the base and a whitewash technique on the wood top, finishing it off with some gentle distressing. It gives the table this lovely worn-in look—like it’s been part of your porch for years. I could practically see it next to a rocking chair with a pitcher of lemonade and a good book.

One little thing I personally loved? The fact that she didn’t over-polish the final look. It’s clean, yes—but still has that imperfect, charming farmhouse appeal. Like something your grandmother might have owned, but cooler.

If you’re into DIY with a heart and a healthy respect for vintage charm, this project is 100% worth trying. It’s simple, budget-friendly, and lets you bring a little slice of the past into your modern-day life. Now if only I could get my hands on a milk can…


Explore

books Christmas CraftGossip Giveaways Craft Inspirations Easter glass halloween Home Decor kid crafts More Crafts Patterns & Tutorials Recycled and Thrifted Ideas recycled art Recycled Clothing Recycled Jewelry Recycled kids crafts Recycled Sewing Recycling Ideas Recycling Organizing tin can

Featured Posts

How to make tp pumpkins for an easy Thanksgiving decoration

How to turn an old headboard into a bench

How Can I Recycle This ?

So many simple elements make adorable figures

How to make a fabric and button star Christmas ornament

RSS More Articles

  • Sewing Pattern Saturday Review: Bookworm Tablet Sleeve Sewing Pattern
  • Designer Spotlight: Mango Charm Studio
  • 3 FREE Tablescape Coloring Pages
  • DIY Rose Water and Glycerin Facial Mist for Dry Skin Relief
  • A Single Skein Shawl to Knit for Summer
  • Book Review: Dear Math, We’re Not Friends
  • 7 Easy Ways to Upgrade Plain Tomato Sauce From a Squeezy Bottle
  • The Hattitude Beanie free crochet pattern
  • FREE Palm Leaf Font for Summer
  • 10 Quilted Bag Ideas to Make with Scrap Fabrics

Copyright © 2026 · CraftGossip | Start Here | Contact Us | Link to Us | Your Editors | Privacy and affiliate policy