If you’re someone who collects wine corks with the intention of “doing something crafty with them one day,” then this is your sign. That stash of corks sitting in your kitchen drawer or jam jar? It’s about to become something both beautiful and useful—a handmade trivet mat. Perfect for protecting your countertops and dining table from hot dishes, this easy DIY project turns wine night leftovers into rustic kitchen charm.
What You’ll Need:
Around 30–50 wine corks (depends on the size of the trivet you want)
A sharp knife or small handsaw
Strong craft glue or a hot glue gun
A clamp or rubber bands (optional, for holding pieces tightly while they dry)
Sandpaper (optional)
Ribbon, twine, or felt for finishing the edges (optional)
A cutting board or non-slip mat to work on
Step 1: Gather and Sort Your Corks
You’ll want natural corks, not the synthetic ones, since those don’t glue as well and can melt slightly under heat. Try to find corks that are roughly the same length and width. A little variation gives it a nice handmade feel, but too much and the trivet might wobble.
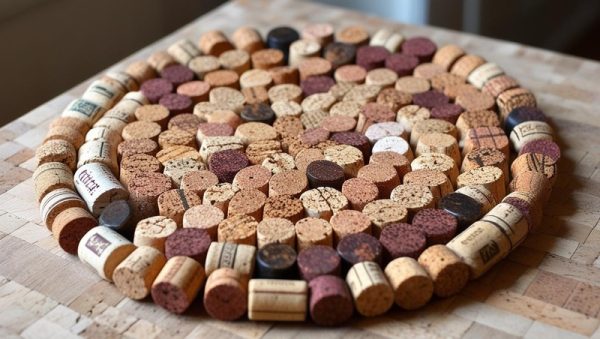
Step 2: Decide on a Shape
You can go classic with a circle or square, or even get creative with a heart or hexagon. Circles look great when you stand the corks on end. Squares are easier if you’re laying the corks side-by-side lengthwise.
Step 3: Cut (Optional)
If you’re standing the corks on end, you don’t need to cut them. But if you want a flat mat with horizontal corks, slicing them in half lengthwise helps them lie flat. Use a sharp knife or a small saw, and be careful—corks can be a bit slippery. A quick sand on the cut edge makes them look more polished.
Step 4: Glue Them Together
Start gluing your corks one at a time. A hot glue gun works quickly, but strong craft glue will hold better long-term. If you’re making a circular trivet, start from the center and work your way out. For square or rectangular shapes, create rows and glue them side by side. You can add a clamp or wrap rubber bands around the whole thing as it dries to help it set firmly.
Step 5: Add a Backing (Optional)
If you want extra sturdiness or a more finished look, glue a piece of felt or cork sheet to the bottom of your trivet once it’s dry. This also helps protect your table from scratches.
Step 6: Finish the Edges (Optional)
Wrap a piece of ribbon, twine, or leather strip around the edge and glue it down to give your trivet a tidy, decorative finish.
And You’re Done!
Let everything dry completely before putting your new trivet to use. Once dry, place your homemade cork mat on the kitchen counter or bring it out during dinner parties. It’s a guaranteed conversation starter, especially if you’ve saved corks from special occasions—anniversaries, vacations, or just really good bottles of wine.
Bonus Idea: If you have even more corks, make a set! Stack a few trivets together and tie with a ribbon for a lovely handmade gift.
So next time you open a bottle of wine, don’t toss that cork—you’re just a few sips away from your next DIY project.