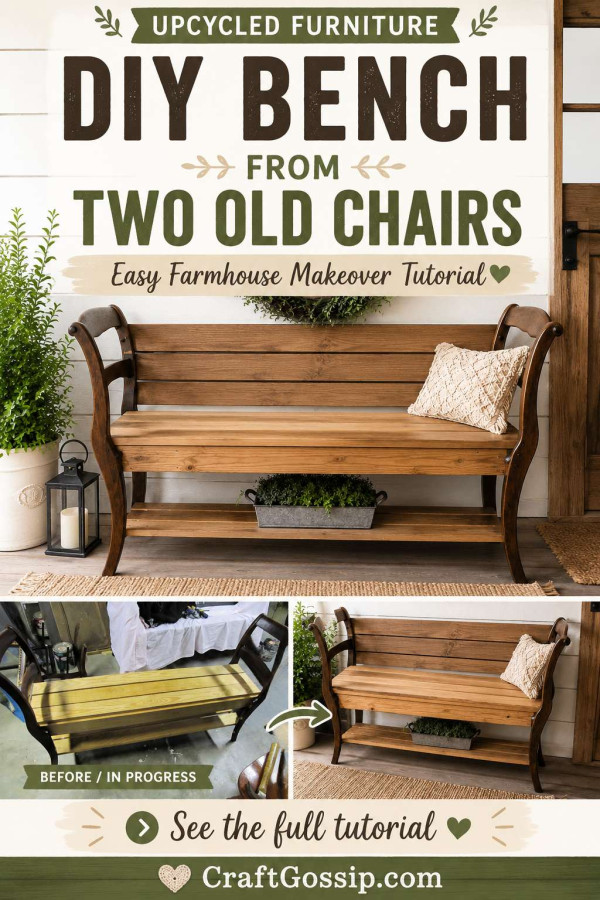
Old chairs are one of those things that seem to hang around forever, don’t they? One has a broken seat, another has a wobbly leg, and somehow they end up in the shed because we convince ourselves they are “too good to throw out.” And honestly, sometimes they are.
This DIY bench made from two old chairs is a clever way to turn a pair of tired wooden chairs into something useful again. Instead of trying to repair them as individual chairs, you use the chair backs and rear legs as the two decorative ends of a bench. Then you build a simple timber frame between them and add planks for the seat, back, and optional lower shelf.
It is thrifty, practical, and full of handmade character — exactly the sort of recycled furniture project that makes me want to rescue every sad chair I see on the side of the road. Not that I need more projects waiting in the garage, but let’s not talk about that.
If you love giving old furniture a second life, you may also enjoy these genius ways to repurpose old chairs into something beautiful and useful. That roundup is full of clever chair makeovers, and this bench tutorial is a lovely project to try when you have two sturdy chairs with good bones.
Why Make A Bench From Two Old Chairs?
A recycled chair bench works because it saves the prettiest part of the chairs — the shaped backs, curved legs, turned details, and vintage character — while replacing the weak or damaged parts.
Most old dining chairs fail at the seat first. The seat cracks, the upholstery falls apart, or the joints loosen. But the back legs and chair backs are often still strong and decorative. By using those parts as the bench ends, you get a custom-looking piece of furniture without having to build the entire thing from scratch.
This project is perfect for:
Entryway seating
Covered porch décor
Mudroom storage
End-of-bed seating
Hallway seating
Cottage or farmhouse decorating
Photo props
Garden room seating
A pretty spot to put on shoes
For another simple seasonal idea using old chairs, this post on upcycled chair ideas for quick porch décor is worth saving too. Old chairs really do have far more potential than we give them credit for.
Choosing The Right Chairs
The best chairs for this DIY bench are wooden chairs that are still structurally sound through the back legs and chair backs. They do not need perfect seats because those will be removed, but the side supports must be sturdy.
Look for chairs with:
Solid wood construction
Strong back legs
Interesting backs or curved details
Similar heights
Minimal cracking
No rot or soft timber
Joints that can be tightened or glued
A shape that will look nice as the end of a bench
Avoid chairs that are badly split, rotten, insect-damaged, or so wobbly they feel unsafe even after tightening. A pretty chair back is lovely, but the bench still needs to hold actual humans, not just a cushion and a dream.
The two chairs do not have to match perfectly, but it is much easier if they are the same height and similar in width. If they are mismatched, you may need to trim the legs or adjust the frame so the bench sits level.
If you are new to furniture makeovers, this CraftBits guide on how to transform old furniture is a helpful read before you get started. The basic cleaning, sanding, priming, and painting ideas apply beautifully to this recycled chair bench too.
Finished Bench Size
Your finished size will depend on the chairs you use, but a comfortable bench is usually around:
48–60 inches long
16–18 inches deep
17–19 inches high at the seat
32–38 inches high at the back
For a beginner-friendly recycled chair bench, I recommend keeping the length around 48 inches. Longer benches can look beautiful, but they need extra centre support so the seat does not sag over time.
Before cutting any timber, place your two chairs apart and stand back to check the proportions. If it looks too long, shorten it. If it looks too narrow, adjust the seat depth. This is one of those projects where your eye is just as useful as the measuring tape.
Supplies
Two old wooden chairs
2 x 4 timber for the seat frame
1 x 4 timber planks for the seat
1 x 4 or 1 x 6 timber planks for the backrest
1 x 4 timber for the lower shelf, optional
Wood screws
Pocket hole screws, optional
Wood glue
Wood filler
Sandpaper in medium and fine grits
Primer
Paint, stain, or clear sealer
Outdoor-rated sealer if the bench will sit on a porch
Bench cushion, optional
Decorative pillows, optional
A cordless drill, clamps, sanding discs, wood glue, and a good clear sealer will make this project much easier. Amazon is a handy source for basic DIY supplies such as clamps, screws, drill bits, sanding discs, and outdoor sealers. If you want to dress up the finished bench, Etsy can also be a lovely place to look for handmade cushion covers, vintage-style furniture appliques, or decorative furniture transfers.
Tools
Drill
Saw or mitre saw
Jigsaw, optional
Screwdriver
Clamps
Measuring tape
Pencil
Level
Square
Sander or sanding block
Safety glasses
Dust mask
Gloves
Safety Notes Before You Start
Wear safety glasses when cutting, drilling, and sanding. Old chairs can have hidden nails, brittle joints, splinters, and all sorts of little surprises.
Work on a flat surface so the frame stays square. Check the bench for wobble before painting and again before using it.
This bench is intended as home seating, not playground equipment. Do not stand on it, jump on it, or use it somewhere children may climb over the back. Once finished, test it gently before regular use.
If the bench will be used outdoors, keep it on a covered porch or protected patio and seal it properly. Most old dining chairs were made for indoor use, so they will not appreciate being left out in heavy rain.
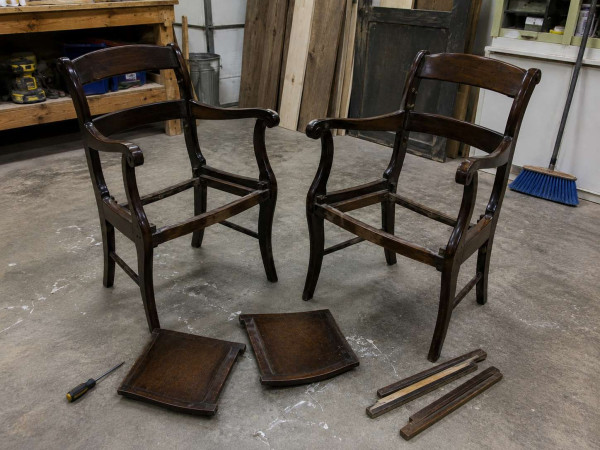
Step 1: Clean And Inspect The Chairs
Start by cleaning both chairs thoroughly. Remove dust, dirt, grease, cobwebs, and any loose finish.
Check the chair backs, rear legs, and side joints. Tighten any screws and repair loose joints with wood glue and clamps. Let repaired joints dry completely before you build the bench.
Remove staples, old upholstery, nails, tacks, and any sharp bits from the original seats. This is also a good time to check for hidden damage.
If one chair sits slightly unevenly, make a note of it. You may be able to correct it later by adjusting the legs or adding furniture glides.
Step 2: Remove The Old Seats And Unwanted Chair Parts
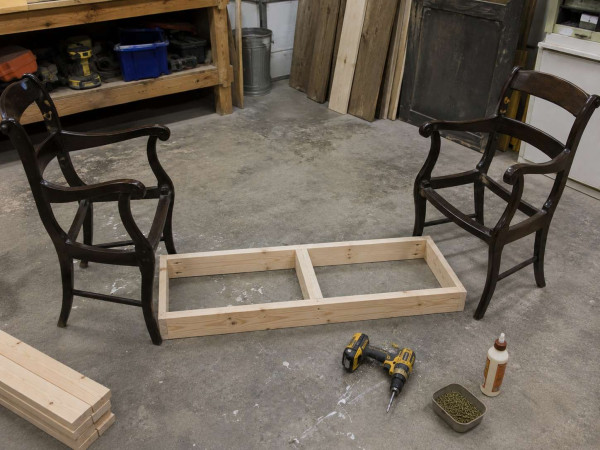
Remove the original chair seats. Depending on the chairs, these may be screwed in, nailed in, glued, upholstered, or simply sitting inside the frame.
You may also need to remove:
Front legs
Front stretchers
Broken side rails
Loose rungs
Old upholstery supports
Any decorative pieces that interfere with the bench frame
Keep the chair backs and rear legs intact. These become the two ends of your bench.
Before cutting anything major, dry-fit the two chair backs in position. Place them at either end of where the bench will sit and look at the overall shape. This is the moment when you decide whether the chairs will work together.
Step 3: Position The Chairs As Bench Ends
Turn the chairs so the backs face outward at each end of the bench. The chair backs now become the decorative arms or ends of the piece.
Measure the distance between the two chair ends. A good starting point is around 48 inches, but you can adjust depending on the size of your chairs and the space where the bench will live.
Write down:
The inside distance between the chair ends
The desired seat depth
The height where the seat frame will attach
The height where the back planks will sit
The length needed for the lower shelf, if adding one
Do not assume both chairs are perfectly identical. Old furniture often has tiny differences, especially if it has been repaired before.
Step 4: Build The Seat Frame
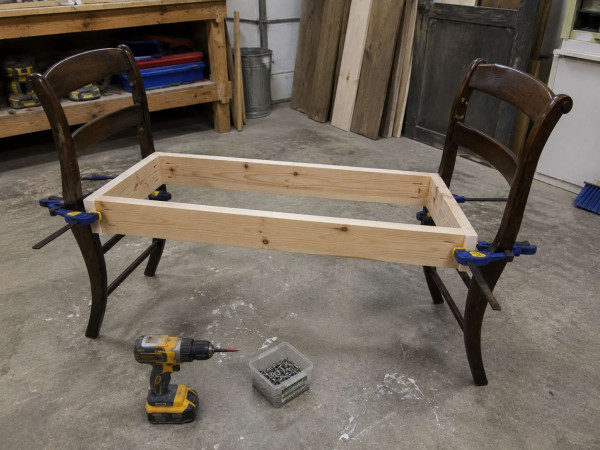
Cut two long pieces of 2 x 4 timber for the front and back rails of the seat frame. Cut two shorter pieces for the side rails.
Join the pieces into a rectangular frame using wood glue and screws. Use a square to check the corners before tightening everything fully.
If your bench is longer than 48 inches, add one or two centre supports inside the frame. These supports help stop the seat planks from sagging.
Dry-fit the frame between the two chair ends. The top of the frame should sit at a comfortable seating height and look balanced with the chair backs.
If you enjoy this kind of practical recycled DIY, you may also like browsing the recycled crafts section on CraftBits for more ways to use what you already have instead of buying everything new.
Step 5: Attach The Frame To The Chair Ends
Clamp the seat frame between the chair ends. Use a level to make sure it sits straight from side to side and front to back.
Drill pilot holes through the frame into the chair legs or side supports. Then attach the frame using wood screws and wood glue.
Use at least two screws at each main connection point if possible. If the chair sides are curved or awkward, add small timber blocks inside the frame to create a flat fixing point.
Check for wobble before moving on. If the frame shifts now, it will only get more annoying once the seat planks are attached.
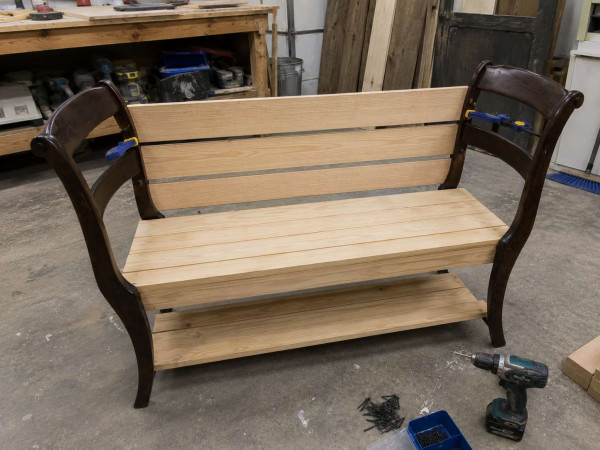
Step 6: Add The Seat Planks
Cut your 1 x 4 planks to fit across the top of the seat frame.
You can run the boards lengthwise for a long farmhouse bench look, or front-to-back for a more traditional slatted seat. For this project, long horizontal seat planks give the bench a simple, rustic look.
Lay the planks across the frame and leave a small, even gap between each board. This allows for slight wood movement and gives the bench a cleaner slatted finish.
Drill pilot holes, then screw each plank into the frame. Add a little wood glue where the planks meet the frame for extra strength.
Sand the front edges slightly so they are comfortable behind the legs when someone sits down.
Step 7: Add Plain Wooden Back Planks
For this version of the bench, keep the back simple with plain horizontal timber planks. This gives the finished piece a clean farmhouse look and makes it easier to style with cushions, plants, quilts, or seasonal décor.
Cut two or three planks to fit between the chair backs. Hold the first plank in place and clamp it. Use a level to make sure it sits straight.
Drill pilot holes and attach the plank to the chair backs with screws. Repeat with the remaining planks, leaving small, even gaps between them.
You can keep the top plank straight for a simple rustic style, or cut a gentle curve with a jigsaw if your chair backs have a softer shape.
A plain plank back is also more flexible than adding a quote or painted lettering. You can change the look with cushions or seasonal styling without the bench feeling too theme-specific.
Step 8: Add A Lower Shelf
A lower shelf is optional, but it adds storage and helps visually balance the bench. It is especially useful for entryways and mudrooms.
Cut support rails to fit between the chair legs below the seat. Attach them securely with screws and wood glue.
Cut 1 x 4 planks for the shelf and screw them into the support rails, leaving small gaps between the boards.
Use the lower shelf for shoes, baskets, folded blankets, garden tools, or a long planter. A basket underneath also hides all sorts of everyday clutter, which is always a small domestic miracle.
If you are making this for a porch or entryway, you might also like these home craft ideas from CraftBits for more practical handmade pieces around the house.
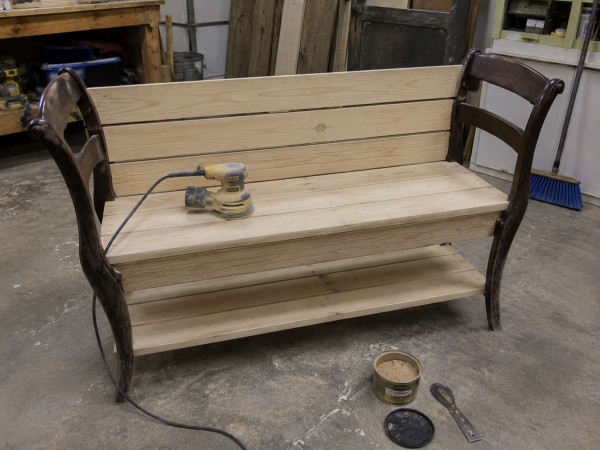
Step 9: Fill Holes And Sand Everything Smooth
Fill screw holes, dents, and any rough areas with wood filler. Let the filler dry completely, then sand it smooth.
Sand the whole bench, especially:
Seat edges
Arm areas
Back planks
Lower shelf
Old chair joins
Any place hands may touch
Start with medium-grit sandpaper, then finish with a finer grit. You do not need to remove every mark from the old chairs. A few dents and scratches help the bench feel rescued rather than factory-made.
Wipe away all sanding dust before painting or staining. Dust hiding under paint is one of those tiny annoyances that somehow becomes the only thing you can see once the project is finished.
Step 10: Prime The Bench
If the old chairs are dark, glossy, stained, or varnished, use primer before painting.
Primer helps paint stick properly and can stop old stains from bleeding through lighter colours. This is especially important if you are using white, cream, sage green, soft grey, or any other pale farmhouse-style paint.
Let the primer dry fully according to the product instructions.
Step 11: Paint, Stain, Or Seal
Now for the fun part — making it pretty.
You can paint the whole bench one colour, stain the seat planks and paint the chair ends, or use a two-tone finish for a more farmhouse-style look.
Here are a few finish ideas:
White paint for a cottage-style bench
Sage green for a soft farmhouse look
Black paint for a dramatic entryway piece
Natural stained timber with clear sealer
Cream paint with lightly distressed edges
Painted chair ends with a stained wooden seat
If the bench will sit indoors, standard furniture paint and a protective clear coat should be fine. If it will be used on a covered porch, use exterior paint or an outdoor-rated sealer.
Let the paint cure properly before using the bench. Dry to the touch is not always the same as fully cured, and nobody wants cushion fabric stuck to tacky paint. Ask me how I know.
Step 12: Add A Cushion And Style The Bench
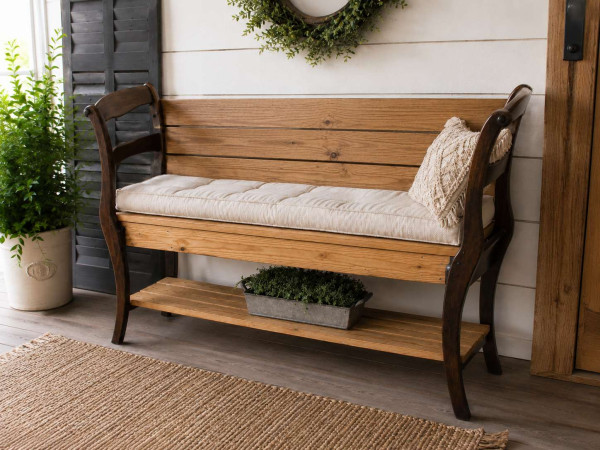
Once the bench is fully dry, add a cushion if you want a softer seat. A long bench cushion, outdoor chair pad, or handmade box cushion can all work, depending on your finished size.
For an indoor bench, try linen, ticking stripe, canvas, cotton, drop cloth, or even a pretty vintage-style floral fabric. For a porch bench, outdoor fabric is the more sensible option.
Add one or two pillows, a basket underneath, a folded quilt, or a small planter on the lower shelf. Keep the styling simple so the shape of the old chairs and the handmade plank construction still shine.
This recycled chair bench works beautifully:
Beside the front door
On a covered porch
In a hallway
At the end of a bed
In a mudroom
Under a window
In a craft room
In a garden room
Beginner Mistakes To Avoid
Do not make the bench too long without adding centre supports. Long planks can sag over time.
Do not skip pilot holes. Old chair wood can split easily.
Do not rely on glue alone. Use screws for strength.
Do not paint over dust, grease, or glossy varnish. Clean and sand first.
Do not use rotten or unsafe chairs. Pretty details are not worth a collapsing bench.
Do not forget to seal the finish, especially if the bench will be used near a doorway, porch, or mudroom.
Do not rush the drying time. Paint and sealer need time to cure.
Easy Variations
Paint the chair ends white and stain the planks for a farmhouse finish.
Use black paint and a neutral cushion for a more modern look.
Paint the bench sage green and add floral pillows for cottage charm.
Add hooks underneath for bags, hats, or dog leads.
Use beadboard instead of back planks for a cottage-style backrest.
Add baskets underneath for shoes or garden supplies.
Stencil a small design on the lower shelf instead of the back.
Make a shorter version for a child’s room or playroom.
Use outdoor fabric and sealer for a covered porch bench.
Why This Upcycled Chair Bench Is Worth Making
This DIY bench from two old chairs is one of those projects that feels extra satisfying because it takes something unwanted and turns it into something useful again.
You keep the character of the old chairs, add strength with a new timber frame, and create a practical bench that can be styled in so many ways. It is budget-friendly, customisable, and just rustic enough to forgive a few imperfect cuts or old-chair quirks.
And really, that is the joy of recycled furniture. It does not need to look like it came from a showroom. It needs to look like it has a story.
So next time you see two old wooden chairs at a garage sale, thrift store, or lurking in the back of the shed, don’t walk past too quickly. They might just be your next DIY bench.