Plastic waste is a growing concern in today’s world. The accumulation of non-biodegradable plastic waste in landfills and oceans has a negative impact on the environment. To help reduce this waste, recycling is an excellent option. By reusing plastic, we can prevent it from polluting the environment and conserve natural resources. One creative way to reuse plastic bottles is by creating a footstool. In this article, we’ll provide a step-by-step guide on how to make a recycled plastic bottle footstool.
Materials needed:
Plastic bottles (size and amount will depend on the desired size of the footstool)
Sticky tape
Cushion (foam or pre-made cushion)
Fabric
Sewing machine
Scissors
Measuring tape
Step 1: Gather the plastic bottles
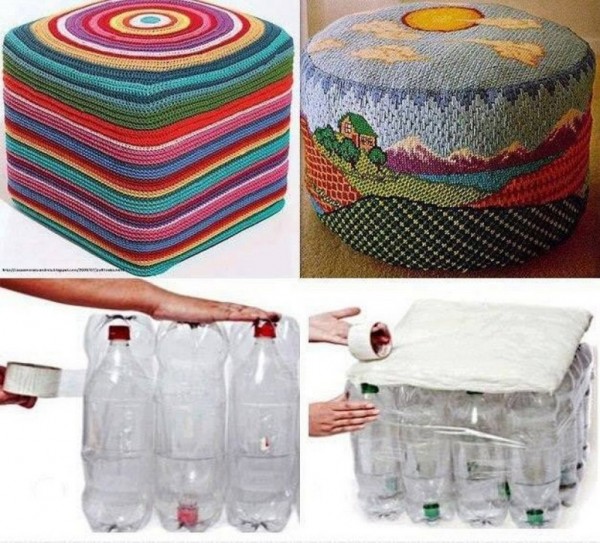
The first step is to gather plastic bottles. The size and amount of bottles required will depend on the desired size of the footstool. To make a footstool, we’ll need to make a solid base by taping the bottles together. It’s important to ensure that the bottles are of similar size, so the base is level. It’s recommended to use transparent bottles so that you can see the level of the base as you’re taping the bottles together.
Step 2: Tape the bottles together
Once you have the required number of bottles, the next step is to tape them together to create a solid base. Arrange the bottles in a circular or rectangular shape, depending on the desired shape of the footstool. Once the bottles are arranged, use sticky tape to join them together. It’s important to make sure that the bottles are securely taped together, so the base is stable.
Step 3: Create a cushion
The next step is to create a cushion for the footstool. You can either purchase a pre-made cushion or create your own. If you choose to create your cushion, you’ll need foam or another soft material to provide padding. Measure the top of the plastic bottle base and cut the foam or material to size.
Step 4: Cut the fabric
To create a cover for the footstool, you’ll need to cut the fabric. Measure the circumference of the bottle base and the height of the cushion. Add two inches to the height and add one inch to the circumference. This will allow for seam allowances. Cut a piece of fabric to these measurements.
Step 5: Sew the cover
The next step is to sew the fabric cover for the footstool. Place the fabric on a flat surface, right side down. Place the cushion on top of the fabric, in the center. Bring the edges of the fabric up and around the cushion, tucking the edges under the cushion. Pin the fabric in place and sew around the edge, leaving a small opening.
Step 6: Attach the cover
Once the fabric cover is sewn, the next step is to attach it to the bottle base. Turn the cover right side out and place it over the bottle base. The cover should fit snugly over the base, with the cushion on top. Use tape to secure the edges of the cover to the bottle base.
Step 7: Finish the footstool
The final step is to finish the footstool. To ensure that the cover stays in place, you can add a drawstring to the cover. Cut a piece of fabric to the circumference of the bottle base and sew it into a tube. Thread a drawstring through the tube and tie it at the top. Place the tube over the edge of the cover and tape it in place. This will hold the cover securely on the bottle base.
Love working with recycled items? Check out this amazing recycled Crafts book.


how many bottles do you use for the square one and how many for the round one since on this one there is no picture. Also in the pic for the square one it looks like the bottle that is turned upside down the top has been pushed inside of the bottle.
It looks like the ends have been cut from each bottle then inserted opposite ends into each bottle to increase the strength.
A little more info on How To would be great!!
The picture does not explain all! How about a step by step guide please, this is not a “how to”
I understand the picture. Even a kindergartener can figure this out! Thanks!
I am a complete novice when it comes to DIY. I have just discovered how fun, enjoyable and creative it can be. That being said the pictures are definitely not self explanatory, it would be so great to have a few more step by step instructions included. Dimensions for the square one well as how to assemble the round one. This looks like it could be a great DIY with just a little bit more put in to it.
I’m wondering if each complete bottle has the bottom part of another bottle that was cut off and put over the top of the first one? Then taped or glued in place so it doesn’t slip off? I don’t know, but it sounds like that would work to me. Any thoughts?
Is it filled with water or something, or is it empty ??? I think it will be better that is filled with something , if not sand than at least water….if not it fly away…? Or ?