If you want a Halloween decoration that looks wonderfully spooky without requiring expensive supplies, this DIY packing tape ghost is one of those projects that makes people stop and ask, “How did you make that?”
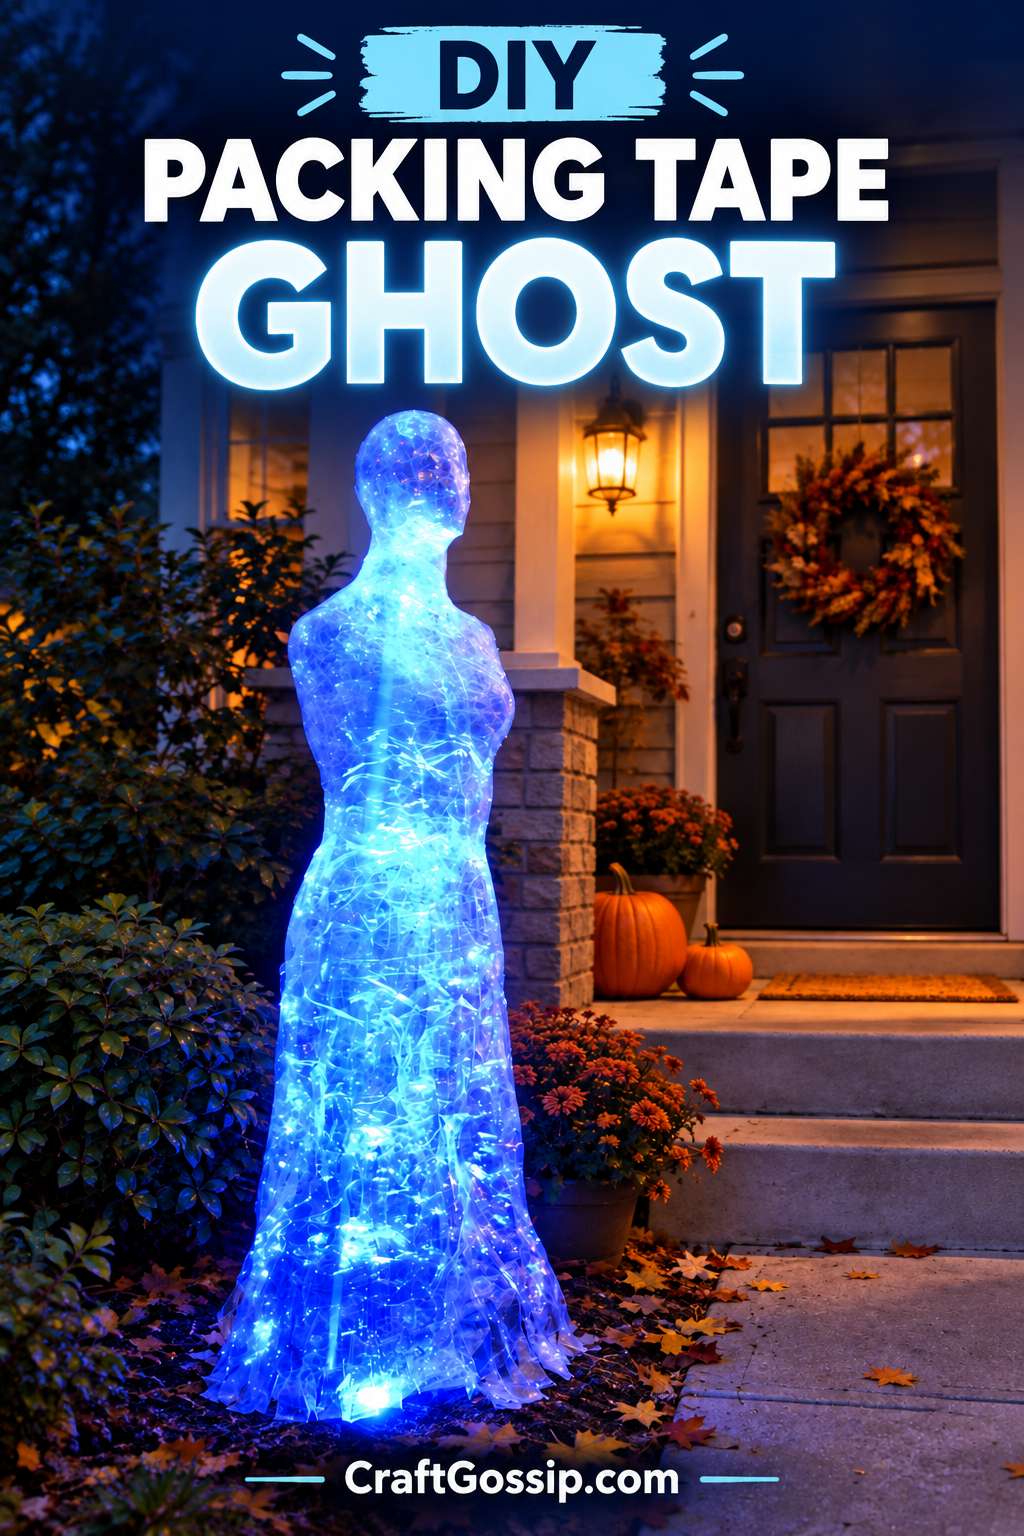
The finished ghost is transparent, lightweight and almost invisible in daylight. Once evening arrives, however, it catches the light and takes on a wonderfully eerie floating appearance. Place a battery-operated light inside and it becomes even more ghostly.
Packing tape ghosts are made by wrapping a human-shaped form with plastic wrap and layers of clear packing tape. The shell is then carefully cut away, removed from the form and taped back together. It sounds slightly odd, because it is, but that is half the fun.
For safety, I recommend using a dressmaker’s mannequin, shop mannequin or homemade body form rather than wrapping a person. You can still create arms, a head and plenty of personality using simple recycled household objects.
Supplies
You will need:
- A dress form, mannequin or homemade body shape
- Several rolls of clear packing tape
- Plastic food wrap
- Scissors with rounded tips
- Empty plastic bottles, cardboard tubes or pool noodles for the arms
- A balloon, foam wig head or lightweight ball for the head
- Clear fishing line for hanging
- Battery-operated LED fairy lights, optional
- Removable hooks, garden stakes or other display supports
- Black paper or removable vinyl for facial features, optional
You can find clear packing tape and battery-operated LED lights on Amazon if you do not already have them hiding in the stationery cupboard.
Never place candles, incandescent bulbs or any heat-producing light inside the finished ghost. Packing tape and plastic wrap should only be used with cool battery-operated LED lights.
Make a Safe Ghost-Shaped Form
Begin by creating the shape that will become your ghost.
A dressmaker’s mannequin is ideal because it already provides a torso and shoulders. You can form arms with cardboard mailing tubes, empty plastic bottles or sections of pool noodle. Secure these temporarily to the mannequin before wrapping.
For the head, attach a balloon, foam wig head or lightweight ball above the torso. Tilt it slightly to one side if you want your ghost to look curious rather than menacing.
Do not worry if the proportions are not perfect. Once the ghost is suspended in a dark corner, slightly wonky shoulders will look atmospheric rather than accidental. Halloween is very forgiving like that.
If you do not own a mannequin, stuff an old long-sleeved shirt with crumpled newspaper, recycled plastic bags or clean packaging material. Place the stuffed shirt over the back of a sturdy chair and add a balloon for the head.
Cover the Form With Plastic Wrap
Cover the entire shape with plastic food wrap before adding tape.
The plastic wrap creates a barrier between the form and the sticky tape, making the finished shell much easier to remove. Overlap the wrap as you work, but avoid pulling it so tightly that it changes the shape of the form.
Cover the torso, shoulders, arms and head separately if that makes the project easier to manage. The individual sections can be joined with more packing tape later.
Add the First Layer of Packing Tape
Wrap clear packing tape over the plastic wrap with the sticky side facing out.
This first layer prevents the tape from permanently sticking to the plastic wrap and makes the shell easier to separate from the form.
Use short pieces around detailed areas such as the face, neck and hands. Longer strips work well across the torso and arms.
Press the tape gently into the contours of the form, but do not squash or distort it.
Strengthen the Ghost
Add another two or three layers of packing tape, this time with the sticky side facing inward against the previous layer.
Change the direction of the tape as you work. Place some strips horizontally, some vertically and others diagonally. This crisscrossed construction creates a much stronger shell than wrapping repeatedly in one direction.
Three or four total layers are usually enough for a hanging indoor ghost. Add another layer around the shoulders, neck and hanging points if the ghost will be displayed outdoors.
You do not need to make every section perfectly smooth. Wrinkles and overlapping tape catch the light and give the finished decoration more character.
Remove the Packing Tape Shell
Once the shell feels firm, decide where you will make the removal cuts.
For the torso, carefully cut a straight line down the back. Cut along the underside of each arm if those sections need to be removed separately. A head form can usually be released with a cut up the back.
Use rounded scissors and keep the lower blade angled away from the mannequin or form.
Gently open the cut edges and lift the packing tape shell away. Take your time around narrow areas such as wrists and the neck.
Once each section has been removed, bring the cut edges back together and seal them with fresh strips of clear packing tape.
Join the head and arms to the torso with additional tape. Reinforce each connection from several directions so that the pieces remain secure when the ghost is suspended.
Create a Floating Lower Body
You can leave the ghost as a floating torso or add a trailing lower section.
To make a longer ghost, form loose panels from layers of plastic wrap and packing tape. Shape the lower edge into uneven points, curls or wispy strips before attaching the panels around the bottom of the torso.
Another option is to attach strips of translucent recycled plastic packaging. Keep these short and well clear of pathways, pets and garden plants.
If you prefer sweet Halloween decorations to genuinely spooky ones, take a look at these thrifted quilt ghost decorations. They are a lovely way to turn damaged vintage bedding into a softer, farmhouse-style ghost display.
Add Lights to the Ghost
Thread a short strand of cool battery-operated LED fairy lights inside the packing tape shell.
Position a few lights inside the head and upper torso, then secure the battery pack somewhere accessible. A small piece of removable tape inside the lower back works well.
Choose cool white lights for a classic spectral glow, purple lights for a theatrical Halloween display or warm white lights for a softer porch decoration.
Do not completely seal the battery pack inside the sculpture. You will need to reach the switch and change the batteries.
Hang and Display Your Packing Tape Ghost
Tie clear fishing line around reinforced sections at both shoulders. Add a third line at the top of the head if you need more control over the position.
Hang the ghost from a secure ceiling hook, porch beam, sturdy tree branch or shepherd’s hook. Using more than one suspension point helps prevent it from spinning every time there is a breeze.
A packing tape ghost looks especially effective:
- Floating above a porch
- Sitting at the top of a staircase
- Hovering beside a front window
- Suspended among bare tree branches
- Grouped with two or three smaller ghosts
- Lit from below with a battery-operated spotlight
- Reaching toward a Halloween candy table
For another lightweight hanging decoration, these DIY floating Halloween ghosts use balloons and fabric to create a completely different ghostly effect.
You could also arrange your ghost beside a DIY textured ghost candy box to create a coordinated porch display without spending a small fortune at the Halloween shop.
Make a Mini Packing Tape Ghost
You do not need to build a full-size ghost to try this technique.
Wrap a doll, action figure, small bottle or handmade foil form with plastic wrap and clear tape. After removing the shell, suspend the miniature ghost inside a glass cloche, from a branch or over a Halloween village.
Mini ghosts are quicker to make and use considerably less tape, which is handy if you are testing the technique for the first time.
For a simple recycled Halloween craft to make with children, try these toilet paper roll ghosts instead. Children can help design and decorate a tape ghost, but an adult should handle the cutting and assembly.
Packing Tape Ghost Safety Tips
- Use a mannequin or homemade form whenever possible.
- Never tightly wrap tape or plastic around a person’s head, neck or chest.
- Adults should handle all cutting.
- Use only cool battery-operated LED lights.
- Keep the ghost away from candles, heaters and open flames.
- Reinforce every hanging point with several layers of tape.
- Keep fishing line and trailing plastic away from young children and pets.
- Bring the ghost indoors during strong wind or heavy rain.
- Hang it where it cannot drift across steps or walking paths.
The finished ghost is wonderfully lightweight, so even a gentle movement of air can make it appear to float. During the day it looks like a clever clear sculpture, but once the sun goes down and those tiny lights begin to glow, it becomes a genuinely impressive handmade Halloween decoration.
And considering it started life as plastic wrap, packing tape and a few bits rescued from the recycling pile, that is a rather good Halloween transformation.
. Pop on over to the blog Crafty Geeks to read her tutorial on how to make a clear packing tape Halloween ghost. This technique could be used for all sorts of shapes I bet. I bet a star or Christmas tree would be cool for the winter holidays.