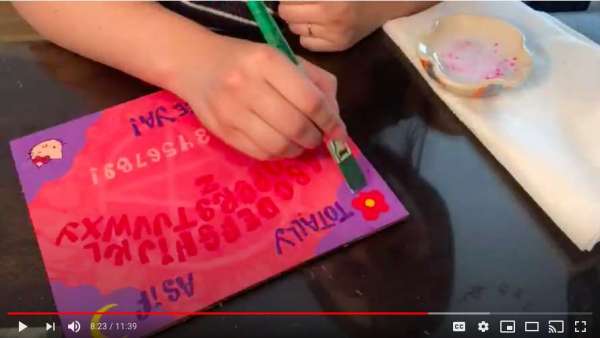
Can I just say how much I love this young Youtuber Rebecca? She has created a fun how-to video that includes all the best elements of you want in your tutorial videos. She is fun and entertaining, she does awesome editing and she talks about how she did her project and the materials she uses. But most of all she has created a project I have never seen before in all my years of creating and writing about crafting! Winning! She created a video on how to make a Hello Kitty themed Ouija board! Yes, you read correctly! Now she “winged” a lot of it and I think that is one of the best parts of this project to show how easy it is. I highly recommend popping over to her Youtube channel to be entertained and educated on how to make a custom Ouija board for maybe this Halloween? Please show her some love and “like” her video. One final note- I should also say I love when a craft combines two unexpected things!!
Comments
Have you read?
DIY Kids Craft Project – Upcycled Cardboard Box Sandcastle
Looking for a creative way to keep the kids entertained this summer without spending a fortune? Turn your trash into treasure with this fun Recycled Sandcastle Craft Project! Using cardboard boxes, plastic lids, glue, and a bit of imagination, kids can build their very own sandcastle kingdom – no beach required!
What You’ll Need:
Cardboard boxes (cereal, tissue, shipping boxes – any size)
Toilet paper rolls or paper towel tubes
Plastic lids (yogurt containers, jar tops, etc.)
Paper or plastic straws, twigs, or sticks
Scrap plastic, paper, or fabric for flags
Craft glue or a hot glue gun (with adult supervision)
Scissors
Sand or beige paint (optional for decoration)
Markers, stickers, or leftover craft supplies to decorate
Step-by-Step Instructions:
Step 1: Gather and Prep Your Recyclables
Head to your recycling bin and pull out clean items that could work as castle parts—boxes for walls, tubes for towers, and lids for turrets. Cut down the boxes into smaller sections if needed, and make sure everything is dry and ready to work with.
Step 2: Plan Your Castle Layout
Before gluing anything down, lay out your castle design on a flat surface. Decide where the towers, walls, and “gate” will go. You can make it symmetrical, or go wild with a quirky kingdom layout!
Step 3: Glue the Main Structure Together
Use craft glue (or hot glue if you’re working with older kids or want faster drying). Start attaching the boxes and tubes together to form the base of your sandcastle. Stack tubes on top of boxes to create turrets. Use plastic lids as domes or roof tops.
Step 4: Add Decorative Elements
This is where the fun begins! Use:
Bottle caps as windows or shields
Buttons as faux stones
Cutout shapes from scrap cardboard for castle doors or battlements (those square-topped castle walls!) Get creative with what you’ve got – there’s no wrong way to build your dream castle.
Step 5: Make and Add Flags
Cut small triangles or flags from scrap plastic, fabric, or colored paper. Tape or glue these to the tops of straws, sticks, or twigs. Then, glue them onto the tops of towers or castle corners. You can even personalize each flag with a coat of arms or your child’s initials!
Step 6: Add the “Sand” Effect (Optional)
For an authentic look, brush glue over the castle and sprinkle it with craft sand. No sand on hand? Use beige paint, or mix some flour with a pinch of cinnamon for a sandy texture.
Step 7: Let it Dry and Display!
Let everything dry completely—especially if you’ve used a lot of glue. Then proudly display your recycled sandcastle on a shelf, or use it as part of imaginative play time.
Bonus Ideas:
Build a whole sandcastle village and connect them with paper bridges.
Make tiny “people” out of clothespins or paper scraps.
Add fairy lights inside for a magical castle glow at night.
This project is a fantastic way to keep little hands busy and teach kids the value of reusing materials. Plus, it’s just plain fun! Whether you’re doing this at home, in a classroom, or at a summer camp, your recycled sandcastles are sure to be a hit.
I’m sorry but ouija boards aren’t something to mess around with.