• Home
  • Suggest A Craft
  • DIY Newsletter

Recycled Crafts

Creative DIY Projects That Turn Trash Into Treasure

  • About CraftGossip
  • Our Network
    • Bath & Body Crafts
    • Candle Making Ideas
    • Crochet Ideas
    • Cross Stitch
    • Edible Crafts
    • Felting Patterns
    • Glass Art
    • Home & Garden Ideas
    • Indie Crafts
    • Jewelry Making
    • Kids Crafts
    • Knitting Patterns
    • Lesson Plans
    • Needlework
    • Party Ideas
    • Polymer Clay
    • Quilting Ideas
    • Recycled Crafts
    • Scrapbooking
    • Sewing Patterns
    • Card Making
    • DIY Weddings
    • Not Craft Ideas
  • Giveaways
  • Roundups
  • Store
  • Search

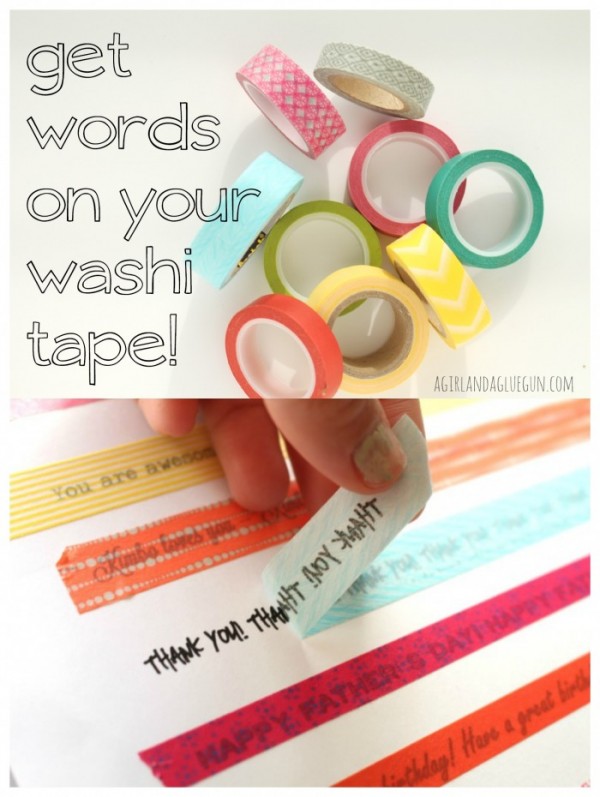
How to get words on Washi tape

February 26, 2015 by Stefanie Girard

get-words-on-your-washi-tape

Washi tape is a versatile crafting material that can be used to add color, pattern, and texture to a variety of projects. It’s easy to tear, reposition, and remove, which makes it perfect for adding decorative accents to your home decor, scrapbook pages, and other craft projects. But have you ever wanted to add words to your washi tape to create a custom design or message? If so, there’s a simple technique you can use to get words on (or under) your washi tape.

The process involves using a printer, a sheet of clear label paper, and your favorite word processing software or online design tool. First, create your design in your preferred software or tool, and then print it onto the clear label paper. Next, cut out your design and apply it to your washi tape. You can choose to place the label on top of the tape or underneath it, depending on the look you’re going for.

By using this technique, you can create custom washi tape that features your favorite quotes, words, type, and fonts. You can use it to create custom labels for jars, cans, or containers, decorate cards, or add an extra special touch to scrapbook pages. The possibilities are endless!

If you’re interested in learning more about how to get words on your washi tape, be sure to check out the blog A Girl and A Glue Gun. With this simple technique, you can take your washi tape projects to the next level and add a personalized touch to all of your crafts.

Pop on over to the blog A Girl and A Glue Gun to see how to get words on washi tape. I will be using this technique for sure!

Looking for more fonts? Check these out at Fontbundles.com

Looking for fun washi tape for your next project? Check these out on Amazon
 

Related Posts:

  • Your pasta machine is good for more than pasta or…
  • The nuts and bolts of printing with nuts and bolts
«
»

Have you read?

Turn Dollar Store Finds into Stunning Vintage Decor with This Easy DIY Milk Glass Hack!

If you’ve ever swooned over the elegant, timeless look of vintage milk glass—but not the antique store price tag—then this DIY trick is about to blow your mind. With just a few simple supplies and a little spray paint magic, you can transform ordinary glassware into beautiful, faux milk glass pieces that look like they’ve been passed down through generations.

This easy milk glass DIY is perfect for budget-conscious decorators, thrift store treasure hunters, and anyone looking to add a touch of farmhouse charm or vintage flair to their home. Think classic vases, fruit bowls, pitchers, candle holders—the possibilities are endless.

The secret? Glossy white spray paint. That’s it. The trick is in the prep work: make sure your glass is clean and smooth, then apply light, even coats for that flawless porcelain finish. It’s an affordable, satisfying weekend project that delivers big impact with very little effort.

Perfect for weddings, holiday centerpieces, or just giving your shelfie game a serious upgrade, this DIY milk glass technique proves that high-end style doesn’t have to come with a high-end price.

So next time you’re strolling the aisles of the dollar store or eyeing those dusty dishes in your cabinet, remember: with a little creativity, you’re just a spray can away from turning them into timeless vintage-style decor.

7 Things to Make With an Old Window Shutter

6 Upcycled DIY Patio Furniture Tutorials

Explore

books Christmas CraftGossip Giveaways Craft Inspirations Easter glass halloween Home Decor kid crafts mason jar More Crafts Patterns & Tutorials recycled art Recycled Clothing Recycled Jewelry Recycled Sewing Recycled Tutorials Recycling Ideas Recycling Organizing tin can

RSS More Articles

  • Etsy Spotlight: Whole Store Bundle – Sewing Patterns
  • 19 FREE Camping SVG Cut Files and Printables
  • Turn Dollar Store Finds into Stunning Vintage Decor with This Easy DIY Milk Glass Hack!
  • A Flower Bouquet Quilt Along
  • Hamsadhwani Sari Crop Top Crochet Pattern
  • Geometric Lion Wall Art
  • Designer Spotlight: Bad Stitched
  • 2 Hour Baby Blanket – Free Crochet Pattern
  • Brighten Your Day with the On Point Pillow: A Sunny Mini Charm Project
  • Perimenopause Calm Down Coloring Sheets (For When You Want to Scream into a Pillow)

Copyright © 2025 · CraftGossip | Start Here | Contact Us | Link to Us | Your Editors | Privacy and affiliate policy