• Home
  • Suggest A Craft
  • DIY Newsletter

Recycled Crafts

Creative DIY Projects That Turn Trash Into Treasure

  • About CraftGossip
  • Our Network
    • Bath & Body Crafts
    • Candle Making Ideas
    • Crochet Ideas
    • Cross Stitch
    • Edible Crafts
    • Felting Patterns
    • Glass Art
    • Home & Garden Ideas
    • Indie Crafts
    • Jewelry Making
    • Kids Crafts
    • Knitting Patterns
    • Lesson Plans
    • Needlework
    • Party Ideas
    • Polymer Clay
    • Quilting Ideas
    • Recycled Crafts
    • Scrapbooking
    • Sewing Patterns
    • Card Making
    • DIY Weddings
    • Not Craft Ideas
  • Giveaways
  • Roundups
  • Store
  • Search

How to Transfer an Image using a technique with acrylic paint

January 23, 2019 by Stefanie Girard

Image transfer techniques can be used to transfer an image from one surface to another, and they can be a fun and creative way to add a personal touch to your projects. One image transfer technique that is similar to silk screening is image transfer with acrylic paint.  

Here are some more detailed instructions to help guide you.

To do this, you’ll need a printed image, some acrylic paint, and a surface to transfer the image onto (such as canvas, wood, or paper). You’ll also need a brayer or roller to apply the paint and a scraper or credit card to smooth out the paint and remove any excess.

Here’s a general outline of the process:

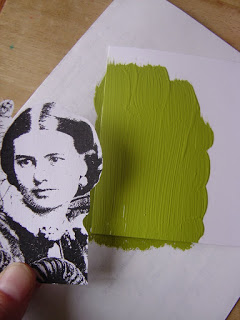
Apply a thin layer of acrylic paint onto a surface, card stock, wood etc.  This will form the background for your image, If you are using a black and white photo then the white paper will remove and reveal the background, leaving behind the black image. 

Next place the image onto the paint. Image side up. 

Allow the paint and image to dry completely.

Once the paint is dry, gently peel the surface away from the image. The image should now be transferred to the surface.

This image transfer technique is similar to silk screening in that it involves applying paint to an image and then transferring the image onto another surface. However, unlike silk screening, this technique can be done with just a few basic supplies and does not require a special screen or press.

You can see the original tutorial here with lots of photos to guide you: tutorial on image transfer with acrylic paint.

I bet you could make a cool set in all different colors of paint with the same image and it would look like an Andy Warhol.

If you are also looking for Andy Warhol resources, then check these Andy Warhol books out.

Related Posts:

  • Your pasta machine is good for more than pasta or…
  • 45 amazing ways to reuse and recycle old playing cards
«
»

Have you read?

Floppy Disk Crafts: Clever Ways to Upcycle Retro Tech

Floppy disk recycled crafts title

Remember floppy disks? Those square little tech relics that used to hold our precious documents and school assignments? If you’ve got a stash of them hiding in the back of a drawer—or you stumble across some at a thrift store—don’t toss them just yet. Floppy disks are surprisingly perfect for upcycled crafting, and these ideas will have you looking at old tech in a totally new way.

One of the most popular ways to breathe new life into these retro icons is by turning them into DIY wall clocks. Whether you keep it simple with one floppy as the clock face or build a larger wall piece using multiple disks, the result is a geeky, functional work of art. Check out the step-by-step guide on Instructables for building your own floppy disk wall clock—it’s a timeless craft, literally!

Want to carry your nostalgia with you? Then you’ll love the floppy disk purse or bag ideas. These functional fashion statements are made entirely from joined-up disks, forming a sturdy and super unique bag. There are tutorials on how to make a full shoulder bag, a clutch, and even a pencil case using nothing but zip ties and some creativity.

Need a conversation-starting piece of décor? A floppy disk chandelier might be just the thing. It’s bold, futuristic, and a brilliant way to show off your upcycling skills. Alternatively, you can go green and make a floppy disk planter—perfect for succulents or desk plants. Just pop out the disk’s center, line it with plastic, and add soil. It’s easy, stylish, and great for small-space gardening.

Looking for quick, crafty projects? Try turning a floppy into a notepad, a photo frame, or a cutlery holder. These smaller projects make great DIY gifts, and they’re perfect for crafters who want instant gratification. You can even make Christmas bows or flowers out of old disks for a fun and shiny holiday twist.

For those who love organizing their craft supplies or electronics, floppy disks can be transformed into component organizers or bill caddies. With a little hot glue and imagination, they make excellent mini shelving units and storage boxes.

Feeling ambitious? Dive into the more elaborate builds like a laptop desk, a lampshade, or even a quirky birdhouse made entirely from floppy disks. These projects take upcycling to the next level and are sure to impress anyone who sees them.

Make a Floppy Disk Wall Clock : 9 Steps – Instructables

Floppy Disk Bag : 12 Steps (with Pictures) – Instructables

Geeky Floppy Note Pad — CraftBits.com

Floppy Disk Chandelier : 8 Steps (with Pictures) – Instructables

DIY Floppy Disk Planters – Brit + Co /

Floppy Disk Planter  

Floppy Disk Art

How to Turn Old Floppy Disks Into Bracelets, Necklaces, or Belts – Instructables 

Upcycled Component Organizer – Make:

Floppy disk photo frame

Wall Clock 

DIY Floppy Disk Planter

Floppy Disk Art | Euromaxx

Bird house 

Cutlery Holder

Floppy Disks Into Pencil Cases • Recyclart 

Floppy Disk Bill Caddy : 3 Steps – Instructables

Make a Floppy Disk Wall Clock : 9 Steps – Instructables 

Floppy Disk Laptop Desk/Stand – Instructables

Disk Combobulation 

Floppy Disk Succulent Planter : 3 Steps (with Pictures) – Instructables 

Floppy Disk Lampshade (with Pictures) – Instructables

Recycled Flowers From DVDs, CDs, and Floppy Disks

USB Flash Diskette : 7 Steps (with Pictures) –

Christmas Bow / Flower From Floppy Disks : 7 Steps (with Pictures) 

Notebook From Old Floppy Disks : 9 Steps (with Pictures)

And of course, there’s wearable tech too. You can cut up and reshape floppy disks into bracelets, necklaces, or belts that scream ’80s nostalgia. It’s retro-futurism at its finest.

Let’s not forget about combining media: recycled flowers and art pieces that use floppy disks, CDs, and DVDs together to create dazzling pieces with texture and shine. Whether you’re decorating your craft room or making a gallery-worthy art piece, these materials are a dream to experiment with.

So next time you come across a box of floppy disks, don’t see e-waste—see endless crafting possibilities. With just a few tools and a lot of imagination, you can turn outdated tech into something totally unique and totally you.

Explore

books Christmas CraftGossip Giveaways Craft Inspirations Easter glass halloween Home Decor kid crafts More Crafts Patterns & Tutorials recycled art Recycled Clothing Recycled Jewelry Recycled kids crafts Recycled Sewing Recycled Tutorials Recycling Ideas Recycling Organizing tin can

RSS More Articles

  • Floppy Disk Crafts: Clever Ways to Upcycle Retro Tech
  • Etsy Spotlight: Goose Baby Lovey PDF Pattern
  • Summer Accordion Mini Album
  • How to Make 3 NEW Pinwheel Quilts – Free Quilting Tutorial
  • Spray Paint Makeover Magic: How a Wicker Table (and My Chairs!) Got a New Life
  • DIY Grape Creatine Gummy Bears – Big, Bold and Packed with Power
  • Crochet Your Own Adorable Amigurumi Tiny Baymax – Free Pattern
  • Crow Cross Stitch Patterns
  • Free Crochet Pattern – Ingrid
  • How to Watercolor on Black Cardstock for a Floral Card

Copyright © 2025 · CraftGossip | Start Here | Contact Us | Link to Us | Your Editors | Privacy and affiliate policy