• Home
  • Suggest A DIY
  • DIY Newsletter

Recycled Crafts

Creative DIY Projects That Turn Trash Into Treasure

  • About CraftGossip
  • Our Network
    • Bath & Body Crafts
    • Candle Making Ideas
    • Crochet Ideas
    • Cross Stitch
    • Edible Crafts
    • Felting Patterns
    • Glass Art
    • Home & Garden Ideas
    • Indie Crafts
    • Jewelry Making
    • Kids Crafts
    • Knitting Patterns
    • Lesson Plans
    • Needlework
    • Party Ideas
    • Polymer Clay
    • Quilting Ideas
    • Recycled Crafts
    • Scrapbooking
    • Sewing Patterns
    • Card Making
    • DIY Weddings
    • Not Craft Ideas
  • Giveaways
  • Roundups
  • Store
  • Search

Giveaway- Washi Tape and how to make a recycled container mobile

February 16, 2016 by Stefanie Girard

Go Washi Tape

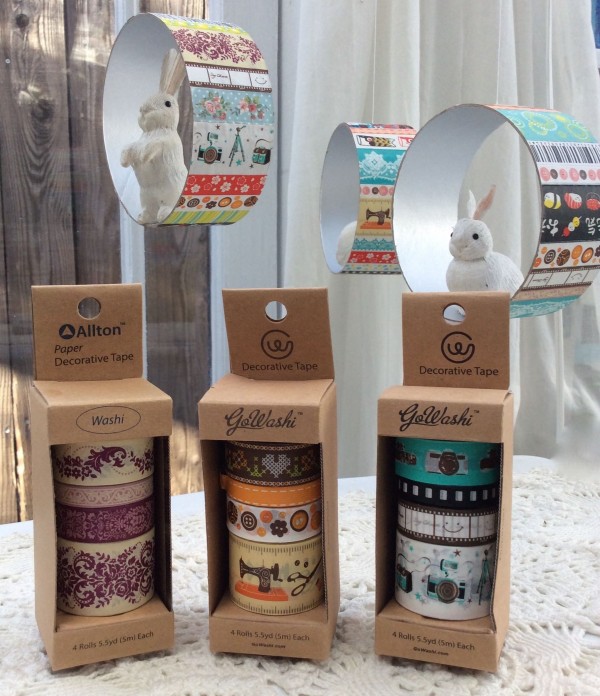
Giveaway- 3 Packages of GoWashi.com Washi Tape

Leave a comment in today’s post by Feb. 25, 2016 and you are entered to win:

1 Pack Victoria

1 Pack Sewing

1 Pack Photograph

of Designers Choice GoWashi tape.

Open to U. S. residents only please.

GoWashi tape recycled container mobile

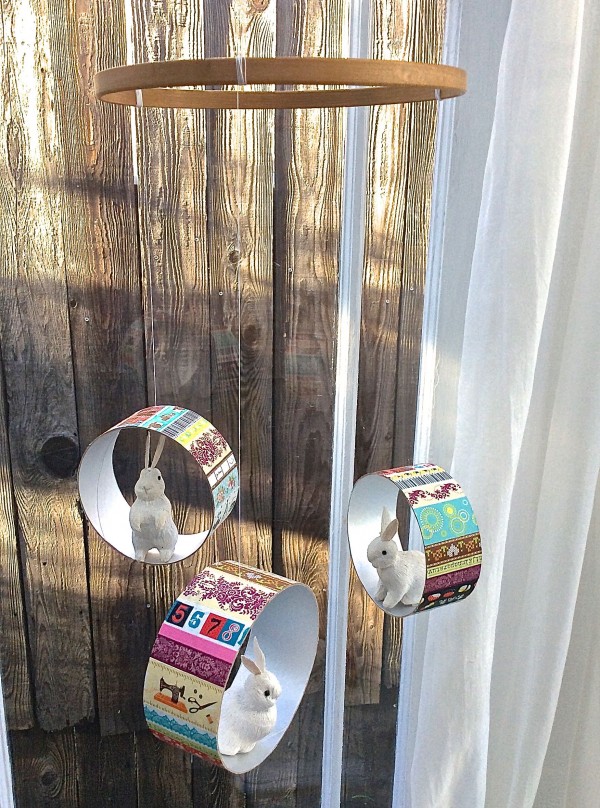
Using washi tape to cover recycled containers is a great way to transform them into stylish home decor items. That’s just what I’ve done to a cardboard container. Simply by slicing it up and covering with washi tape I have made a fun mobile perfect to display fun little figurines.

how to make a cylinder mobile

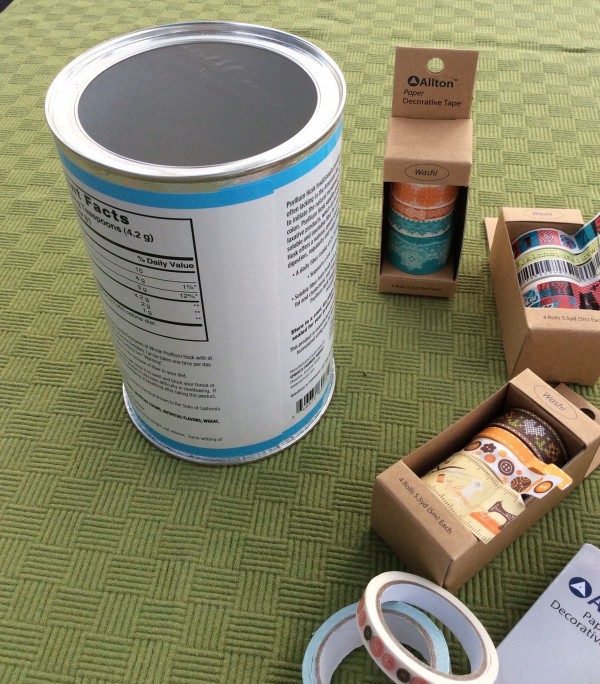
The first step is to slice the container into sections.

First I cut the metal part off the top.

how to cut a cardboard cylinder

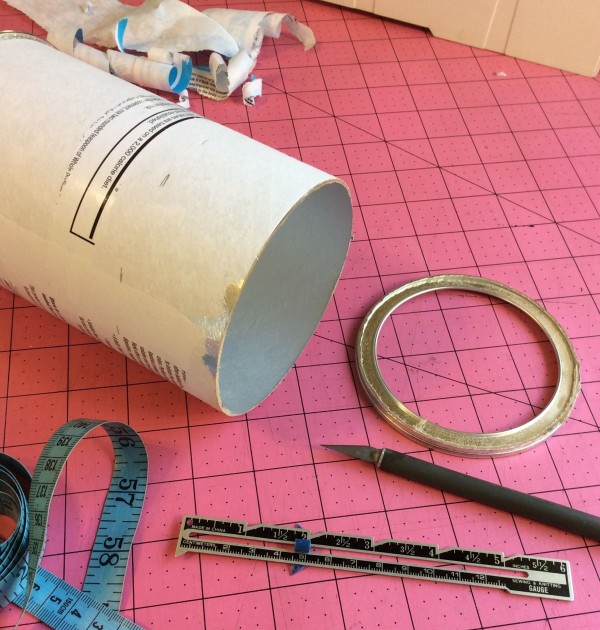
I used a seam gauge to mark 1 3/4 inch sections with a pencil.

how to cut a carboard container Dremel

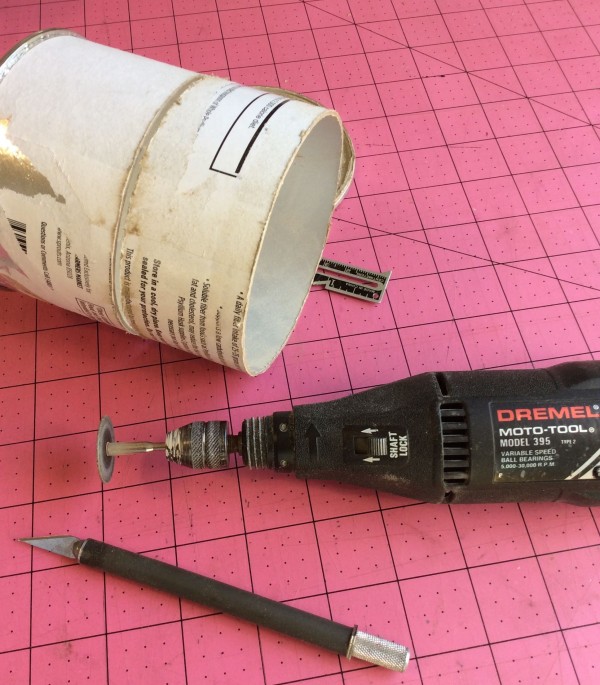
I used a combination of an X-Acto knife and a Dremel.

sand cardboard edge with nail file

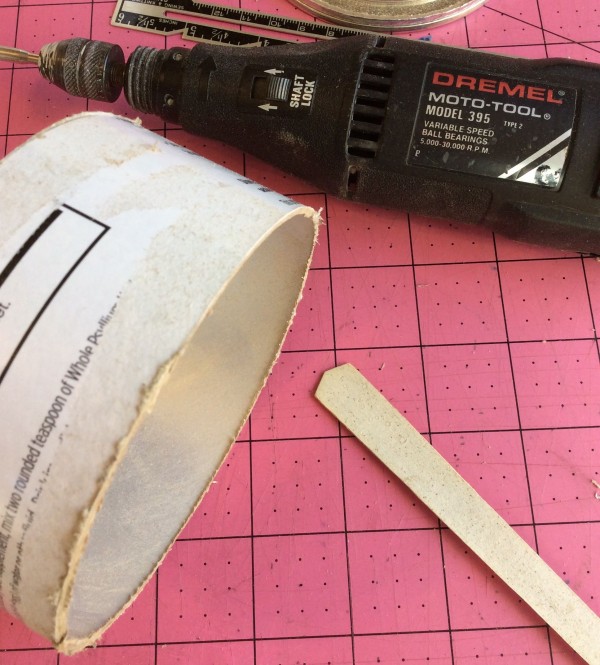
To make the edges smooth I used the high-tech tool, a nail file (emery board). I also pealed the paper label off as much as would come off easy and then sanded sown the rest with the emery board.

Alton Go washi tape mobile

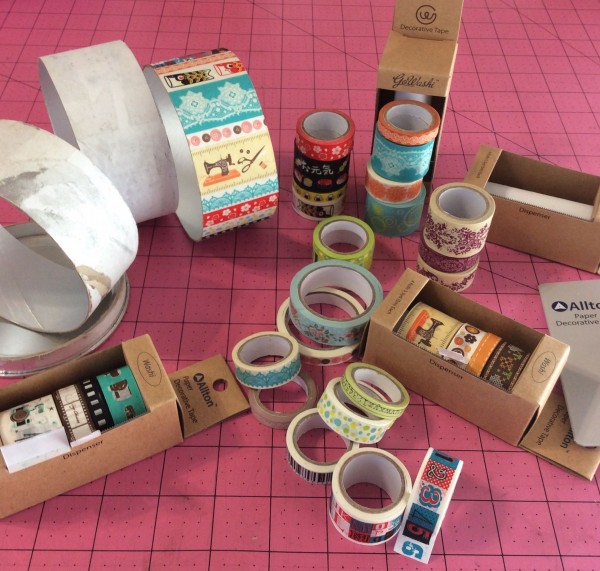
These packs of Washi tape from GoWashi come with cutting edge on the dispenser. How cool! You can see all the different packs and more washi tape projects at their site.

Go washi tape cutting tip

Cover each section with strips of washi tape. I like to cut the tape from the back side so the edge of the scissors is flush to the edge of the cardboard. This makes a perfect flush cut.

On the last piece of washi tape I put on the cylinder I slipped one end of button thread under it with a bit of white glue to secure.

Once the glue is dry tie the other end of the thread to an embroidery hoop and use a bit more thread to hang the hoop.

I plan on switching out what I display in the mobile. The variety of prints on the washi tape will allow me to mix up my decorations throughout the year.

Related Posts:

  • 40 Recycled Crafts For Adults That Turn Trash Into Treasure
  • How To Make A Wasp Nest Decoy Using Recycled Brown Cardboard
«
»

Comments

  1. Steph Anie says

    February 16, 2016 at 2:40 pm

    This is the cutest idea ever! I love it!

  2. scrapnsew says

    February 16, 2016 at 2:42 pm

    Absolutely adorable mobile! I love it and the gorgeous Washi tape. Thanks for chance to win. Good luck all!

  3. Amanda Hajja says

    February 16, 2016 at 2:44 pm

    Cool project and waaay cool washi tape! Washi tape is hard to find locally, so fingers crossed! XD

  4. Dennis Mullins Sr says

    February 16, 2016 at 2:56 pm

    I love using washi-tape, it easy touse and a lot fun colors and designs. I loke your idea thanks. Thank you for a chance to win.

  5. Karen says

    February 16, 2016 at 2:57 pm

    Oh, I love washi tape! This would be so much fun!

  6. gayle says

    February 16, 2016 at 3:14 pm

    These washi tape designs are incredible!

  7. ladysusanpdx says

    February 16, 2016 at 3:18 pm

    Really love this project and washi tape!
    Thank you for this giveaway. My fingers
    and toes are crossed…

  8. Samir Tahiri says

    February 16, 2016 at 3:36 pm

    Great crafting and love the washi tape

  9. Lola Bellouere says

    February 16, 2016 at 3:37 pm

    Love the washi tape and top project

  10. Marti Schoenwalder says

    February 16, 2016 at 3:40 pm

    I’ve never seen such uniquely patterned and pretty Washi tape! My mind is racing with ideas of how to develop some great crafts!

  11. Beth Oswitch says

    February 16, 2016 at 3:43 pm

    How fantastic! I would love to win this so I can do the same!

  12. Mary Angelini says

    February 16, 2016 at 3:47 pm

    Beautiful washi tape and beautiful project!!!

  13. faithnchls says

    February 16, 2016 at 4:03 pm

    What a cute mobile! Please enter me in your contest. Thanks!!

  14. Sandy Longan says

    February 16, 2016 at 4:16 pm

    I’ve never tried Washi Tape, but would love to explore the crafting possibilities.

  15. Lee says

    February 16, 2016 at 4:29 pm

    What a fun giveaway! My daughter and I love washi tape!

  16. Brenda says

    February 16, 2016 at 4:34 pm

    Would like to try Washi Tape. Looks like fun.

  17. aj says

    February 16, 2016 at 5:02 pm

    I LOVE playing with washi tapes! This is an adorable idea for a mobile. May have to do something along these lines for my cousin’s baby on the way.

  18. Theresa says

    February 16, 2016 at 5:19 pm

    Amazing all the colors and designs the tape comes in these days. So pretty!

  19. marla says

    February 16, 2016 at 5:26 pm

    love this idea….would be fun to do with my grandchild for her to use to display her little trinkets..

  20. Princess Jones says

    February 16, 2016 at 5:29 pm

    Thanks for the opportunity to win. Totally cute colors and adorable themes! Thanks for sharing the video.

  21. Jacqueline says

    February 16, 2016 at 5:54 pm

    I would love to try this tape I’ve never even seen it before maybe not in Ontario??

  22. Kathy johnson says

    February 16, 2016 at 6:04 pm

    These are great! I especially love the sewing motifs!

  23. Cindy S says

    February 16, 2016 at 6:21 pm

    I’ve been seeing about this tape for a long time, this would be a great way to try it.

  24. kate says

    February 16, 2016 at 6:24 pm

    Very fun, I the idea. Love the patterns

  25. Karla says

    February 16, 2016 at 6:24 pm

    Wonderful idea!!! This is one of the so many reasons I love washi tape… you can use it for everything!

  26. Laura Mustion says

    February 16, 2016 at 6:59 pm

    Very nice tape varieties. And cool idea for a craft project!

  27. Melinda says

    February 16, 2016 at 7:00 pm

    These are such lively looking sets…very nice tutorial as well. Great idea and giveaway.

  28. Sue Schrieber says

    February 16, 2016 at 7:05 pm

    Great idea. Love all the great inspiration I receive from you site. Please enter me in the contest. Thanks

    Sue Schrieber

  29. Laurie says

    February 16, 2016 at 7:10 pm

    Such a cute project, great idea!

  30. Shari J. says

    February 16, 2016 at 7:11 pm

    My granddaughters recently discovered that they can cover so many things with washi tape. They had a lot of fun making some ugly old bangle bracelets look new and “:modern”. They just “pop with color” using washi. The girls wear them to school and trade with their friends for the day or week. We plan on using a lot more of this in the future for their crafting projects. Thanks for the opportunity to win some great patterns we haven’t purchased yet.

  31. Clemencia says

    February 16, 2016 at 7:32 pm

    Those are awesome! thanks so much for the giveaway 🙂

  32. Judy Maniaci says

    February 16, 2016 at 7:45 pm

    Very cute project : )

  33. Cathy R says

    February 16, 2016 at 7:54 pm

    I love washi! I love using it in my scrapbooking as well as cardmaking.

  34. MARTHAIA says

    February 16, 2016 at 8:04 pm

    WoW !!!! What great things you can make from washi tape ,would enjoy making lots of great items.TY

  35. Duane says

    February 16, 2016 at 8:17 pm

    I would love to make some projects with the grandkids!

  36. Lee says

    February 16, 2016 at 8:34 pm

    What a great idea!

  37. Susan says

    February 16, 2016 at 8:39 pm

    Very cute…washi tape is the crafter’s friend.

  38. Sheri says

    February 16, 2016 at 9:10 pm

    Love this idea!!!

  39. Kathy H says

    February 16, 2016 at 9:35 pm

    Such an adorable project! I love using washi tape and am always looking for inspiration!! Thanks so much!!

  40. ella says

    February 16, 2016 at 10:03 pm

    Such a great use for washi tape. I always feel bad throwing containers like that into the recycling bin, because I KNOW I could do something with them I just don’t know what!

  41. Mich V. says

    February 16, 2016 at 10:08 pm

    Wow. Wow. Wow. I’ve never used washi tape before, but that looks awesome, I LOVE the sewing set! Thanks for sharing!

  42. Anne Servillo says

    February 17, 2016 at 12:11 am

    I think I have a washi tape addiction! Lovely designs!

  43. Sarah Oswald says

    February 17, 2016 at 12:15 am

    I love this mobile it is so adorable and I love that its recycled materials thanks for sharing the idea.

  44. Mary says

    February 17, 2016 at 12:50 am

    What a great idea! I have never used Washi Tape before, so many lovely colors and designs, I can’t wait to try it. Thanks much.

  45. Dianne VdC says

    February 17, 2016 at 1:50 am

    2 of my favorites! Bunnies and Washi tape. Hope I win!

  46. Denise Jordan says

    February 17, 2016 at 1:55 am

    I love the photographer’s tape. Just recently I heard about this tape

  47. Karen M says

    February 17, 2016 at 2:22 am

    I love the designs on the tape. I have never used it before, but am anxious to try it. Thanks for the contest.

  48. MelodyJ says

    February 17, 2016 at 4:25 am

    What a good idea. The prints on the tape are very nice.

  49. Meredith says

    February 17, 2016 at 6:53 am

    This is adorable! And the possibilities of what to display inside are endless!

  50. deb r says

    February 17, 2016 at 11:18 am

    fun contest with a great product. what a great product with so many uses. very pretty colors

« Older Comments
Newer Comments »

Have you read?

Vintage Doily Jar Lanterns: A Pretty Recycled Jar Craft For Weddings, Tables & Cozy Corners

Turn old glass jars, thrifted doilies, lace, burlap and twine into romantic DIY jar lanterns for weddings, table décor, porch styling and handmade gifts. A pretty recycled craft for adults using supplies you may already have.

There is something about an old doily that instantly makes a project feel soft, nostalgic and just a little bit romantic. Add a recycled glass jar, a scrap of burlap or lace, and a warm little candle glow, and suddenly you have the kind of handmade décor that looks like it belongs on a wedding table, a mantel, a porch step or a cozy sideboard.

These vintage doily jar lanterns are one of those lovely recycled crafts for adults that feel much fancier than they actually are. You can make them from empty pasta sauce jars, jam jars, mason jars, old candle jars or any clear glass container you’ve been saving because “it might come in handy one day.” And finally, yes, it has.

They are perfect for rustic weddings, bridal showers, Mother’s Day table settings, handmade gifts, Christmas displays, garden parties or quiet little corners that need a bit of glow. If you enjoy recycled crafts, you might also like browsing the Recycled Crafts section on CraftGossip for more upcycling ideas, or the Recycled Crafts category on CraftBits for practical projects using jars, tins, bottles and everyday household bits.

Why This Recycled Jar Craft Works So Well

The beauty of this project is in the contrast. Glass keeps it clean and simple, the doily adds delicate detail, and burlap or twine gives it that rustic handmade finish. It is a sweet little meeting point between vintage, farmhouse and shabby-chic décor.

This is also a very forgiving craft. Your jars do not need to match. Your doilies do not need to be perfect. In fact, slightly mismatched jars and thrifted doilies often look better together because they feel collected rather than mass-produced.

If you are making these for a wedding or party, you can create a whole table full of them without spending a fortune. If you are making one or two for home décor, it is a lovely way to use up a pretty doily that has been sitting in a drawer waiting for its moment.

And if you are anything like me, you probably already have at least three suitable jars hiding in the cupboard because they were “too nice to throw out.” This is their time to shine.

Supplies You Will Need

Clean recycled glass jars
Small vintage doilies, crochet doilies or lace pieces
Burlap ribbon, lace ribbon, torn fabric strips or twine
Craft adhesive spray or Mod Podge
Small buttons, charms or ribbon scraps
Battery-operated tealights
Scissors
A paintbrush, if using Mod Podge
Rubbing alcohol or vinegar for cleaning glass
Optional: jute string, pearl trim, dried flowers, tags or small fabric scraps

For supplies, I’d use what you already have first. This project is perfect for raiding the sewing basket, the linen cupboard and the “random trims I bought years ago” box. If you need basics, Amazon is useful for battery tealights, Mod Podge, twine, glue guns and craft adhesive spray. Etsy can be lovely for vintage doilies or lace bundles, but use it sparingly if you only need one or two pieces.

Choosing The Right Jars

Clear glass jars work best because they allow the light to glow through the doily pattern. Jam jars, pasta sauce jars, pickle jars, old candle jars and mason jars are all good choices.

Look for jars with straight or gently curved sides. Heavily ridged jars can make it harder for the doily to sit flat, although they can still work if you are using a smaller lace motif.

Remove all labels and sticky residue before you begin. Soak the jars in warm soapy water, then use a little oil, rubbing alcohol or adhesive remover if the label glue is being stubborn. Dry the jars completely before adding your doily.

A quick wipe with rubbing alcohol or vinegar helps remove fingerprints and oils from the glass, which gives your adhesive a better surface to grip.

Choosing Doilies And Lace

Vintage cotton doilies give the prettiest effect because the openwork pattern lets the candlelight shine through. Crochet doilies, small lace motifs, cut pieces from damaged lace tablecloths, or old lace curtain scraps can all work beautifully.

If your doily is too large for the jar, you can cut a section from it, especially if it is already damaged or stained. I know cutting into vintage linens can feel a bit naughty, but if the piece is otherwise unusable, turning it into something lovely is much better than leaving it in a drawer forever.

Paper doilies can work for a quick party version, but they do not have the same texture or softness as fabric or crochet doilies. They can also wrinkle more easily when glued.

For a softer romantic look, use white or cream doilies. For a rustic farmhouse look, pair cream doilies with burlap and jute twine. For weddings, choose lace and ribbon colours that match your theme.

How To Make Vintage Doily Jar Lanterns

Start by washing and drying your jars thoroughly. Make sure there is no grease, dust or label residue left on the glass.

Lay your doily flat and position the jar over it to decide where the design should sit. For most jars, placing the doily on one side works beautifully and keeps the lantern from looking too busy.

If using adhesive spray, place the doily face down on scrap paper or inside a cardboard box to catch overspray. Lightly spray the back of the doily, then carefully press it onto the jar. Smooth from the centre outward so the lace or crochet sits neatly against the glass.

If using Mod Podge, brush a thin layer onto the back of the doily or directly onto the jar. Press the doily in place, then gently smooth it down. You can brush a light layer over the top to seal it, but avoid overloading it or the doily may become too stiff and cloudy.

Let the jar dry completely before adding trims.

Wrap burlap ribbon, lace, torn fabric or twine around the neck of the jar. Tie it in a simple bow or knot. Add a small button, charm, tag or dried flower if you want a more finished look.

Place a battery-operated tealight inside the jar and watch the doily pattern glow.

Candle Safety Notes

For this project, I strongly recommend battery-operated tealights, especially if you are using burlap, twine, lace, dried flowers or any fabric trim near the top of the jar.

If you choose to use real candles, keep all fabric, twine and trims well away from the flame. Never leave lit candles unattended, and do not use real candles for outdoor events where wind could shift trims or decorations.

Battery candles are safer, reusable and much easier for weddings or parties because you can turn them on before guests arrive without worrying about wax, flames or little hands reaching across the table.

Pretty Variations To Try

For a wedding centerpiece, group three jars of different heights together on a wood slice or tray. Add greenery, baby’s breath, dried lavender or small scattered flowers around the base.

For a Christmas version, use cream lace, red ribbon, tiny pinecones and warm white battery lights.

For a coastal version, skip the burlap and add jute twine with a small shell charm. This would sit beautifully with other beachy upcycled pieces, especially if you like projects such as the DIY scallop shell and can organizer on CraftBits.

For a farmhouse table, use torn ticking fabric, jute twine and wooden buttons.

For a romantic Valentine’s Day version, add soft pink ribbon, a small heart charm or a tiny tag with a handwritten message. You could pair it with other handmade Valentine décor from the Valentine’s Day crafts collection on CraftBits.

For a garden party, use mismatched jars and hang them from shepherd hooks or place them along a path. Use battery lights only if hanging them outdoors.

How To Make Them Look More Expensive

The secret is restraint. I know, I know — the craft table says “add more ribbon,” but sometimes the jar just wants one good bow and a button.

Stick to two or three textures. For example: glass, lace and twine. Or glass, doily and satin ribbon. Too many trims can make the jar look cluttered.

Use matching candle colours. Warm white battery tealights look much better than harsh blue-white ones.

Trim loose threads neatly. Burlap can fray in a charming way, but there is a fine line between rustic and “dragged through the craft cupboard.”

Group jars in odd numbers. Three or five lanterns together usually look more styled than two or four.

Use height variation. Mix short jam jars with taller pasta sauce jars or mason jars for a more collected display.

Where To Use Doily Jar Lanterns

These recycled jar lanterns work beautifully as:

Wedding centerpieces
Bridal shower table décor
Mother’s Day gifts
Mantel decorations
Porch lanterns
Guest room nightstand décor
Christmas table accents
Rustic party decorations
Handmade hostess gifts
Craft stall items
Memorial table lights
Garden party decorations

They are also lovely for using up inherited linens in a gentle way. If you have a damaged doily from a grandmother or aunt, this can be a sweet way to keep part of it visible rather than packed away.

Tips For Batch-Making These For Weddings Or Events

If you are making a large number of jar lanterns, start collecting jars early. Ask friends and family to save jars for you, but be specific about the size and shape you want or you may end up with 47 pickle jars and one tiny mustard pot.

Clean all jars in one go and remove labels before the crafting day. This is the least glamorous part of the project, so do it ahead of time.

Choose two or three trim styles and repeat them across the jars. For example, some jars might have lace ribbon, some might have burlap, and some might have twine, but keep the colour palette consistent.

Use battery tealights in bulk. They are much easier than managing real candles at an event, and guests can take the lanterns home afterwards as favours.

If you want name tags or table numbers, tie small kraft tags around the necks of the jars. This turns the lanterns into useful wedding décor rather than just pretty extras.

Troubleshooting

If your doily keeps lifting, your jar may not be clean enough or the doily may be too heavy. Wipe the jar again and use a stronger adhesive or a thinner lace piece.

If the doily wrinkles, use less glue. Too much wet adhesive can cause fabric and lace to buckle.

If the jar looks cloudy, you may have used too much Mod Podge over the top. A thin coat is enough.

If the burlap frays too much, add a tiny line of clear glue along the cut edge or use wired burlap ribbon instead.

If the lantern looks too plain, add a small charm, button, tag or ribbon bow to the neck. Do not cover too much of the glass, though — the glow is the prettiest part.

More Recycled Jar Craft Ideas

Once you start saving jars, it is hard to stop. They are useful for candle holders, pantry storage, craft room organisation, vases, gift jars and seasonal displays.

For another recycled jar idea, have a look at this Mason Jar Photo Frame on CraftBits. It has the same “simple jar turned into something special” feel.

You may also enjoy browsing the jars tag on CraftGossip for more jar-based craft inspiration, especially if your recycling bin is currently looking a little too inspiring.

A Gentle Little Upcycling Reminder

Projects like these are why I love recycled crafts. You are not buying a whole new pile of supplies. You are taking something ordinary — a jar, a doily, a scrap of ribbon — and giving it a second life.

It is soft, pretty, budget-friendly and practical. And if anyone asks why you have a cupboard full of empty jars, simply point to your glowing doily lanterns and say, “See? I had a plan.” 

Explore

books Christmas CraftGossip Giveaways Craft Inspirations Easter glass halloween Home Decor kid crafts More Crafts Patterns & Tutorials recycled art Recycled Clothing Recycled Jewelry Recycled kids crafts Recycled Sewing Recycled Tutorials Recycling Ideas Recycling Organizing tin can

RSS More Articles

  • Designer Spotlight: Unique Stitch Crafts
  • Peyote Stitch Pendants And Necklaces: 10 Seed Bead Jewelry Projects To Make
  • Free Dotted Lines Embroidery Pattern Review
  • Choose Your Own Brioche Knitting Adventure with this Shawl Knitting Pattern
  • How to Make a Masculine Folio Album
  • Courtyard Garden Quilt Kit Review – A Classic Floral Quilt with Vintage Garden Charm
  • Free Loving Life Crochet Blanket – Free Crochet Pattern
  • Book Review: The Royal School of Needlework Book of Embroidery
  • Learning about Finland for Kids
  • How Craft Bloggers Can Use AI Without Losing Their Handmade Voice

Copyright © 2026 · CraftGossip | Start Here | Contact Us | Link to Us | Your Editors | Privacy and affiliate policy