• Home
  • Suggest A DIY
  • DIY Newsletter

Recycled Crafts

Creative DIY Projects That Turn Trash Into Treasure

  • About CraftGossip
  • Our Network
    • Bath & Body Crafts
    • Candle Making Ideas
    • Crochet Ideas
    • Cross Stitch
    • Edible Crafts
    • Felting Patterns
    • Glass Art
    • Home & Garden Ideas
    • Indie Crafts
    • Jewelry Making
    • Kids Crafts
    • Knitting Patterns
    • Lesson Plans
    • Needlework
    • Party Ideas
    • Polymer Clay
    • Quilting Ideas
    • Recycled Crafts
    • Scrapbooking
    • Sewing Patterns
    • Card Making
    • DIY Weddings
    • Not Craft Ideas
  • Giveaways
  • Roundups
  • Store
  • Search

Giveaway-Totally Washi ! : More Than 45 Super Cute Washi Tape Crafts for Kids

April 12, 2016 by Stefanie Girard

Screen Shot 2016-01-26 at 11.20.40 AM

Giveaway-Totally Washi!: More Than 45 Super Cute Washi Tape Crafts for Kids

Leave a comment in today’s post by April 21, 2016 and you are in the running for this fun book.

Open to U. S. residents only please.

Stick on the fun!

Say hello to a whole new way of decorating! With Totally Washi!, you’ll learn how to use washi tape, a colorful Japanese crafting tape, to transform everyday items into adorable creations everyone will love. Featuring 50 awesome washi tape projects, this book encourages you to let your imagination roam free as you cover your locker, bedroom, and even your friends’ accessories in the stylish tape. Best of all, when you’re bored with the look, you can simply peel off the tape and start all over again! The possibilities are endless with fun washi tape crafts like:

  • Cloud & raindrop bookmark
  • Braided friendship bracelets
  • Cutout art frames
  • Bobby pin flower
  • Locker dry erase board

Complete with step-by-step instructions and full-color photos, Totally Washi! will show you how to customize just about anything!

Looking for fun washi tape for your next project? Check these out on Amazon
«
»

Comments

  1. Pip says

    April 12, 2016 at 11:03 am

    Very cute. :3

  2. Nancy JR says

    April 12, 2016 at 11:21 am

    I would love to win the Washi tape book for my grandaughter. She is very interested in crafts.

  3. Cathleen H. says

    April 12, 2016 at 11:27 am

    I have rolls and rolls of washi tape! My kids and I love it, and would love some new creative ideas!

  4. Stephanie Daniel says

    April 12, 2016 at 11:30 am

    I think this book would be great! Thanks would love to win it!

  5. Mary Helene says

    April 12, 2016 at 11:31 am

    I have dozens of rolls of washi tape and would love to have this book and share fun ideas with my grand daughter.

  6. Holly Young says

    April 12, 2016 at 11:33 am

    Would love to win this! Looks like a fun thing to share with my boss’s kids to give them things to do during the summer when they spend a lot of time with me in the office.

  7. Kath U says

    April 12, 2016 at 11:42 am

    I would love to win this book. I have accumulated many rolls of washi tape but don’t have creative ideas on how to use them.

  8. Duane says

    April 12, 2016 at 12:03 pm

    This book would help me to make crafts with my grandchildren.

  9. Donna R says

    April 12, 2016 at 12:10 pm

    I am a program director for a Girl Scout day camp in June. This book looks like the perfect way to find ideas for craft projects. Thanks for the chance!

  10. Kelly says

    April 12, 2016 at 12:12 pm

    This would be really cute to do with my 5 year old niece!

  11. evergreen grrrl says

    April 12, 2016 at 12:23 pm

    I would love to get this book for the special needs teenager that lives with me. She loves crafts and art, but she has lots of trouble creating without step-by-step instructions. We went to the Dollar Tree this weekend and stocked up on craft supplies for Mothers’ Day gifts….8 different rolls of Washi Tape included (and there were still more designs from which to choose!). Crafts do not need to be expensive…you just need to think outside the Crayola Box 🙂 Most “Dollar Stores” have popsickle sticks, Washi tape, clay, glitter, paint, hot glue, baker’s twine, hombre string, pony beads, paint brushes, Mod Podge, construction paper, stencils, vases, plastic flowers, tissue paper, pipe cleaners, pom-poms, etc. For all of those grandparents and babysitters out there, use your resources wisely. I used to keep a medium-sized box of craft supplies bought at the dollar store in my closet for those occasions where my nephew came to visit. The craft station has grown over time, but if you just buy about $5 worth of supplies each month and add it to the box, then kids will find a way to use it creatively. Trip #1 = crayons, construction paper, water color palette and brush, scissors, tape (clear).

  12. ladysusanpdx says

    April 12, 2016 at 12:27 pm

    This would be just the right book to have for the little ones I babysit! They
    – and I – all love washi tape!!

  13. Jean says

    April 12, 2016 at 1:08 pm

    I teach a class at children’s church. This book would be very helpful. Thanks for the chance to win.

  14. Carla Hundley says

    April 12, 2016 at 1:22 pm

    Washi tape rules!
    Love it and this
    book would be
    fun to use.
    Carla from Utah

  15. caf12015 says

    April 12, 2016 at 1:27 pm

    my grandkids would just love to get and it would be a great project for them

  16. Denise Bryant says

    April 12, 2016 at 1:31 pm

    Sounds like lots of great ideas packed inside this fun book!

  17. Gizala says

    April 12, 2016 at 1:35 pm

    My kiddo would love this book!

  18. Amy Cooley says

    April 12, 2016 at 2:29 pm

    This look like a fun book for my kids!

  19. Kathy Roberts says

    April 12, 2016 at 2:45 pm

    I’m a new Kindergarten teacher and my kiddos would LOVE to do this!

  20. annehaun says

    April 12, 2016 at 3:04 pm

    Wonderful book.

  21. Laura Mustion says

    April 12, 2016 at 5:04 pm

    Washi Tapes are so cute. My grandchildren would love this igft.

  22. Laurel says

    April 12, 2016 at 5:57 pm

    I’d love to do some Washi activities with the kids at work!

  23. Lisa says

    April 12, 2016 at 6:18 pm

    I am literally obsessed with washi tape crafts

  24. Brenda Obregon says

    April 12, 2016 at 8:28 pm

    Perfect book for our public library collection! I do twice weekly STEAM read aloud programs for tiny tots, and twice monthly adult crafts programs. Mahalo for the op to win a new book for the library.

  25. aj says

    April 12, 2016 at 9:42 pm

    What a great giveaway! I love washi tape!

  26. Marilee says

    April 12, 2016 at 11:42 pm

    This looks like a fun and beautifully colored book that I would love to share with my 3yr old little boy. He loves trucks and things he can make with washi tape (and stickers). Washi is must for every household.

  27. MARTHAIA says

    April 13, 2016 at 1:54 am

    Great fun to learn new crafts…..TY

  28. Denise Jordan says

    April 13, 2016 at 7:46 am

    Thank you for offering this book as a giveaway!

  29. bjcobb says

    April 13, 2016 at 11:27 am

    Can you say Girl Scout projects?

  30. Lisa Huff says

    April 13, 2016 at 1:40 pm

    I love washi tape! Thank you for the chance to win such an amazing book.

  31. Teresa Lilly says

    April 13, 2016 at 6:51 pm

    Would love to win and explore new ways to use washi tape! Thanks for the chance!!!

  32. Carissa says

    April 14, 2016 at 10:24 pm

    Looks so fun!

  33. Carmen N says

    April 16, 2016 at 5:42 pm

    I don’t have many but I love washi tape!

  34. Miko says

    April 18, 2016 at 12:58 am

    So cute !
    Maybe able to do some projects with preschoolers I teach.

  35. Rose Santuci-Sofranko says

    April 18, 2016 at 10:39 pm

    How cute is that! Such fun. Thanks and God bless! ILuvTheEucharist (at) aol.com

  36. Renee G says

    April 20, 2016 at 1:42 am

    my niece would love this one.

  37. Doris McCarty says

    April 20, 2016 at 8:05 am

    My daughter loves Washi tape. She got a whole set for Christmas. This would be great for her!

  38. Rebecca H says

    April 21, 2016 at 11:22 am

    with 12 grandchildren this would be so fun to share with them. They would love it!

Have you read?

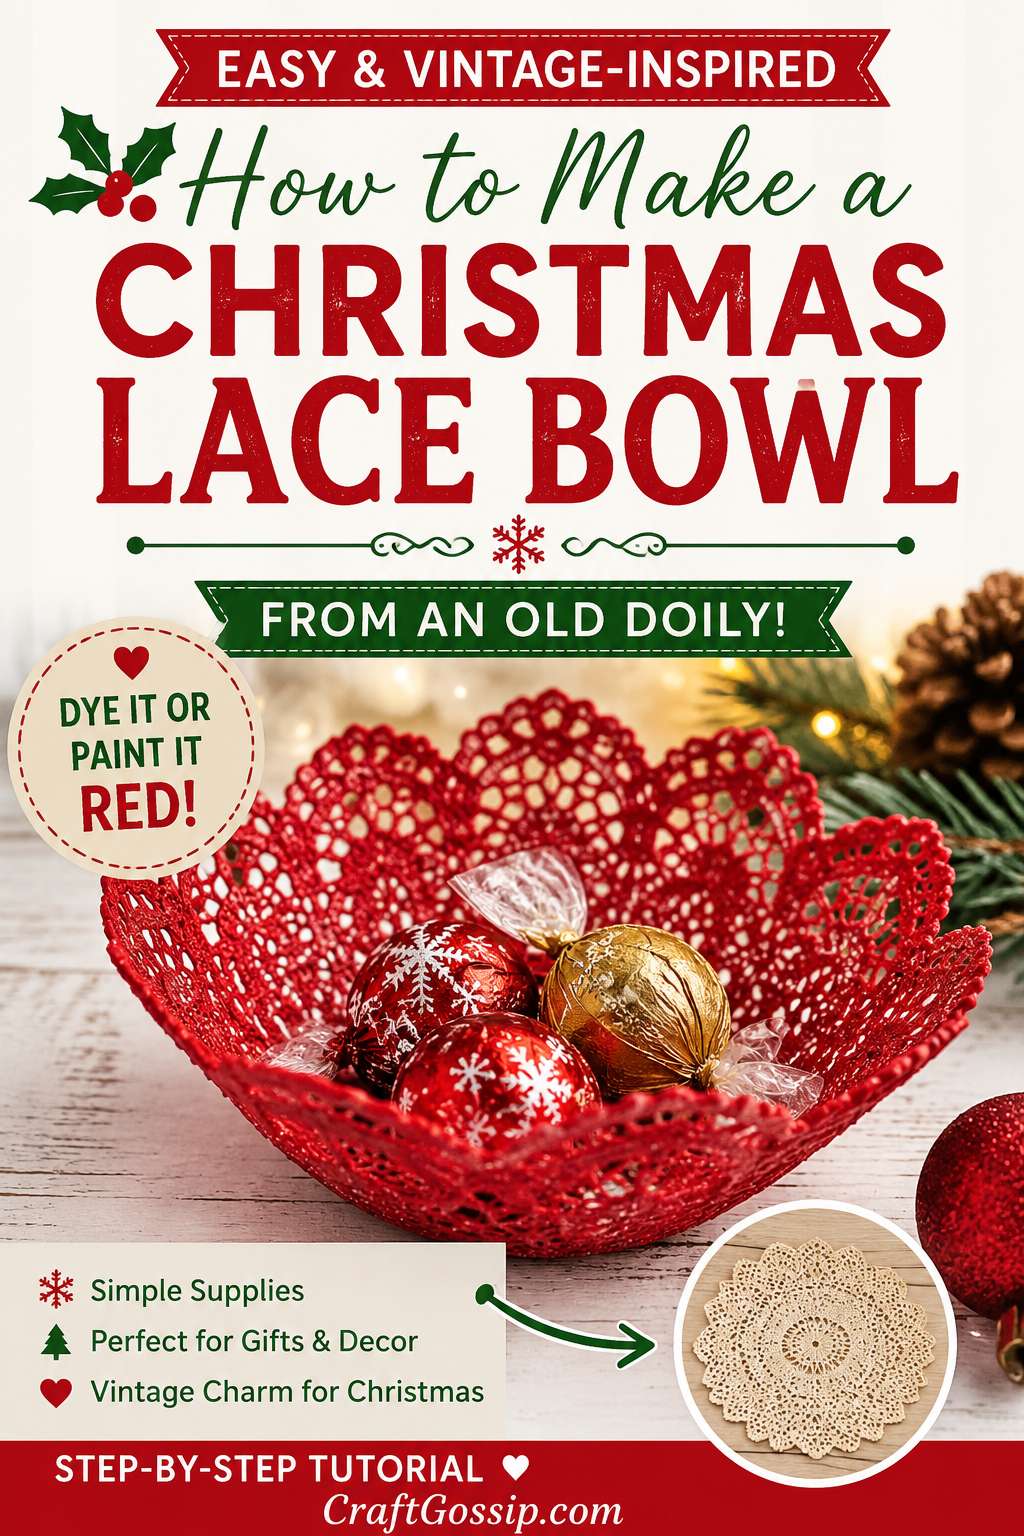
How To Make A Christmas Lace Bowl From An Old Doily

There is something so charming about a lace doily at Christmas, especially when it has that vintage handmade feeling that makes you think of biscuit tins, old linen cupboards, and someone’s grandmother who absolutely knew how to starch things properly.

This Christmas lace bowl is a pretty little upcycled craft made from an old lace doily, fabric stiffener or glue, and a bowl used as a mould. Once it dries, you end up with a delicate decorative bowl that can be used for wrapped sweets, baubles, jewellery, table favours, or festive little gift displays.

For this Christmas version, we are giving the lace a lovely red finish. You can either dye the lace using fabric dye for a deeper, more even colour, or paint it with watered-down red acrylic paint for a softer handmade look. Both methods work, and both have their own charm. The dye gives a more traditional fabric finish, while watered-down paint gives you a little more control if you want that slightly rustic, vintage Christmas feel.

This is a great project for using old doilies, thrifted lace, or crochet pieces that are too pretty to throw away but maybe not quite table-ready anymore. You know the ones — a tiny stain here, a pulled thread there, and suddenly they live in the “I’ll do something with this one day” pile. Well, today is that day.

If you enjoy vintage-style handmade decorations, you might also like this lace-inspired idea for DIY stamped air dry clay bowls, or have a browse through the CraftBits home crafts section for more easy handmade décor ideas.

What You Can Use A Christmas Lace Bowl For

These lace bowls are decorative rather than heavy-duty, but they are surprisingly useful during the festive season.

Use them for:

  • wrapped Christmas chocolates
  • small baubles
  • jewellery gifts
  • handmade soaps
  • table place setting gifts
  • battery tea lights
  • sewing clips or buttons
  • Christmas craft stall displays
  • festive trinkets
  • small wrapped treats

They also look beautiful on a mantel, sideboard, Christmas lunch table, bedside table, or craft room shelf. Just remember that these bowls are not washable and should not be used for wet food or anything heavy.

Supplies You Will Need

You will need:

  • 1 lace doily or piece of lace fabric
  • Red fabric dye or red acrylic paint
  • White PVA craft glue or fabric stiffener
  • Warm water
  • Bowl, jar, or rounded container to use as a mould
  • Plastic wrap or cling film
  • Mixing bowl or disposable container
  • Foam brush
  • Gloves
  • Baking paper or newspaper
  • Scissors
  • Optional: gold paint, glitter, ribbon, beads, small bells, or metallic wax
  • Optional: spray sealer

If you are planning to make several of these for Christmas gifts or craft stalls, it is worth having a large bottle of craft glue or fabric stiffener on hand. A good foam brush, disposable gloves, and a self-healing craft mat or covered table will make the whole thing much less messy. You can usually find basic supplies like PVA glue, acrylic paint, fabric dye, foam brushes, and plastic wrap on Amazon. For vintage doilies and lace bundles, Etsy is always a lovely place to look, especially if you want mismatched old-fashioned pieces.

Before You Start: Dye Or Paint?

There are two easy ways to make your lace bowl red.

Option 1: Fabric Dye

Fabric dye is best if you want a richer, more even red and your lace is made from cotton or another natural fibre. Vintage crochet doilies often dye beautifully, especially if they are cotton.

Fabric dye may not work as well on synthetic lace, so check the fibre if you can. If you are using a thrifted lace piece and have no idea what it is made from, do a small test first.

Option 2: Watered-Down Acrylic Paint

Watered-down acrylic paint works well if you want a softer red finish or if your lace is synthetic and may not take dye properly. It is also handy if you only need to make one bowl and do not want to set up a full dye bath.

This method gives the lace a more painted, handmade finish. It can be a little rustic, which I personally think suits Christmas crafts beautifully.

Step 1: Choose Your Lace

Choose a clean lace doily with a pretty pattern. Round doilies are the easiest to shape into bowls, but oval or square pieces can work too.

Look for lace with strong details such as flowers, scalloped edges, stars, leaves, or repeating patterns. Once the lace is stiffened, those details become the feature.

Avoid lace that is too fragile, torn, or full of loose threads. A little wear is charming. Falling apart in your hands is less charming.

If your lace has stains, do not worry too much if you are dyeing or painting it red. The colour will hide many small marks.

Step 2: Wash And Dry The Lace

If your lace is thrifted or has been stored for a long time, give it a gentle wash first.

Use warm water and mild soap, then rinse well and let it dry completely. This helps remove dust, oils, or old starch that could stop the dye or paint from soaking in properly.

Do not use fabric softener, as it can interfere with the stiffening process later.

Step 3: Colour The Lace Red

Now it is time to turn the lace into something festive.

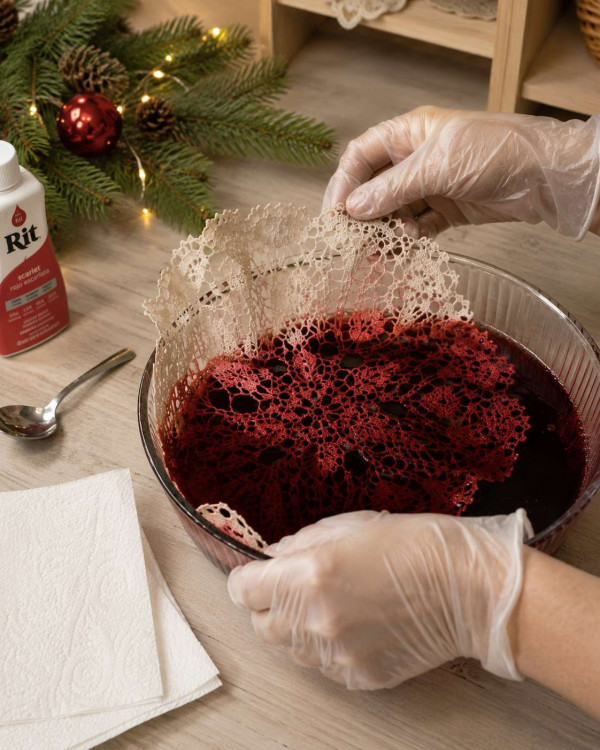
Method 1: Dyeing The Lace Red

Follow the instructions on your fabric dye packet, as different brands vary slightly.

As a general guide:

  1. Wear gloves and protect your work surface.
  2. Mix the red fabric dye according to the packet directions.
  3. Place the lace into the dye bath.
  4. Gently move it around so the colour reaches all the little openings and details.
  5. Leave it in the dye until it reaches the shade you like.
  6. Rinse according to the dye instructions.
  7. Let the lace dry completely before stiffening.

For a deep Christmas red, you may need to leave the lace in the dye bath a little longer. Keep in mind that lace often looks darker when wet and slightly lighter once dry.

Method 2: Painting The Lace With Watered-Down Red Paint

If you are using acrylic paint, mix:

1 part red acrylic paint to 1 part warm water

Stir until smooth. The mixture should be thin enough to soak into the lace but not so watery that the colour disappears.

Place the lace on baking paper or plastic wrap. Use a foam brush to dab the paint mixture into the lace, making sure both sides are covered. You can also dip the lace directly into the mixture and gently squeeze out the excess.

If you want a darker red, let the first coat dry and then add a second coat.

For a rustic vintage look, do not worry if the colour is slightly uneven. It gives the bowl a lovely handmade finish.

Let the lace dry before moving on to the stiffening step.

Step 4: Prepare Your Bowl Form

Choose a bowl, jar, or rounded container that matches the shape you want.

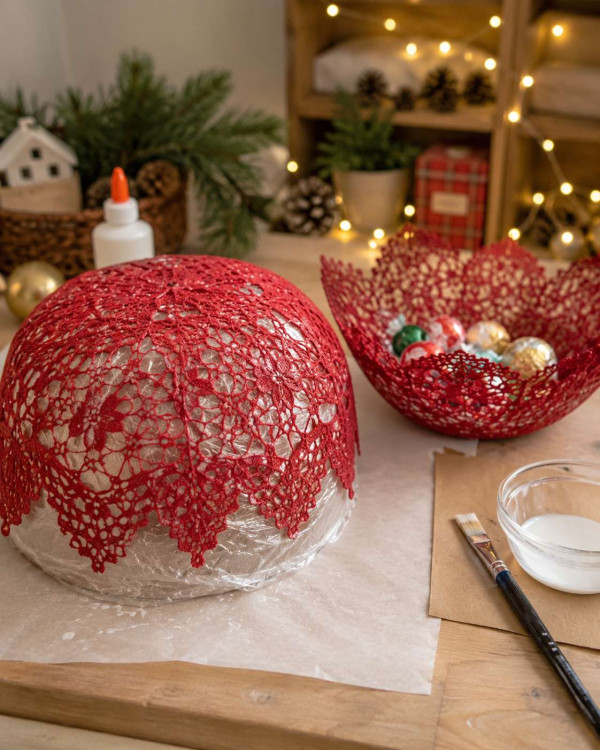
Turn the bowl upside down and cover it tightly with plastic wrap. Smooth out as many wrinkles as possible, because big folds in the plastic can leave marks in the lace.

Place the covered bowl on baking paper or newspaper. This is a gluey project, and it is much nicer to throw away a messy sheet of paper than scrape dried glue off the table later.

Step 5: Mix The Stiffener

You can use ready-made fabric stiffener or make your own with white craft glue.

For homemade stiffener, mix:

2 parts white PVA glue to 1 part warm water

For example:

  • 2 tablespoons white glue
  • 1 tablespoon warm water

Stir until smooth.

If the mixture feels too thick to soak through the lace, add a tiny splash of warm water. If it feels very runny, add a little more glue. You want the lace fully coated, but not dripping in puddles.

Step 6: Soak The Red Lace

Place the red lace into the stiffener mixture and gently press it down until it is fully saturated.

Use your fingers or a foam brush to work the stiffener through the pattern. Make sure the edges and centre are coated well, because those areas help the bowl hold its shape.

Lift the lace and let the excess drip back into the container. Do not wring it out, as that can stretch or distort the lace.

Step 7: Shape The Lace Over The Bowl

Carefully drape the wet lace over your plastic-wrapped bowl form.

Centre the lace so the pattern sits nicely. Smooth it gently with your fingers and arrange the edges so they fall evenly around the bowl.

You can create:

  • a neat scalloped edge
  • soft natural folds
  • a shallow dish shape
  • a deeper candy bowl shape
  • a fluted edge

Once you are happy with the shape, dab a little extra stiffener onto any areas that look dry.

Step 8: Let It Dry Completely

Leave the lace bowl to dry for at least 24 hours.

If your lace is thick, heavily painted, or the weather is humid, it may need 48 hours or longer. Do not rush this step. A lace bowl that is removed too early can sag, flop, or lose its shape.

Place it somewhere safe where it will not be bumped. If you have pets, put it somewhere they cannot “help.” Every crafter knows that cats and drying projects have a special and dangerous relationship.

Step 9: Remove The Lace Bowl From The Form

Once the lace is completely dry and firm, gently lift it off the bowl form.

Peel away the plastic wrap carefully. If any areas still feel soft, place the lace bowl upright and let it dry longer.

If the base is a little uneven, lightly mist just the bottom with water and press it gently onto a flat surface. Let it dry again before using.

Step 10: Add Christmas Details

Your red lace bowl can be left as it is, or you can dress it up a little.

Try adding:

  • a dry-brushed gold edge
  • tiny gold bells
  • red velvet ribbon
  • pearl beads
  • a little glitter
  • metallic wax on the raised lace areas
  • a small bow on one side
  • a dusting of faux snow
  • a clear spray sealer for extra protection

A touch of gold paint on the rim looks especially pretty for Christmas. Use a small brush and go lightly so you still see the lace detail.

Christmas Styling Ideas

These red lace bowls look beautiful in all sorts of festive settings.

Try placing one:

  • on each Christmas lunch place setting
  • beside a guest bed with wrapped chocolates
  • on a mantel with greenery and fairy lights
  • on a bathroom vanity with handmade soaps
  • in a craft stall display filled with ornaments
  • under a small battery tea light
  • beside your sewing machine for festive stitch markers and clips
  • filled with mini baubles as a centrepiece

For a vintage Christmas table, mix red lace bowls with greenery, old brass candlesticks, white plates, and linen napkins. It looks fancy without needing to actually be fancy, which is my favourite sort of decorating.

Can You Use Spray Paint Instead?

You can use spray paint, but it gives a different finish. Spray paint tends to sit more on top of the lace rather than soaking into it. It can also clog up the delicate openings if sprayed too heavily.

If you use spray paint, apply very light coats and let each coat dry before adding another. For this project, I prefer fabric dye or watered-down acrylic paint because the lace still looks soft and detailed.

Can You Make This With Crochet Doilies?

Yes, crochet doilies work beautifully for this craft. In fact, they often hold their shape very well because the cotton thread is thicker than fine lace fabric.

A crochet doily may need extra stiffener and a longer drying time, especially if it has raised stitches or a dense centre.

Troubleshooting Tips

The bowl is too soft

Brush on another coat of fabric stiffener or glue mixture and let it dry again. Make sure the lace is fully dry before judging the final stiffness.

The red colour looks patchy

If you used paint, add a second thin coat. If you used dye, the lace may contain synthetic fibres that did not absorb the dye evenly. A watered-down paint wash can help even it out.

The lace stuck to the plastic wrap

Peel slowly and gently. Next time, make sure the lace is not sitting in a thick puddle of glue at the base.

The bowl has cloudy glue marks

This usually means there was too much glue sitting on the surface. You can often disguise it with a little red paint, gold dry brushing, or glitter.

The shape is uneven

Handmade lace bowls often have a soft organic shape. If you want to adjust it, lightly mist the area with water, reshape gently, and let it dry again.

Gift Ideas For Christmas Lace Bowls

These make sweet handmade gifts, especially if you fill them with something small.

Try filling them with:

  • wrapped chocolates
  • handmade soap
  • a small candle
  • sewing notions
  • hair clips
  • earrings
  • lip balm
  • mini ornaments
  • tea bags
  • Christmas biscuits in a clear bag

Wrap the filled bowl in cellophane and tie it with ribbon for a simple handmade gift. It is the sort of present that looks thoughtful without requiring three days of emotional recovery afterward.

A Pretty Way To Use Old Doilies At Christmas

This Christmas lace bowl is a lovely way to give old doilies and lace scraps a festive second life. Whether you dye the lace a rich Christmas red or paint it with watered-down acrylic for a softer rustic finish, the result is delicate, handmade, and full of vintage charm.

It is simple enough for beginners, affordable enough to make in batches, and pretty enough to use for gifts, table décor, or craft stall stock. And best of all, it lets you turn something forgotten into something festive — which is exactly the sort of Christmas crafting I love.


Explore

books Christmas CraftGossip Giveaways Craft Inspirations Easter glass halloween Home Decor kid crafts More Crafts Patterns & Tutorials Recycled and Thrifted Ideas recycled art Recycled Clothing Recycled Jewelry Recycled kids crafts Recycled Sewing Recycling Ideas Recycling Organizing tin can

Featured Posts

Vickie’s top 10 household items to repurpose with project how-to’s

Recycled cardboard tube microphone

How to restyle an old doll house

How to make a recycled paper bag Art Journal

How to make a skirt from a recycled top

RSS feed: More Articles More Articles

  • Free Christmas Berry Branch Table Runner Embroidery Pattern Review
  • Freebie Friday – Gothic Christmas Borders and Tags Printable Set
  • Free Felting Tutorial Friday: Nuno Felt Pillow
  • Free Christmas Tree Bauble Knitting Pattern: An Easy Ornament Knitted Flat
  • 8 No-Cook Keto Lunches for Days When the Stove Can Wait
  • Scandinavian Christmas Winter Lantern Review – A Beautiful Dollar Tree Craft with Cozy Nordic Charm
  • 15 Christmas Gifts You Can Sew in an Afternoon
  • Giant Coloring Pages for Kids and Adults: Free Printables, Posters and Classroom Ideas
  • Cozy Crochet Bauble – A Scrap-Busting Holiday Ornament
  • DIY Gift Tags Using Scrapbooking Supplies You Already Have

Copyright © 2026 · CraftGossip | Start Here | Contact Us | Link to Us | Your Editors | Privacy and affiliate policy