• Home
  • Suggest A DIY
  • DIY Newsletter

Recycled Crafts

Creative DIY Projects That Turn Trash Into Treasure

  • About CraftGossip
  • Our Network
    • Bath & Body Crafts
    • Candle Making Ideas
    • Crochet Ideas
    • Cross Stitch
    • Edible Crafts
    • Felting Patterns
    • Glass Art
    • Home & Garden Ideas
    • Indie Crafts
    • Jewelry Making
    • Kids Crafts
    • Knitting Patterns
    • Lesson Plans
    • Needlework
    • Party Ideas
    • Polymer Clay
    • Quilting Ideas
    • Recycled Crafts
    • Scrapbooking
    • Sewing Patterns
    • Card Making
    • DIY Weddings
    • Not Craft Ideas
  • Giveaways
  • Roundups
  • Store
  • Search

Giveaway: Steampunk Emporium: Creating Fantastical Jewelry, Devices and Oddments from Assorted Cogs, Gears and Curios

June 7, 2011 by Stefanie Girard

Yes! The peeps at North Light Books have bequeathed upon me a copy of Steampunk Emporium: Creating Fantastical Jewelry, Devices and Oddments from Assorted Cogs, Gears and Curios by Jema “Emilly Ladybird” Hewitt to give to one lucky reader of Recycled Crafts at CraftGossip.com! Can I get a whoo-hoo?!?! The author Jema was kind enough to do a little Q & A with me which I posted over at Sweater Surgery along with a fun quick and easy gear and Swarovski crystal earring project.

The details: Leave a comment here by Midnight June 16th, 2011 and you are in the running for a copy of Steampunk Emporium. The fine print: Open to USA residents only.

Looking for Steampunk supplies? Check out these steampunk papers, embellishment and stamps.
«
»

Comments

  1. mary says

    June 7, 2011 at 5:13 pm

    always looking for new ways to raise money for the Cystic Fibrosis Foundation and getting inspiration from this book should keppm me off of regretsy!@

  2. Tiffanie says

    June 7, 2011 at 5:27 pm

    I love Steampunk Jewelry. This is such an intersesting book. Love it!

  3. Josie says

    June 7, 2011 at 5:27 pm

    I love steampunk stuff and the jewelry is beautiful and unique.

  4. Lysa says

    June 7, 2011 at 5:28 pm

    I’ve been getting into steampunk since I’ve discovered it and this book would definitely be put to use. Thanks for the opportunity to win this awesome book!

  5. Jennette says

    June 7, 2011 at 5:29 pm

    Looks realy cool. I have wanted to try making some steampunk jewelry but not sure if I could do it!

  6. Lauren says

    June 7, 2011 at 5:33 pm

    I love steampunk!

  7. Darleen says

    June 7, 2011 at 5:34 pm

    This book is on my list to get – the best on Steampunk!

  8. Tina Wegner says

    June 7, 2011 at 5:36 pm

    Looks very interesting, could really learn to love a new kind of craft!

  9. sharon Dryjanski says

    June 7, 2011 at 5:38 pm

    That is the most awesome book …love steampunk and been addicted to that style for some. Great chance to make and get inspiration for the
    seniors center…

  10. Lisa says

    June 7, 2011 at 5:41 pm

    This is my favorite genre. I sure this book would give me inspiration.

  11. Dawn says

    June 7, 2011 at 5:43 pm

    I work with polymer clay and steampunk is one of the things I love to incorporate into my critters. I would really enjoy this book and adding to all of the ideas I have running through my head.

  12. Siobhan says

    June 7, 2011 at 5:43 pm

    That is so cool! I’ve really been having fun with steampunk lately.

  13. Natalie Quisenberry says

    June 7, 2011 at 5:44 pm

    My husband is totally into the steampunk look. He’s gradually incorporating the look into his “man cave.” Would love to win this and help him with decorating ideas!

  14. Page Turners Hollow says

    June 7, 2011 at 5:47 pm

    My husband and I would LOVE to make these fun pieces!

  15. Connie says

    June 7, 2011 at 5:50 pm

    Luv the aesthetic of scifi/fantasy edges with Victorian flair!!!

  16. Leslie says

    June 7, 2011 at 6:12 pm

    I love using recycled materials to make people and animals!

  17. southlakesmom says

    June 7, 2011 at 6:24 pm

    This is so my daughter. She loves Steampunk — and I’m with a Friends of the Library group that has an “attic” sale of all the stuff that comes in with donations that is not books — keys, brads, beads, etc. NOW we’ll know what to do with them, if we win the book!

    Thanks!

  18. LeAnn says

    June 7, 2011 at 6:35 pm

    Whoo-hoo!!! Love steampunk!

  19. Jennie says

    June 7, 2011 at 6:42 pm

    I can never resist the lure of new craft books…. Mmmm…..

  20. Suzanna says

    June 7, 2011 at 6:47 pm

    Oh, this looks fantastic! I can’t wait to read it!

  21. Valerie says

    June 7, 2011 at 6:55 pm

    I love steampunk! It’s such a fun, elegant, and fascinating subculture!

  22. Michelle says

    June 7, 2011 at 6:57 pm

    Oooh, I would devour this book cover to cover!

  23. Lindsay nice says

    June 7, 2011 at 7:30 pm

    Ooooo this is a good one, pick me pick me 🙂 fingers crossed

  24. Alisa says

    June 7, 2011 at 7:30 pm

    After reading how to make diy steampunk goggles recently this would be an awesome book to get more projects and inspiration from.

  25. Laura says

    June 7, 2011 at 7:53 pm

    We are doing a steampunk wedding for my DD this December this would be a great help. Thanks for all your wonderful postings.
    🙂

  26. Kelly says

    June 7, 2011 at 7:57 pm

    I can never get enough how to’s, especially ideas on steampunk 🙂

  27. Anne says

    June 7, 2011 at 8:23 pm

    I embrace victorian and love to juxtapose the industrial, hard look of items like gears, typewriter keys, bullets and such into this revival style of jewelry we know as Steampunk! I’ve incorporated several steampunk looks into my line of jewelry and accessories and have been educating many that stop at my booth on the term, the look, the trend. Just love it!

  28. GM says

    June 7, 2011 at 8:37 pm

    This is going on my to read list (and on pinterest); I really hope I win!

  29. Heather Logsdon says

    June 7, 2011 at 8:46 pm

    I love the steampunk movement – what a great way to recycle and upcycle materials. I wonder what new projects I can play with in this book. =-)

  30. Brian S. says

    June 7, 2011 at 8:55 pm

    OMG! I want this so bad. I have gotten into the kick of making steampunk nerf guns and squirtguns.

  31. lissy says

    June 7, 2011 at 9:22 pm

    Where was this book when I had to make steampunk bridesmaid jewlery last month? Better late than never

  32. Rebecca says

    June 7, 2011 at 9:31 pm

    I have gotten so hardcore into steampunk, lately. So awesome. And steampunk craftiness? Um, YES.

  33. Steph says

    June 7, 2011 at 10:03 pm

    This looks like way too much fun! 😀

  34. Katie says

    June 8, 2011 at 1:16 am

    *drools* This book is heaven! It’s at the top of my wishlist. I would definitely love to win a copy. Thanks for such a wonderful giveaway!

  35. Topaz says

    June 8, 2011 at 2:29 am

    Excellent, great giveaway! Thank you!

  36. Jessica C. says

    June 8, 2011 at 4:02 am

    I’d love to win, I love Steampunk! It is so cool!

  37. jenclair says

    June 8, 2011 at 4:57 am

    I make dolls, Little Eccentrics, and love to include steampunk elements!

  38. Jhana says

    June 8, 2011 at 5:05 am

    I can never get the right “look” when I try and make steampunky stuff. This book would sure help!!!!

  39. Gina says

    June 8, 2011 at 5:18 am

    Oh my! This is so cool. I love anything steampunk, upcycled, and multimedia.

  40. ShannonR2 says

    June 8, 2011 at 5:31 am

    I hadn’t seen this before, but it looks cool.
    Thanks!

  41. Pat Upton says

    June 8, 2011 at 5:54 am

    Steampunk is awesome but I haven’t yet figured it out! I would love to get a hold of this book!

  42. Sara says

    June 8, 2011 at 6:33 am

    EEEKKKK!!! This looks awesome, I didn’t even know it existed & now I really want it.

  43. jacqueline koudry says

    June 8, 2011 at 6:39 am

    Steampunk is the greatest. Would love to win this.

  44. kathy mcelroy says

    June 8, 2011 at 7:09 am

    I love Steampunk!!! Please enter me in your drawing.

  45. Ami says

    June 8, 2011 at 7:11 am

    Oh, fabulous! I love Steampunk …well…anything!

  46. Debbie says

    June 8, 2011 at 7:58 am

    Love, love, love Steampunk! Victorian with a demented twist – I’m there. To have this book for inspiration would make me very happy! 🙂

  47. Mary Mac says

    June 8, 2011 at 8:06 am

    One of the best giveaways in along time. I love steampunk.

  48. Julie says

    June 8, 2011 at 8:11 am

    The age of victorian inginuity is gathering steam! It’s always inspiring to find new ways to blend the old & the new,from an age where possibilites that were only dreams that became realities only limited by what could be formed by hands…..sounds like a great guide to some beautiful pieces for the Dicken’s fair in cali too! ;]

  49. Fran DeWitte says

    June 8, 2011 at 8:15 am

    I would love to win the book: Steampunk Emporium. I love the style & have a great time
    making jewelry in this style.

  50. Linda says

    June 8, 2011 at 8:19 am

    I’ve recently been introduced to Steampunk and am entranced with this created era. I make jewelry to supplement my disability retirement income and this would be wonderful. Plus, I and my family would love to wear some of these created items!

Newer Comments »

Have you read?

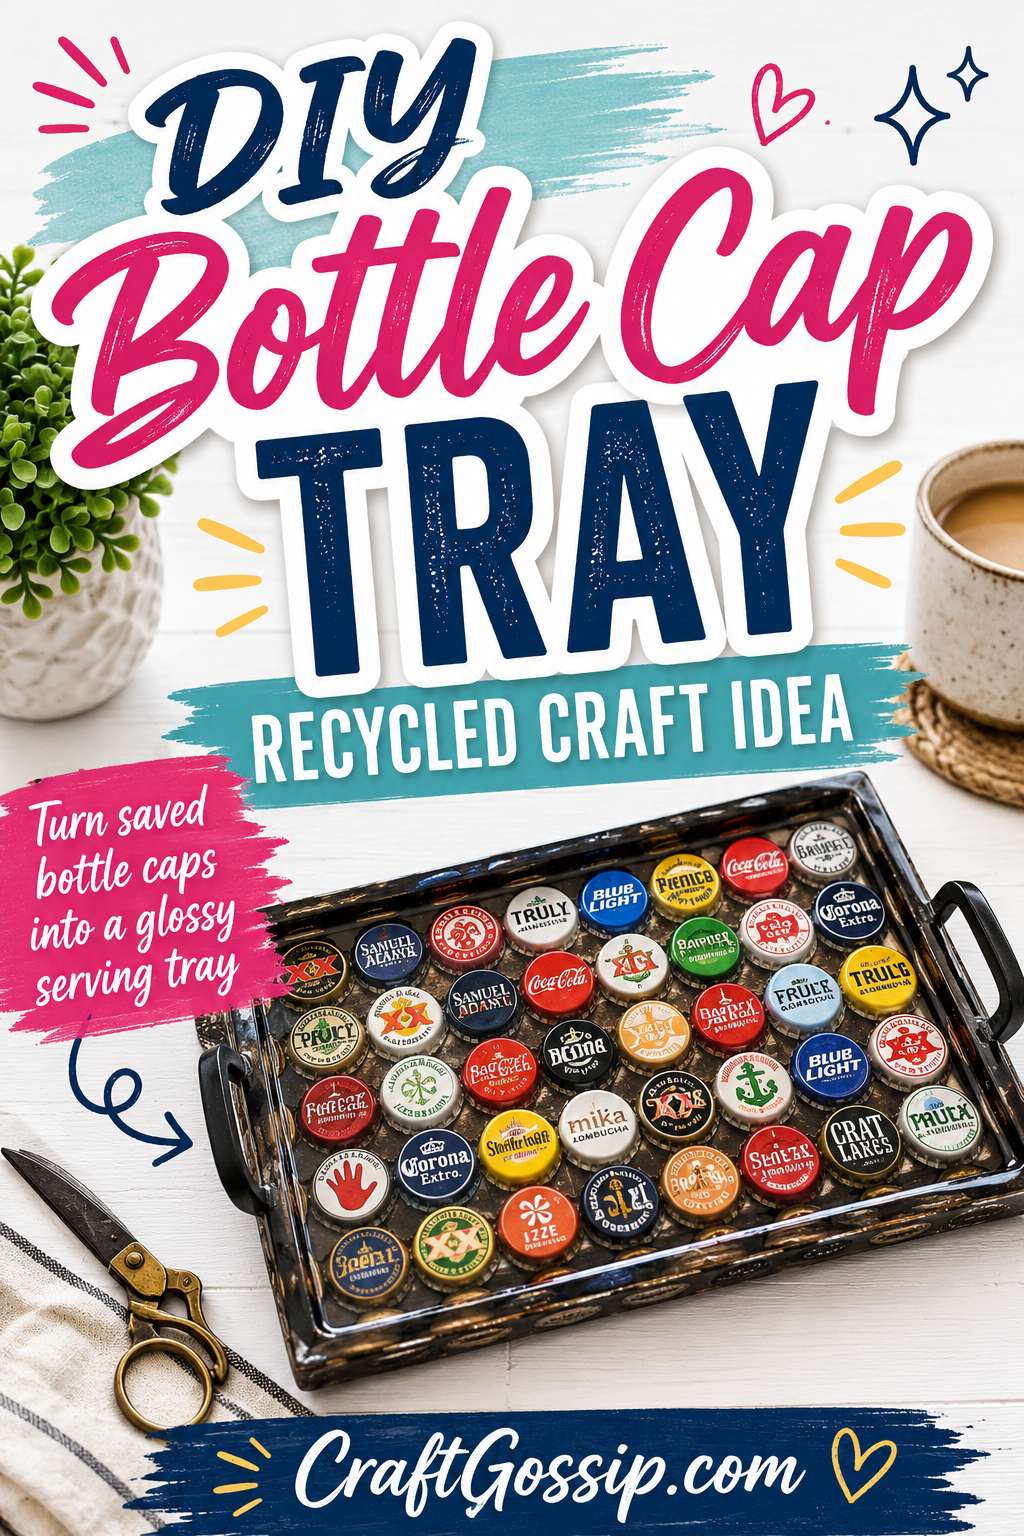
How To Make A Recycled Bottle Cap Tray With Resin

There are some recycled craft supplies that quietly collect in jars for years, waiting for their big moment. Buttons do it. Wine corks do it. And bottle caps? Oh, bottle caps are absolutely guilty.

If you have a stash of beer bottle caps, soda caps, kombucha caps or colourful metal drink caps, this recycled bottle cap tray is a brilliant way to turn them into something useful, bold and full of personality. Instead of hiding them in a jar “for someday,” you can set them into an old tray, seal them under resin, and create a sturdy serving tray for drinks, snacks, craft supplies, coffee tables, outdoor entertaining or a home bar.

This project is especially good if you like recycled crafts that look like they have a bit of story behind them. You can use caps collected from holidays, parties, favourite drinks, local breweries, family gatherings or even a special event. A tray made from saved bottle caps has far more character than something plain from a shop shelf.

And if you are already in a bottle-cap crafting mood, you might also like the Recycled Crafts section on CraftGossip or the recycled craft ideas on CraftBits for more ways to turn everyday bits and pieces into something worth keeping.

Why Bottle Caps Work So Well In Resin Trays

Bottle caps are perfect for resin craft projects because they are shallow, colourful and sturdy. Once they are glued into a tray and covered with clear resin, they create a smooth wipeable surface while still keeping all that lovely colour and texture visible underneath.

You can make the finished tray look playful, rustic, retro, masculine, coastal, bar-style, colourful or surprisingly polished depending on the caps you use and how you arrange them.

Beer bottle caps give a vintage pub or home-bar feel. Soda caps look bright and cheerful. Matching caps can look neat and graphic. Mixed caps feel collected and relaxed. And if you use caps with interesting designs inside, you can place them open-side up so the artwork shows.

This is also a great way to rescue a tired tray. Scratched, dated, chipped or slightly ugly trays are perfect candidates because the bottle caps and resin will completely transform the base.

Supplies You Will Need

An old tray with raised sides
Metal bottle caps
Epoxy resin suitable for craft use
Strong clear glue or industrial craft adhesive
Spray paint or acrylic paint for the tray
Primer, optional but useful
Sandpaper
Ruler or measuring tape
Disposable gloves
Mixing cups and stir sticks for resin
Craft heat tool or small torch for bubbles
Drop cloth or plastic table cover
Masking tape
A level surface for curing
Optional: clear spray sealer, decorative handles, felt pads for the base

For this project, Amazon is useful for epoxy resin kits, disposable gloves, mixing cups, stir sticks, craft heat tools, strong glue and spray paint. If you want a more decorative look, Etsy can be a good place to find vintage beer caps, unusual bottle caps or handmade tray handles, but this project works best when you use what you already have.

Choosing The Right Tray

The best tray for this project has raised sides. That edge is important because it keeps the resin contained while it cures.

Wooden trays, metal trays and sturdy plastic trays can all work, but wooden trays are often the easiest to paint and prepare. Make sure the tray is solid, flat and not warped. Resin needs a level surface, so a twisted or uneven tray will cause the resin to pool in one corner.

A tray with a flat base is easiest. If the bottom has a deep curve or raised pattern, the caps may not sit neatly.

Before you start, clean the tray well. Remove dust, grease, old stickers and anything that might stop the paint or glue from sticking. If the tray has a glossy finish, lightly sand it so the new paint has something to grip.

How Many Bottle Caps Do You Need?

The number of bottle caps depends on the size of your tray and how closely you arrange them.

As a rough guide:

Small tray: 40–60 caps
Medium tray: 70–100 caps
Large tray: 120+ caps

The competitor project used 99 bottle caps for its tray, which gives a good idea of how quickly caps disappear once you start filling a surface.

Before gluing anything, lay your caps inside the tray and test the layout. This is the part where you realise your “huge collection” may only cover half the tray. Very humbling.

If you are short on caps, you can leave a painted border around the edge, space the caps out slightly, or combine caps with small tiles, coins, buttons or flat glass gems.

Preparing The Bottle Caps

Wash the bottle caps in warm soapy water and dry them completely. Sticky drink residue and resin are not friends.

Check for bent or damaged caps. Slight dents are fine and can add character, but badly crushed caps may not sit flat. If needed, place a cap on a scrap piece of wood and gently flatten it with a hammer.

Decide whether you want the printed side facing up or the open side facing up. Printed side up gives a cleaner bottle-cap look. Open side up can show hidden branding, colours or little designs inside the caps.

If you are using beer caps, try arranging them by colour, brand, country, drink type or memory. This is where the tray can become a bit of a conversation piece.

Paint The Tray First

Once your tray is clean and lightly sanded, paint it before adding the caps.

Spray paint gives a smooth finish, especially on metal or wooden trays. Acrylic paint works too, especially if you already have some in your craft cupboard.

Choose a colour that works with your caps. Black makes bright caps pop. White or cream gives a cleaner modern look. Navy, forest green or charcoal can make beer caps look more grown-up and home-bar friendly. Metallic paint can make the tray feel more polished.

Let the paint dry fully before moving on. Do not rush this part. If the paint is still soft when you add glue or resin, the finish can lift or wrinkle.

Arrange Your Bottle Caps

Lay the bottle caps into the tray before gluing them down.

You can arrange them in neat rows, a diagonal pattern, circles, colour blocks, a rainbow, random scatter style, or even initials or a simple shape if you have enough colours.

Take a quick photo of the layout before moving anything. This is such a simple step, but it saves a lot of muttering later when you accidentally bump the tray and everything shifts.

A tight layout looks more mosaic-like, while a spaced layout lets more of the painted tray show through. Both work, so choose the look you prefer.

Glue The Bottle Caps Down

Once you are happy with the layout, remove the caps section by section and glue them in place.

Use a strong clear glue and apply enough to hold each cap firmly. Press each cap down and keep working across the tray.

Let the glue dry completely before adding resin. Overnight drying is best. If the caps are not firmly attached, they can float or shift when the resin is poured, and nobody wants to chase bottle caps through sticky resin.

For extra security, place a few heavy books over a protective sheet on top of the caps while the glue dries. Just make sure the glue is not squeezing up and sticking to the protective layer.

Resin Safety Before You Pour

Resin can give a beautiful glossy finish, but it does need sensible handling.

Work in a well-ventilated area. Wear gloves. Cover your table. Read the instructions on your specific resin kit before mixing. Resin brands vary, and the ratio and curing time matter.

Do not guess measurements. Resin usually needs very accurate mixing to cure properly. If the ratio is wrong or the mixture is not stirred well enough, the finish can stay sticky.

Keep children and pets away from the resin area while you work and while the tray cures.

This is not the craft to do in a rush ten minutes before dinner. Give yourself time and space.

Pour The Resin

Place the tray on a perfectly level surface. This matters. If the surface is not level, the resin will settle unevenly.

Mix the resin according to the package instructions. Stir slowly and scrape the sides and bottom of the mixing cup so both parts combine properly.

Pour the resin slowly over the bottle caps, letting it spread between the gaps. Use a stir stick to guide it into corners if needed. You want enough resin to cover the bottle caps and create a smooth tray surface.

Do not overfill the tray. Resin can creep up the sides or spill if you add too much.

Once poured, use a craft heat tool or small torch to remove bubbles. Keep the heat moving and do not hold it in one spot too long. The competitor article also notes using a craft heat tool to help remove tiny resin bubbles.

Let The Tray Cure Properly

Once the resin is poured, leave the tray alone on a level surface.

Cover it with a large box or plastic storage tub to keep dust, pet hair and wandering insects out of the resin while it cures. Make sure the cover does not touch the resin.

Most resin needs at least 24 hours to cure, but some brands take longer. Follow your product instructions.

Do not poke it. I know it is tempting. Do not do it.

Once cured, the surface should be firm, smooth and glossy.

Finishing Touches

After the resin has cured, check the tray edges.

If there are any rough resin drips, carefully trim or sand them according to your resin product’s instructions. Add felt pads to the bottom of the tray to protect tables.

If your tray handles look tired, replace them with new ones or wrap them with twine, leather cord or fabric strips.

You can also add a clear sealer to painted outer edges if the tray will be used outdoors or around drinks.

Design Ideas For Your Bottle Cap Tray

A bottle cap tray can go in lots of different directions.

For a home bar tray, use beer caps and paint the tray black, charcoal or deep green.

For a retro kitchen tray, use colourful soda caps and a bright painted base.

For a patio tray, use mixed caps and a weathered wood tray.

For a Father’s Day gift, collect caps from favourite beers or drinks and add a simple masculine colour palette.

For a travel memory tray, use caps collected from trips, breweries or special events.

For a coastal look, mix blue, white and silver caps with a pale painted tray.

For a craft room tray, use colourful caps and keep it on your desk for scissors, glue sticks, pens and washi tape.

What Can You Use The Finished Tray For?

This tray is practical as well as decorative.

Use it as:

A drinks tray
A coffee table tray
A home bar tray
A patio serving tray
A craft supply tray
A desk organiser
A Father’s Day gift
A handmade housewarming gift
A barbecue serving tray
A game-room or man-cave accessory
A display tray for candles or plants

If you are using it for food or drinks, keep food on plates or napkins rather than directly on the resin surface unless your resin product specifically says it is food-safe. Many craft resins are decorative only.

Troubleshooting Resin Tray Problems

If your resin has lots of bubbles, you may have stirred too fast or skipped the heat tool step. Stir slowly and use gentle heat after pouring.

If bottle caps float, they were not glued down firmly enough. Let the glue cure overnight before resin.

If the resin cures sticky, the mixture may not have been measured or stirred correctly. Follow the resin ratio exactly.

If dust lands in the resin, cover the tray while it cures.

If resin pools to one side, your surface was not level. Use a small level before pouring.

If caps show through above the resin, you may need a second thin pour after the first layer cures.

More Bottle Cap Craft Ideas

Once you start saving bottle caps, there are plenty of ways to use them.

CraftGossip has an older roundup of crafts to use your extra bottle caps, which is a useful internal link for anyone who has more caps than tray space.

CraftBits also has a cheerful Bottle Cap Daisy Garden Wall Art project, which would pair nicely with this tray for a recycled craft cluster. You can also browse the wider CraftBits recycled crafts category for more projects using bottles, tins, jars and other saved bits from around the house.

And if you want a matching garden-style project, a recycled bottle cap planter would make a lovely companion piece to this tray.

Why This Project Is Worth Making

A recycled bottle cap tray is one of those projects that feels both useful and personal. You are not just decorating a tray; you are turning a pile of little saved pieces into something practical.

It is thrifty, colourful, sturdy, and easy to customise for different people or rooms. It also makes a great handmade gift for someone who loves entertaining, craft beer, garden parties, retro décor or recycled crafts.

So if you have an old tray waiting for a makeover and a jar of bottle caps that has been quietly judging you from the shelf, this is their moment.

Give them some glue, a glossy coat of resin, and a second life as something worth serving drinks on.

Explore

books Christmas CraftGossip Giveaways Craft Inspirations Easter glass halloween Home Decor kid crafts More Crafts Patterns & Tutorials Recycled and Thrifted Ideas recycled art Recycled Clothing Recycled Jewelry Recycled kids crafts Recycled Sewing Recycling Ideas Recycling Organizing tin can

Featured Posts

How to make a recycled book pumpkin

How to make a recycled salt shaker menorah

Recycled necktie monster plushy great for Halloween

Welcome (and welcome)

How to make a “loving” banner

RSS feed: More Articles More Articles

  • Christmas Tree Crochet Scarf – A Fun and Festive Pattern Worth Revisiting
  • Paper Snowflake Art Book Review: 100 Patterns for a Nostalgic Paper Craf
  • 20 Infant Lesson Plan Ideas for Birth to 12 Months
  • Free Felting Tutorial Friday: Wet Felted Wool Cookie Cutter Ornaments
  • Free Poinsettia Embroidery Design Review
  • DIY Terracotta Pot Miniature Pond: A Mossy Little Water Garden for Your Patio
  • 20 November Lesson Plan Ideas for Preschool and Elementary
  • Book Review: Stitches from the Yuletide by Kathy Schmitz
  • Thanksgiving Scrapbook Layouts That Tell the Story Around the Table
  • How To Make Christmas Resin Jewelry: Easy Handmade Pendants, Earrings And Gift Ideas

Copyright © 2026 · CraftGossip | Start Here | Contact Us | Link to Us | Your Editors | Privacy and affiliate policy