• Home
  • Suggest A DIY
  • DIY Newsletter

Recycled Crafts

Creative DIY Projects That Turn Trash Into Treasure

  • About CraftGossip
  • Our Network
    • Bath & Body Crafts
    • Candle Making Ideas
    • Crochet Ideas
    • Cross Stitch
    • Edible Crafts
    • Felting Patterns
    • Glass Art
    • Home & Garden Ideas
    • Indie Crafts
    • Jewelry Making
    • Kids Crafts
    • Knitting Patterns
    • Lesson Plans
    • Needlework
    • Party Ideas
    • Polymer Clay
    • Quilting Ideas
    • Recycled Crafts
    • Scrapbooking
    • Sewing Patterns
    • Card Making
    • DIY Weddings
    • Not Craft Ideas
  • Giveaways
  • Roundups
  • Store
  • Search

Giveaway- Paper Pom-poms and Other Party Decorations: 35 Step-by-step Projects to Make With Tissue, Paper and Card

December 29, 2015 by Stefanie Girard

Screen Shot 2015-12-03 at 5.52.05 PM

Giveaway–Paper Pom-poms and Other Party Decorations: 35 Step-by-step Projects to Make With Tissue, Paper and Card

Leave a comment in today’s post by January 8th, 2016 and you are in the running for this beautiful paper crafting book that is filled with so many great projects I don’t know which one I am going to make first!

Open to U. S. residents only please.

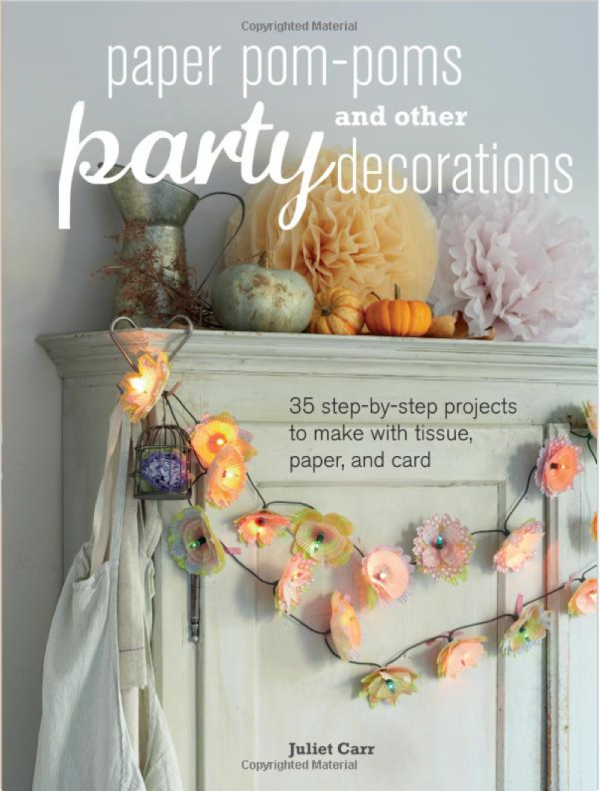
Discover how to create a spectacular setting for your next party with these 35 fabulous projects. From eye-catching pom-poms to pretty garlands and stunning giant flowers, you’ll want to make every one of these wonderful paper decorations.

Begin with the classic pom-poms–popular in the 60s and 70s, but enjoying a stylish revival today. Make them in different sizes and colors for a real impact. Learn, too, how to make honeycomb balls, a star piñata, and rosette snowflakes–all beautiful hanging decorations that will look great hung from the ceiling, in a window, or on a Christmas tree. In chapter 2, you’ll find garlands and bunting–why not try the cupcake garland, using cupcake cases to sit around fairy lights and look like twinkling flowers? Or have a go at the vintage book bunting that would add character at a themed party, or even in your workspace.

Finally, create impressive centerpieces–giant roses and daffodils, a coffee filter flower wreath, and waxed floating lilies are among the striking designs. The projects use a variety of paper materials, including tissue, cardstock, and crepe paper, as well as recycled magazine pages and gift-wrap–and no specialist craft experience is needed. Step-by-step photography will show you exactly what to do. You’ll also find out about all the different types of paper available–such as water-resistant tissue paper, and two-tone paper that has a different color on each side of it–as well as where to buy them. Plus, every template you’ll need is included at the back of the book.

Related Posts:

  • 15 Beautiful Things To Make With Old Book Pages
  • 40 Recycled Crafts For Adults That Turn Trash Into Treasure
«
»

Comments

  1. Barbara Vaughan says

    December 29, 2015 at 11:34 am

    I would love to win because my granddaughter loves crafts and my grandson loves origami so I think this would be perfect. Barbara Vaughan

  2. Bonney says

    December 29, 2015 at 11:55 am

    I love that garland. This book looks so interesting. I love working with paper.

  3. Joy says

    December 29, 2015 at 12:20 pm

    I love making crafts out of paper because it’s usually inexpensive and often recycles.

  4. Deb Neerman says

    December 29, 2015 at 12:42 pm

    Oh baby, my paper-crafting, paper-lovin’ heart is skipping beats! Would love to own this treasure …. thanks so much for the chance!

  5. Janine says

    December 29, 2015 at 1:14 pm

    Would love to win ! My kids craft with me too !

  6. Carla Hundley says

    December 29, 2015 at 1:28 pm

    This book sounds like a lot of
    fun to be had! Thanks for
    offering this giveaway!
    Happy New Year.
    Carla from Utah

  7. lindaedkinswyatt says

    December 29, 2015 at 2:01 pm

    Oooh, I would looove to win this! Right up my alley????

  8. Julie says

    December 29, 2015 at 2:05 pm

    I love papercrafting, I need an excuse to use all my tools!

  9. Patricia Jones says

    December 29, 2015 at 3:49 pm

    I would love to win as I try to keep six grandkids busy in their “free”time with crafts rather than electronic gizmos!!!

  10. duchick says

    December 29, 2015 at 8:57 pm

    This book sounds so interesting and would be so much fun! I’d love to create my own decorations for parties and get-togethers. Being creative is just my style!

  11. Sara S says

    December 29, 2015 at 11:54 pm

    This sounds like fun! My family enjoys paper for many artsy things, and this book would be a welcome addition to our excitement!

  12. Erika Todden says

    December 30, 2015 at 12:21 am

    Can’t wait to see the ideas! Love this garland featured on the mantle!

  13. shari harniss says

    December 30, 2015 at 9:56 am

    This book looks so cool! I would love to win this!

  14. .|k|. says

    December 30, 2015 at 10:09 am

    I love paper crafts and this looks like a beautiful book. Thanks for hosting the giveaway!

  15. Heather S says

    December 30, 2015 at 10:12 am

    How FUN! I would la la LOVE to win and use this book! xoxo

  16. Mary Helene says

    December 30, 2015 at 11:11 am

    This craft book would be so much fun to make projects with my grand daughter.

  17. Denise Bryant says

    December 30, 2015 at 12:47 pm

    Looks like some beautiful projects to make!

  18. Candace says

    December 30, 2015 at 1:01 pm

    WOW!!!! This looks like a lot of fun! And rather elegant too!!!!
    x0x0x0x

  19. Pat Schwab says

    December 30, 2015 at 1:41 pm

    Thanks for a chance to win this book. I would love to learn how to make paper decorations.

  20. annehaun says

    December 30, 2015 at 2:42 pm

    Sounds like a fantastic book – thanks for the chance to win.

  21. Alice C. says

    December 30, 2015 at 3:47 pm

    I truly love paper crafting and these projects would be fabulous for many occasions! Pick me!

  22. Susan Spiers says

    December 30, 2015 at 4:26 pm

    Great fun & pretty too!

  23. Theresa says

    December 30, 2015 at 6:31 pm

    Oh, what a terrific looking book. I’d love to see the insides of it.
    Thanks for the chance to win.

  24. Kris Westphal says

    December 30, 2015 at 10:12 pm

    If I don’t win this book I’m going to need the super soft type of tissues! 😀

  25. Angela Rose says

    December 30, 2015 at 10:43 pm

    WOW !

  26. Jackie Posnansky says

    December 31, 2015 at 5:45 am

    I am always looking for new ideas. Your book looks fantastic! My fingers are crossed to win!

  27. Angie Quinn says

    December 31, 2015 at 8:36 am

    Creating with paper and fabric my two favorite escapes and the thought of what’s inside this book made my heart skip a beat!

  28. Ramona Brady says

    January 1, 2016 at 1:41 am

    OMG! Need!! A ton of great projects!

  29. Susan T says

    January 1, 2016 at 6:43 pm

    This looks like fun! I love paper crafts.

  30. Kathy Faries says

    January 2, 2016 at 5:25 pm

    I would love to win this! I do crafts with the seniors and I just know there are projects in there that they would love to do! Many thanks!

  31. Tina Goodall says

    January 3, 2016 at 11:12 pm

    Instant love of that garland on the front of the book!! Squee! I’m making that first!

  32. Dennis Mullins Sr says

    January 5, 2016 at 4:12 pm

    I love all kinds of paper crafts so this book would be great for me. Thanks for a chance.

  33. Gizala says

    January 6, 2016 at 3:44 pm

    I’m always looking for new ideas to kick it up a notch!

  34. Karey says

    January 7, 2016 at 12:26 am

    Cool book! It’s amazing what you can make with paper!

  35. Peechee Neric says

    January 8, 2016 at 6:39 am

    I love Pom-poems and paper crafting! This would be an awesome win! Thanks for offering it.

  36. Marilyn Giardini says

    August 17, 2018 at 5:44 pm

    I truly enjoy your website! Recycled crafts are environmentally friendly: treasured, rather than trashed! Of all the holiday crafts, I enjoy creating Christmas crafts the most! Thank you for the opportunity for a chance to win that great book! Sincerely stated, Marilyn G. ?

Have you read?

Vintage Doily Jar Lanterns: A Pretty Recycled Jar Craft For Weddings, Tables & Cozy Corners

Turn old glass jars, thrifted doilies, lace, burlap and twine into romantic DIY jar lanterns for weddings, table décor, porch styling and handmade gifts. A pretty recycled craft for adults using supplies you may already have.

There is something about an old doily that instantly makes a project feel soft, nostalgic and just a little bit romantic. Add a recycled glass jar, a scrap of burlap or lace, and a warm little candle glow, and suddenly you have the kind of handmade décor that looks like it belongs on a wedding table, a mantel, a porch step or a cozy sideboard.

These vintage doily jar lanterns are one of those lovely recycled crafts for adults that feel much fancier than they actually are. You can make them from empty pasta sauce jars, jam jars, mason jars, old candle jars or any clear glass container you’ve been saving because “it might come in handy one day.” And finally, yes, it has.

They are perfect for rustic weddings, bridal showers, Mother’s Day table settings, handmade gifts, Christmas displays, garden parties or quiet little corners that need a bit of glow. If you enjoy recycled crafts, you might also like browsing the Recycled Crafts section on CraftGossip for more upcycling ideas, or the Recycled Crafts category on CraftBits for practical projects using jars, tins, bottles and everyday household bits.

Why This Recycled Jar Craft Works So Well

The beauty of this project is in the contrast. Glass keeps it clean and simple, the doily adds delicate detail, and burlap or twine gives it that rustic handmade finish. It is a sweet little meeting point between vintage, farmhouse and shabby-chic décor.

This is also a very forgiving craft. Your jars do not need to match. Your doilies do not need to be perfect. In fact, slightly mismatched jars and thrifted doilies often look better together because they feel collected rather than mass-produced.

If you are making these for a wedding or party, you can create a whole table full of them without spending a fortune. If you are making one or two for home décor, it is a lovely way to use up a pretty doily that has been sitting in a drawer waiting for its moment.

And if you are anything like me, you probably already have at least three suitable jars hiding in the cupboard because they were “too nice to throw out.” This is their time to shine.

Supplies You Will Need

Clean recycled glass jars
Small vintage doilies, crochet doilies or lace pieces
Burlap ribbon, lace ribbon, torn fabric strips or twine
Craft adhesive spray or Mod Podge
Small buttons, charms or ribbon scraps
Battery-operated tealights
Scissors
A paintbrush, if using Mod Podge
Rubbing alcohol or vinegar for cleaning glass
Optional: jute string, pearl trim, dried flowers, tags or small fabric scraps

For supplies, I’d use what you already have first. This project is perfect for raiding the sewing basket, the linen cupboard and the “random trims I bought years ago” box. If you need basics, Amazon is useful for battery tealights, Mod Podge, twine, glue guns and craft adhesive spray. Etsy can be lovely for vintage doilies or lace bundles, but use it sparingly if you only need one or two pieces.

Choosing The Right Jars

Clear glass jars work best because they allow the light to glow through the doily pattern. Jam jars, pasta sauce jars, pickle jars, old candle jars and mason jars are all good choices.

Look for jars with straight or gently curved sides. Heavily ridged jars can make it harder for the doily to sit flat, although they can still work if you are using a smaller lace motif.

Remove all labels and sticky residue before you begin. Soak the jars in warm soapy water, then use a little oil, rubbing alcohol or adhesive remover if the label glue is being stubborn. Dry the jars completely before adding your doily.

A quick wipe with rubbing alcohol or vinegar helps remove fingerprints and oils from the glass, which gives your adhesive a better surface to grip.

Choosing Doilies And Lace

Vintage cotton doilies give the prettiest effect because the openwork pattern lets the candlelight shine through. Crochet doilies, small lace motifs, cut pieces from damaged lace tablecloths, or old lace curtain scraps can all work beautifully.

If your doily is too large for the jar, you can cut a section from it, especially if it is already damaged or stained. I know cutting into vintage linens can feel a bit naughty, but if the piece is otherwise unusable, turning it into something lovely is much better than leaving it in a drawer forever.

Paper doilies can work for a quick party version, but they do not have the same texture or softness as fabric or crochet doilies. They can also wrinkle more easily when glued.

For a softer romantic look, use white or cream doilies. For a rustic farmhouse look, pair cream doilies with burlap and jute twine. For weddings, choose lace and ribbon colours that match your theme.

How To Make Vintage Doily Jar Lanterns

Start by washing and drying your jars thoroughly. Make sure there is no grease, dust or label residue left on the glass.

Lay your doily flat and position the jar over it to decide where the design should sit. For most jars, placing the doily on one side works beautifully and keeps the lantern from looking too busy.

If using adhesive spray, place the doily face down on scrap paper or inside a cardboard box to catch overspray. Lightly spray the back of the doily, then carefully press it onto the jar. Smooth from the centre outward so the lace or crochet sits neatly against the glass.

If using Mod Podge, brush a thin layer onto the back of the doily or directly onto the jar. Press the doily in place, then gently smooth it down. You can brush a light layer over the top to seal it, but avoid overloading it or the doily may become too stiff and cloudy.

Let the jar dry completely before adding trims.

Wrap burlap ribbon, lace, torn fabric or twine around the neck of the jar. Tie it in a simple bow or knot. Add a small button, charm, tag or dried flower if you want a more finished look.

Place a battery-operated tealight inside the jar and watch the doily pattern glow.

Candle Safety Notes

For this project, I strongly recommend battery-operated tealights, especially if you are using burlap, twine, lace, dried flowers or any fabric trim near the top of the jar.

If you choose to use real candles, keep all fabric, twine and trims well away from the flame. Never leave lit candles unattended, and do not use real candles for outdoor events where wind could shift trims or decorations.

Battery candles are safer, reusable and much easier for weddings or parties because you can turn them on before guests arrive without worrying about wax, flames or little hands reaching across the table.

Pretty Variations To Try

For a wedding centerpiece, group three jars of different heights together on a wood slice or tray. Add greenery, baby’s breath, dried lavender or small scattered flowers around the base.

For a Christmas version, use cream lace, red ribbon, tiny pinecones and warm white battery lights.

For a coastal version, skip the burlap and add jute twine with a small shell charm. This would sit beautifully with other beachy upcycled pieces, especially if you like projects such as the DIY scallop shell and can organizer on CraftBits.

For a farmhouse table, use torn ticking fabric, jute twine and wooden buttons.

For a romantic Valentine’s Day version, add soft pink ribbon, a small heart charm or a tiny tag with a handwritten message. You could pair it with other handmade Valentine décor from the Valentine’s Day crafts collection on CraftBits.

For a garden party, use mismatched jars and hang them from shepherd hooks or place them along a path. Use battery lights only if hanging them outdoors.

How To Make Them Look More Expensive

The secret is restraint. I know, I know — the craft table says “add more ribbon,” but sometimes the jar just wants one good bow and a button.

Stick to two or three textures. For example: glass, lace and twine. Or glass, doily and satin ribbon. Too many trims can make the jar look cluttered.

Use matching candle colours. Warm white battery tealights look much better than harsh blue-white ones.

Trim loose threads neatly. Burlap can fray in a charming way, but there is a fine line between rustic and “dragged through the craft cupboard.”

Group jars in odd numbers. Three or five lanterns together usually look more styled than two or four.

Use height variation. Mix short jam jars with taller pasta sauce jars or mason jars for a more collected display.

Where To Use Doily Jar Lanterns

These recycled jar lanterns work beautifully as:

Wedding centerpieces
Bridal shower table décor
Mother’s Day gifts
Mantel decorations
Porch lanterns
Guest room nightstand décor
Christmas table accents
Rustic party decorations
Handmade hostess gifts
Craft stall items
Memorial table lights
Garden party decorations

They are also lovely for using up inherited linens in a gentle way. If you have a damaged doily from a grandmother or aunt, this can be a sweet way to keep part of it visible rather than packed away.

Tips For Batch-Making These For Weddings Or Events

If you are making a large number of jar lanterns, start collecting jars early. Ask friends and family to save jars for you, but be specific about the size and shape you want or you may end up with 47 pickle jars and one tiny mustard pot.

Clean all jars in one go and remove labels before the crafting day. This is the least glamorous part of the project, so do it ahead of time.

Choose two or three trim styles and repeat them across the jars. For example, some jars might have lace ribbon, some might have burlap, and some might have twine, but keep the colour palette consistent.

Use battery tealights in bulk. They are much easier than managing real candles at an event, and guests can take the lanterns home afterwards as favours.

If you want name tags or table numbers, tie small kraft tags around the necks of the jars. This turns the lanterns into useful wedding décor rather than just pretty extras.

Troubleshooting

If your doily keeps lifting, your jar may not be clean enough or the doily may be too heavy. Wipe the jar again and use a stronger adhesive or a thinner lace piece.

If the doily wrinkles, use less glue. Too much wet adhesive can cause fabric and lace to buckle.

If the jar looks cloudy, you may have used too much Mod Podge over the top. A thin coat is enough.

If the burlap frays too much, add a tiny line of clear glue along the cut edge or use wired burlap ribbon instead.

If the lantern looks too plain, add a small charm, button, tag or ribbon bow to the neck. Do not cover too much of the glass, though — the glow is the prettiest part.

More Recycled Jar Craft Ideas

Once you start saving jars, it is hard to stop. They are useful for candle holders, pantry storage, craft room organisation, vases, gift jars and seasonal displays.

For another recycled jar idea, have a look at this Mason Jar Photo Frame on CraftBits. It has the same “simple jar turned into something special” feel.

You may also enjoy browsing the jars tag on CraftGossip for more jar-based craft inspiration, especially if your recycling bin is currently looking a little too inspiring.

A Gentle Little Upcycling Reminder

Projects like these are why I love recycled crafts. You are not buying a whole new pile of supplies. You are taking something ordinary — a jar, a doily, a scrap of ribbon — and giving it a second life.

It is soft, pretty, budget-friendly and practical. And if anyone asks why you have a cupboard full of empty jars, simply point to your glowing doily lanterns and say, “See? I had a plan.” 

Explore

books Christmas CraftGossip Giveaways Craft Inspirations Easter glass halloween Home Decor kid crafts More Crafts Patterns & Tutorials recycled art Recycled Clothing Recycled Jewelry Recycled kids crafts Recycled Sewing Recycled Tutorials Recycling Ideas Recycling Organizing tin can

RSS More Articles

  • 4 FREE Downloadable Sentiments for Dad
  • Everything You Need to Know About Embroidery Hoops
  • Printable Stickers for Journals and Planners – Self Care
  • Needle Felting Fairy Tutorial by Santa Meada
  • Stitch Your Favorite Fruit on a Sweater
  • 12 Color Wheel Inspired Scrapbook Layouts
  • Crafts With Old Bricks: Creative Ways To Upcycle Leftover Bricks
  • How To Make A Milk Mache Molding Compound
  • The 5 Outlet Placement Mistakes You Don’t Want to Make
  • Celebrate the Spirit of the Southwest with These Stunning Indian Navajo Tribal Quilt Patterns

Copyright © 2026 · CraftGossip | Start Here | Contact Us | Link to Us | Your Editors | Privacy and affiliate policy