• Home
  • Suggest A DIY
  • DIY Newsletter

Recycled Crafts

Creative DIY Projects That Turn Trash Into Treasure

  • About CraftGossip
  • Our Network
    • Bath & Body Crafts
    • Candle Making Ideas
    • Crochet Ideas
    • Cross Stitch
    • Edible Crafts
    • Felting Patterns
    • Glass Art
    • Home & Garden Ideas
    • Indie Crafts
    • Jewelry Making
    • Kids Crafts
    • Knitting Patterns
    • Lesson Plans
    • Needlework
    • Party Ideas
    • Polymer Clay
    • Quilting Ideas
    • Recycled Crafts
    • Scrapbooking
    • Sewing Patterns
    • Card Making
    • DIY Weddings
    • Not Craft Ideas
  • Giveaways
  • Roundups
  • Store
  • Search

Giveaway- Paper Jewelry: 55 Projects for Reusing Paper

July 21, 2015 by Stefanie Girard

Paper jewelry

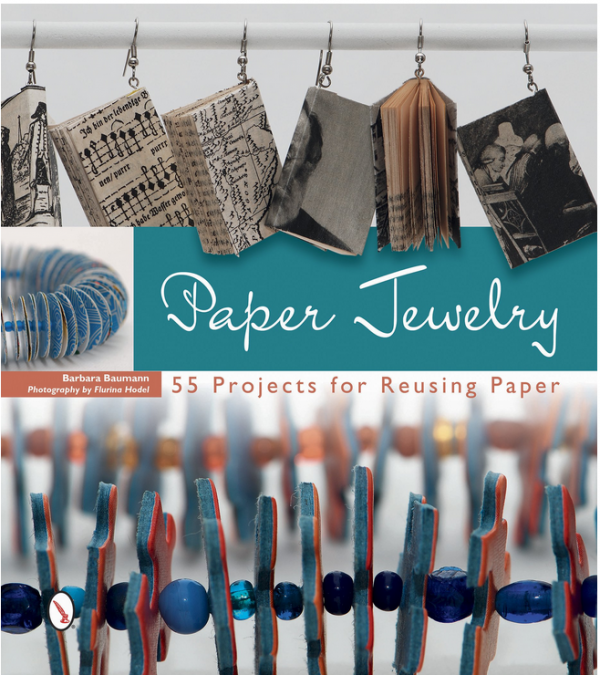
Enter to win the beautiful new book Paper Jewelry: 55 Projects for Reusing Paper

by Barbara Baumann by leaving a comment in today’s post by July 30th, 2015.

Open to U. S. residents only please.

Looking for jewelry-making supplies? Check out our favorite supplier BeeBeeCraft


Beautiful and creative contemporary designs abound in this book. They are very do-able for virtually any level crafter. If you like making jewelry and looking for a good tutorial book on working with paper this will surely give you lots of directions and ideas for your designs. If you are a paper crafter or mixed-media artist looking to get into jewelry making this would make a great guide.There are some astounding new concepts and ideas in this book like using cigarette filters as beads!!!!! I will be running right out to try this new material to work with. There are some other really innovative combinations of materials and construction techniques that I look forward to trying as well.

More about the book from the publisher, Schiffer Publishing:

“With detailed instructions, templates, and colorful photography, this book shows how to craft 55 paper jewelry projects. Colorful and graphic designs range from necklaces, brooches, earrings, and bracelets to hair accessories. Learn how to find inspiration in a wide variety of recycled papers. Projects re-use maps, stationery, comic books, cardboard, magazines, and even candy wrappers. The various projects appeal to a wide variety of aesthetics, from the more traditional and refined to the more contemporary and flamboyant. There are also projects for a wide range of skill levels, making this an inspiring and practical book for everyone from beginners to established jewelry artists.”

Related Posts:

  • 15 Recycled Golf Ball Crafts For Garden Art, Gifts…
  • Upcycled Keyboard Key Crafts: 20+ Clever Ways to…
«
»

Comments

  1. Melinda says

    July 21, 2015 at 6:29 pm

    Have been making paper beads for a while and how fun would it be to do so much more.

  2. Randy Torres says

    July 21, 2015 at 6:34 pm

    Yes please!

  3. Susan Jackson says

    July 21, 2015 at 6:45 pm

    I would love to have this book. I hope I win.

  4. Chantel Lee says

    July 21, 2015 at 7:11 pm

    Sounds like a fun book!

  5. Deb Neerman says

    July 21, 2015 at 7:53 pm

    As a beginning jewelry maker and a dedicated upcycler, this book would make my crafting and upcycling easy and fun. I’m so impressed with this book and would love to add it to my crafting library … thanks so much for the chance!

  6. Erin S. says

    July 21, 2015 at 8:05 pm

    Looks like an awesome book, fingers crossed!

  7. Renate says

    July 21, 2015 at 8:23 pm

    Looks awesome!

  8. Lynne Florig- says

    July 21, 2015 at 8:25 pm

    Would love to play with this!

  9. barbaramoore28 says

    July 21, 2015 at 9:09 pm

    This book sounds magnificent! Fingers crossed I win!

  10. Sandi Nakoneczny says

    July 21, 2015 at 10:08 pm

    Sounds like such fun. Would love to win.

  11. Allison CB says

    July 21, 2015 at 10:18 pm

    This looks like a great book!

  12. MelodyJ says

    July 22, 2015 at 2:25 am

    This looks interesting.

  13. Leah says

    July 22, 2015 at 2:26 am

    I love learning new ways to repurpose would-be trash into something new and functional & a book like this would be perfect. It would also be fun to learn & share with my kids.

  14. Ellie says

    July 22, 2015 at 8:02 am

    I would love this- it would be fun to play with as one of my intended projects this summer is paper beads.

  15. Tammy Davis says

    July 22, 2015 at 8:56 am

    I would love something to use my scraps – I never throw anything away! Thanks for the chance to win!

  16. Joanne Carpenter says

    July 22, 2015 at 9:37 am

    This book looks like fun and chock-ful of new ideas!

  17. Vika says

    July 22, 2015 at 10:56 am

    Paper jewelry is one of my hobbies. I would be interested in extending my knowledge in it.

  18. Charlene Anderson says

    July 22, 2015 at 11:13 am

    Sounds like a wonderful book!

  19. maidenjane says

    July 22, 2015 at 11:19 am

    It looks inspiring! Thank you!

  20. Kathleen K says

    July 22, 2015 at 11:22 am

    love to get this

  21. Jan says

    July 22, 2015 at 11:26 am

    Would love to see 55 ways!

  22. Linda Vairamoglou says

    July 22, 2015 at 11:29 am

    How wonderful! I can’t imagine how much fun it would be to own this book. The book earrings are perfect. I can see high school and college girls craving them. How creative!

  23. Eileen Hughes says

    July 22, 2015 at 11:31 am

    Paper is a great medium to work with. Projects look like fun.

  24. Holly Young says

    July 22, 2015 at 11:37 am

    I’d love to win this! Making things with paper is one of the most fun things to do, and this book looks like it has a lot of neat ideas. Thanks for the chance!

  25. Marcia says

    July 22, 2015 at 11:47 am

    Just up my interest alley! I would love this book!

  26. Mary Helene says

    July 22, 2015 at 11:47 am

    I love making recycled paper beads.

  27. kim says

    July 22, 2015 at 11:52 am

    So exciting! Love the post and the book looks awesome. I love paper and thanks so much for a chance to win!~kim

  28. joyce says

    July 22, 2015 at 12:04 pm

    I love anything made with old books.

  29. Julie Buscher says

    July 22, 2015 at 12:10 pm

    Looks like a lot of fun!

  30. Jane Thomas says

    July 22, 2015 at 12:33 pm

    I love papercrafts and this book looks wonderful.

  31. boblosan says

    July 22, 2015 at 12:38 pm

    I’d love to win this book – it sounds like a great way to use my “extra” scrapbook paper 🙂

  32. sarasara771Sara Lynott says

    July 22, 2015 at 12:47 pm

    This looks like such a fun book. Always looking to recycle.

  33. Sharon SS says

    July 22, 2015 at 12:48 pm

    I’ve done paper crafting, but not anything so small. Would love to give it a try.

  34. Pat Schwab says

    July 22, 2015 at 1:12 pm

    Hope I win this. I have been wanting to try making paper jewelry. Thanks for a chance to win this book.

  35. Sharon Cardenez says

    July 22, 2015 at 1:13 pm

    Getting ideas just from the cover. What magic could be inside?

  36. Barbara Rose says

    July 22, 2015 at 1:20 pm

    What a great book! The project are awesome. I can’t wait to try them!

  37. Phyllis says

    July 22, 2015 at 1:47 pm

    Yes, please!

  38. Linda says

    July 22, 2015 at 1:58 pm

    This book looks like what I have been wanting!

  39. Barbara says

    July 22, 2015 at 2:29 pm

    I love using paper for different crafts

  40. mizdebonealDebra ONeal says

    July 22, 2015 at 2:47 pm

    I would love to have this book – it’s already on my Amazon wish list!

  41. Evelene sterling says

    July 22, 2015 at 3:33 pm

    Thanks for a chance to win. It looks like fun!

  42. Jane S. says

    July 22, 2015 at 3:38 pm

    What a fun book! I enjoy working with paper, and making jewelry is part of that pleasure. Thanks for the chance to win. 🙂

  43. Dennis Mullins Sr says

    July 22, 2015 at 3:46 pm

    Hi, I love working with paper and making jewerly. This giveaway would be a great thing to win. Thanks for a chance and have a great week.

  44. C. Timko says

    July 22, 2015 at 4:17 pm

    As a lover of all things paper I would be giddy with joy to win this book.

  45. Cindy says

    July 22, 2015 at 4:23 pm

    Would love to have 55 more great ideas!

  46. Debby says

    July 22, 2015 at 6:39 pm

    I love the look of reusing old music, but there are certain pieces I don’t dare touch. I should get a old book from good will or somewhere for projects. This looks like fun.

  47. Karen @ Crafty Commons says

    July 22, 2015 at 7:08 pm

    Would love to have this book!

  48. kim says

    July 22, 2015 at 7:52 pm

    this looks fabulous!

  49. Theresa K says

    July 22, 2015 at 8:20 pm

    I love paper crafting and recycling items, so this sounds like a very interesting bookThanks for the chance to win.

  50. tusitalabrenda says

    July 22, 2015 at 9:07 pm

    Please allow me to win this book for our public library’s crafts collectio! Mahalo.

Newer Comments »

Have you read?

Vintage Doily Jar Lanterns: A Pretty Recycled Jar Craft For Weddings, Tables & Cozy Corners

Turn old glass jars, thrifted doilies, lace, burlap and twine into romantic DIY jar lanterns for weddings, table décor, porch styling and handmade gifts. A pretty recycled craft for adults using supplies you may already have.

There is something about an old doily that instantly makes a project feel soft, nostalgic and just a little bit romantic. Add a recycled glass jar, a scrap of burlap or lace, and a warm little candle glow, and suddenly you have the kind of handmade décor that looks like it belongs on a wedding table, a mantel, a porch step or a cozy sideboard.

These vintage doily jar lanterns are one of those lovely recycled crafts for adults that feel much fancier than they actually are. You can make them from empty pasta sauce jars, jam jars, mason jars, old candle jars or any clear glass container you’ve been saving because “it might come in handy one day.” And finally, yes, it has.

They are perfect for rustic weddings, bridal showers, Mother’s Day table settings, handmade gifts, Christmas displays, garden parties or quiet little corners that need a bit of glow. If you enjoy recycled crafts, you might also like browsing the Recycled Crafts section on CraftGossip for more upcycling ideas, or the Recycled Crafts category on CraftBits for practical projects using jars, tins, bottles and everyday household bits.

Why This Recycled Jar Craft Works So Well

The beauty of this project is in the contrast. Glass keeps it clean and simple, the doily adds delicate detail, and burlap or twine gives it that rustic handmade finish. It is a sweet little meeting point between vintage, farmhouse and shabby-chic décor.

This is also a very forgiving craft. Your jars do not need to match. Your doilies do not need to be perfect. In fact, slightly mismatched jars and thrifted doilies often look better together because they feel collected rather than mass-produced.

If you are making these for a wedding or party, you can create a whole table full of them without spending a fortune. If you are making one or two for home décor, it is a lovely way to use up a pretty doily that has been sitting in a drawer waiting for its moment.

And if you are anything like me, you probably already have at least three suitable jars hiding in the cupboard because they were “too nice to throw out.” This is their time to shine.

Supplies You Will Need

Clean recycled glass jars
Small vintage doilies, crochet doilies or lace pieces
Burlap ribbon, lace ribbon, torn fabric strips or twine
Craft adhesive spray or Mod Podge
Small buttons, charms or ribbon scraps
Battery-operated tealights
Scissors
A paintbrush, if using Mod Podge
Rubbing alcohol or vinegar for cleaning glass
Optional: jute string, pearl trim, dried flowers, tags or small fabric scraps

For supplies, I’d use what you already have first. This project is perfect for raiding the sewing basket, the linen cupboard and the “random trims I bought years ago” box. If you need basics, Amazon is useful for battery tealights, Mod Podge, twine, glue guns and craft adhesive spray. Etsy can be lovely for vintage doilies or lace bundles, but use it sparingly if you only need one or two pieces.

Choosing The Right Jars

Clear glass jars work best because they allow the light to glow through the doily pattern. Jam jars, pasta sauce jars, pickle jars, old candle jars and mason jars are all good choices.

Look for jars with straight or gently curved sides. Heavily ridged jars can make it harder for the doily to sit flat, although they can still work if you are using a smaller lace motif.

Remove all labels and sticky residue before you begin. Soak the jars in warm soapy water, then use a little oil, rubbing alcohol or adhesive remover if the label glue is being stubborn. Dry the jars completely before adding your doily.

A quick wipe with rubbing alcohol or vinegar helps remove fingerprints and oils from the glass, which gives your adhesive a better surface to grip.

Choosing Doilies And Lace

Vintage cotton doilies give the prettiest effect because the openwork pattern lets the candlelight shine through. Crochet doilies, small lace motifs, cut pieces from damaged lace tablecloths, or old lace curtain scraps can all work beautifully.

If your doily is too large for the jar, you can cut a section from it, especially if it is already damaged or stained. I know cutting into vintage linens can feel a bit naughty, but if the piece is otherwise unusable, turning it into something lovely is much better than leaving it in a drawer forever.

Paper doilies can work for a quick party version, but they do not have the same texture or softness as fabric or crochet doilies. They can also wrinkle more easily when glued.

For a softer romantic look, use white or cream doilies. For a rustic farmhouse look, pair cream doilies with burlap and jute twine. For weddings, choose lace and ribbon colours that match your theme.

How To Make Vintage Doily Jar Lanterns

Start by washing and drying your jars thoroughly. Make sure there is no grease, dust or label residue left on the glass.

Lay your doily flat and position the jar over it to decide where the design should sit. For most jars, placing the doily on one side works beautifully and keeps the lantern from looking too busy.

If using adhesive spray, place the doily face down on scrap paper or inside a cardboard box to catch overspray. Lightly spray the back of the doily, then carefully press it onto the jar. Smooth from the centre outward so the lace or crochet sits neatly against the glass.

If using Mod Podge, brush a thin layer onto the back of the doily or directly onto the jar. Press the doily in place, then gently smooth it down. You can brush a light layer over the top to seal it, but avoid overloading it or the doily may become too stiff and cloudy.

Let the jar dry completely before adding trims.

Wrap burlap ribbon, lace, torn fabric or twine around the neck of the jar. Tie it in a simple bow or knot. Add a small button, charm, tag or dried flower if you want a more finished look.

Place a battery-operated tealight inside the jar and watch the doily pattern glow.

Candle Safety Notes

For this project, I strongly recommend battery-operated tealights, especially if you are using burlap, twine, lace, dried flowers or any fabric trim near the top of the jar.

If you choose to use real candles, keep all fabric, twine and trims well away from the flame. Never leave lit candles unattended, and do not use real candles for outdoor events where wind could shift trims or decorations.

Battery candles are safer, reusable and much easier for weddings or parties because you can turn them on before guests arrive without worrying about wax, flames or little hands reaching across the table.

Pretty Variations To Try

For a wedding centerpiece, group three jars of different heights together on a wood slice or tray. Add greenery, baby’s breath, dried lavender or small scattered flowers around the base.

For a Christmas version, use cream lace, red ribbon, tiny pinecones and warm white battery lights.

For a coastal version, skip the burlap and add jute twine with a small shell charm. This would sit beautifully with other beachy upcycled pieces, especially if you like projects such as the DIY scallop shell and can organizer on CraftBits.

For a farmhouse table, use torn ticking fabric, jute twine and wooden buttons.

For a romantic Valentine’s Day version, add soft pink ribbon, a small heart charm or a tiny tag with a handwritten message. You could pair it with other handmade Valentine décor from the Valentine’s Day crafts collection on CraftBits.

For a garden party, use mismatched jars and hang them from shepherd hooks or place them along a path. Use battery lights only if hanging them outdoors.

How To Make Them Look More Expensive

The secret is restraint. I know, I know — the craft table says “add more ribbon,” but sometimes the jar just wants one good bow and a button.

Stick to two or three textures. For example: glass, lace and twine. Or glass, doily and satin ribbon. Too many trims can make the jar look cluttered.

Use matching candle colours. Warm white battery tealights look much better than harsh blue-white ones.

Trim loose threads neatly. Burlap can fray in a charming way, but there is a fine line between rustic and “dragged through the craft cupboard.”

Group jars in odd numbers. Three or five lanterns together usually look more styled than two or four.

Use height variation. Mix short jam jars with taller pasta sauce jars or mason jars for a more collected display.

Where To Use Doily Jar Lanterns

These recycled jar lanterns work beautifully as:

Wedding centerpieces
Bridal shower table décor
Mother’s Day gifts
Mantel decorations
Porch lanterns
Guest room nightstand décor
Christmas table accents
Rustic party decorations
Handmade hostess gifts
Craft stall items
Memorial table lights
Garden party decorations

They are also lovely for using up inherited linens in a gentle way. If you have a damaged doily from a grandmother or aunt, this can be a sweet way to keep part of it visible rather than packed away.

Tips For Batch-Making These For Weddings Or Events

If you are making a large number of jar lanterns, start collecting jars early. Ask friends and family to save jars for you, but be specific about the size and shape you want or you may end up with 47 pickle jars and one tiny mustard pot.

Clean all jars in one go and remove labels before the crafting day. This is the least glamorous part of the project, so do it ahead of time.

Choose two or three trim styles and repeat them across the jars. For example, some jars might have lace ribbon, some might have burlap, and some might have twine, but keep the colour palette consistent.

Use battery tealights in bulk. They are much easier than managing real candles at an event, and guests can take the lanterns home afterwards as favours.

If you want name tags or table numbers, tie small kraft tags around the necks of the jars. This turns the lanterns into useful wedding décor rather than just pretty extras.

Troubleshooting

If your doily keeps lifting, your jar may not be clean enough or the doily may be too heavy. Wipe the jar again and use a stronger adhesive or a thinner lace piece.

If the doily wrinkles, use less glue. Too much wet adhesive can cause fabric and lace to buckle.

If the jar looks cloudy, you may have used too much Mod Podge over the top. A thin coat is enough.

If the burlap frays too much, add a tiny line of clear glue along the cut edge or use wired burlap ribbon instead.

If the lantern looks too plain, add a small charm, button, tag or ribbon bow to the neck. Do not cover too much of the glass, though — the glow is the prettiest part.

More Recycled Jar Craft Ideas

Once you start saving jars, it is hard to stop. They are useful for candle holders, pantry storage, craft room organisation, vases, gift jars and seasonal displays.

For another recycled jar idea, have a look at this Mason Jar Photo Frame on CraftBits. It has the same “simple jar turned into something special” feel.

You may also enjoy browsing the jars tag on CraftGossip for more jar-based craft inspiration, especially if your recycling bin is currently looking a little too inspiring.

A Gentle Little Upcycling Reminder

Projects like these are why I love recycled crafts. You are not buying a whole new pile of supplies. You are taking something ordinary — a jar, a doily, a scrap of ribbon — and giving it a second life.

It is soft, pretty, budget-friendly and practical. And if anyone asks why you have a cupboard full of empty jars, simply point to your glowing doily lanterns and say, “See? I had a plan.” 

Explore

books Christmas CraftGossip Giveaways Craft Inspirations Easter glass halloween Home Decor kid crafts More Crafts Patterns & Tutorials recycled art Recycled Clothing Recycled Jewelry Recycled kids crafts Recycled Sewing Recycled Tutorials Recycling Ideas Recycling Organizing tin can

RSS More Articles

  • 4 FREE Downloadable Sentiments for Dad
  • Everything You Need to Know About Embroidery Hoops
  • Printable Stickers for Journals and Planners – Self Care
  • Needle Felting Fairy Tutorial by Santa Meada
  • Stitch Your Favorite Fruit on a Sweater
  • 12 Color Wheel Inspired Scrapbook Layouts
  • Crafts With Old Bricks: Creative Ways To Upcycle Leftover Bricks
  • How To Make A Milk Mache Molding Compound
  • The 5 Outlet Placement Mistakes You Don’t Want to Make
  • Celebrate the Spirit of the Southwest with These Stunning Indian Navajo Tribal Quilt Patterns

Copyright © 2026 · CraftGossip | Start Here | Contact Us | Link to Us | Your Editors | Privacy and affiliate policy