• Home
  • Suggest A DIY
  • DIY Newsletter

Recycled Crafts

Creative DIY Projects That Turn Trash Into Treasure

  • About CraftGossip
  • Our Network
    • Bath & Body Crafts
    • Candle Making Ideas
    • Crochet Ideas
    • Cross Stitch
    • Edible Crafts
    • Felting Patterns
    • Glass Art
    • Home & Garden Ideas
    • Indie Crafts
    • Jewelry Making
    • Kids Crafts
    • Knitting Patterns
    • Lesson Plans
    • Needlework
    • Party Ideas
    • Polymer Clay
    • Quilting Ideas
    • Recycled Crafts
    • Scrapbooking
    • Sewing Patterns
    • Card Making
    • DIY Weddings
    • Not Craft Ideas
  • Giveaways
  • Roundups
  • Store
  • Search

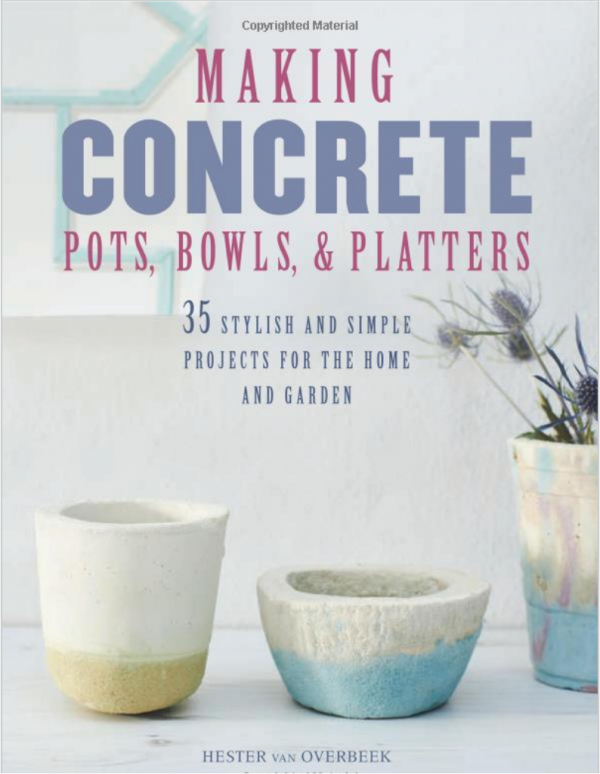
Giveaway- Making Concrete Pots, Bowls, and Platters: 35 stylish and simple projects for the home and garden

February 23, 2017 by Stefanie Girard

Giveaway- Making Concrete Pots, Bowls, and Platters: 35 stylish and simple projects for the home and garden

Leave a comment in today’s post by March 3, 2017 and you are in the running for this awesome book that shows you all sorts of way to make all sorts of things with concrete.

Open to U. S. residents only please.

Create 35 beautiful planters, decorations, and gifts—all using concrete.

Follow Hester van Overbeek‘s simple tutorials to make a huge range of unique concrete projects. You will find everything you need to know—what type of concrete to buy, how to use it, and how to decorate it—explained in a comprehensive techniques section. From there you can make chic and on-trend home accessories such as upside-down plant pots, a concrete vase with a wooden base, serving platters, a letter-shaped bookend, fruit bowls, and much more.
«
»

Comments

  1. lisa Nixon says

    February 23, 2017 at 6:34 pm

    This is definitely a book that I would put to use – it sounds like a very affordable craft with maximum impact.

  2. Chris says

    February 24, 2017 at 12:28 am

    How fun this would be!

  3. Shari Harniss says

    February 24, 2017 at 8:22 am

    Love to win- just in time for spring planting!

  4. Mary says

    February 24, 2017 at 11:00 am

    Oh my gosh … I have been wanting to do this!

  5. Phyllis says

    February 24, 2017 at 11:16 am

    I gonna say, thank you for my book!

  6. Lisa Brinker says

    February 24, 2017 at 12:20 pm

    Gardening & crafting are my two top hobbies so I would love to learn this.

  7. Annamari Szabo says

    February 25, 2017 at 6:32 pm

    I’m very interested in making concrete pots! So this book would be very useful for me!

  8. ellen says

    February 25, 2017 at 10:04 pm

    What a fun project to do!

  9. Connie Strother says

    February 27, 2017 at 9:40 am

    We have taken down our above ground pool and are making this area into an outside seating/gathering area. It would be so cool to be able to create items to include in this project!

  10. Rebecca H says

    February 28, 2017 at 4:47 pm

    Wow, with knee deep snow still at my house, this would be so fun to look forward to whenever I see the ground again. Thanks for the chance

  11. Rose Santuci-Sofranko says

    March 1, 2017 at 12:24 am

    Oh wow, those look so cool to make! Thanks and God Bless! ILuvTheEucharist @ aol dot com

Have you read?

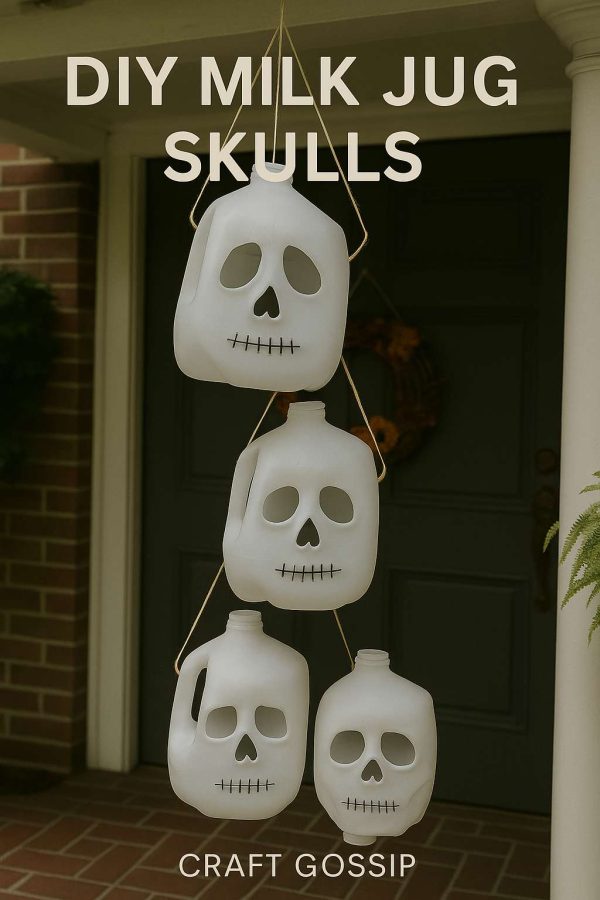
DIY Milk Jug Halloween Skulls – Recycled Porch Decor

If you’re anything like me, the Halloween decorating bug bites as soon as the first leaves start to turn. I love pulling out the pumpkins, stringing up lights, and adding a little spook factor to the front porch. But here’s the thing—Halloween decorations can get expensive, especially if you want a whole collection of them.

That’s where this thrifty little craft comes in. With nothing more than a few empty milk jugs, a marker, and some string, you can create a row of DIY milk jug skulls that look fantastic hanging from the porch or glowing in the yard. It’s simple, it’s cheap, and it’s a wonderful way to give those plastic jugs a second life before tossing them into the recycling bin.

This is one of those crafts that proves you don’t need a big budget for big impact. Even better—it’s family-friendly. Kids can help draw the faces, while the grown-ups handle the cutting. Before you know it, you’ll have a creepy crew of skulls ready to scare (or charm) the neighbors.

What Makes These Milk Jug Skulls So Fun?

  • Eco-Friendly: They’re made from recyclables, which means less waste. 
  • Budget-Friendly: The only thing you may need to buy is a pack of battery tea lights. 
  • Customizable: Keep them classic and spooky, or jazz them up with paint or glitter. 
  • Porch-Ready: They’re lightweight and easy to hang in clusters for maximum effect. 

Supplies You’ll Need

  • Empty plastic milk jugs (1 gallon size works best, but you can use any size) 
  • Permanent black marker (Sharpie is perfect for clean, bold lines) 
  • Scissors or craft knife (adults only—this is the only tricky part) 
  • Hole punch (optional, for stringing) 
  • Twine, string, or fishing line (for hanging) 
  • Battery-operated tea lights (optional, for glowing skull lanterns) 

Step-By-Step Instructions

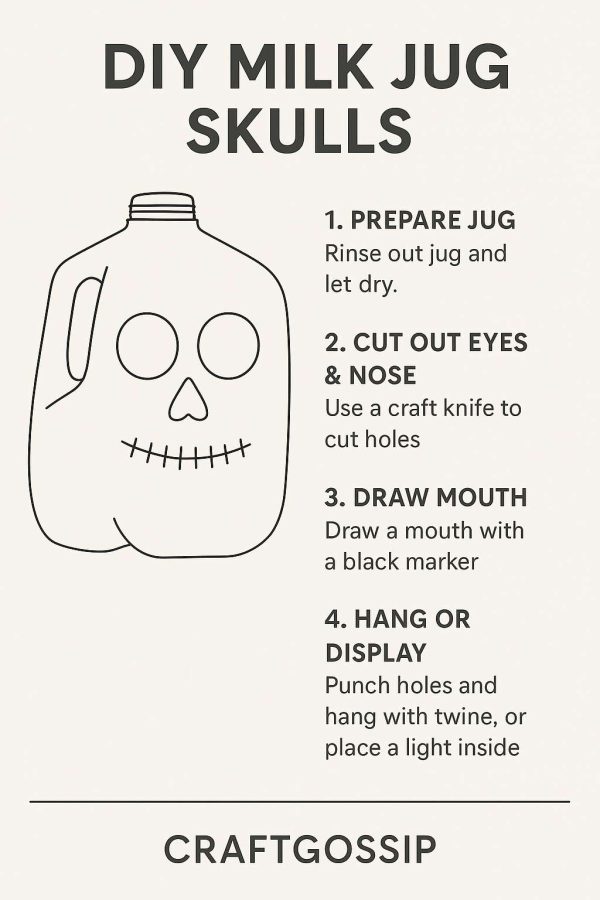
Step 1: Rinse & Prep the Jugs

Give your jugs a good rinse with hot soapy water to remove any leftover milk residue (nobody wants a stinky skull). Peel off any labels—you might need to scrub a little with warm water or rubbing alcohol if the glue is stubborn. Let the jugs dry completely before you start.

Step 2: Cut Out the Skull Features

Using scissors or a craft knife, carefully cut out:

  • Eye sockets: Two large ovals or circles near the upper front of the jug. 
  • Nose: A small upside-down triangle below the eyes. 

Tip: Don’t stress if they’re not perfect. In fact, slightly uneven shapes look creepier and give the skulls more personality.

Step 3: Add the Mouth

Now grab your permanent marker and draw a long horizontal line across the lower part of the jug (just above the spout). Then add short vertical lines through it to create a “stitched” effect.

Want them extra spooky? Make the mouth jagged, curved, or crooked—each one can have its own little “expression.”

Step 4: String Them Up or Place Them Out

  • To Hang: Punch two small holes at the top of the jug, thread through twine, and knot it. Hang them in clusters from the porch or tree branches for maximum impact. 
  • To Display on the Ground: Pop a battery-operated tea light or glow stick inside. At night, the cut-out features glow eerily, making them perfect for lining a walkway or lighting up your porch steps. 

Extra Decoration Ideas

Want to take it up a notch? Here are a few twists you can try:

  • Paint the whole jug black or silver before cutting for a bolder look. 
  • Use glow-in-the-dark paint around the eyes and mouth so they stand out at night. 
  • Add fake spider webs or plastic spiders inside for extra creep factor. 
  • Mix them with sugar skull versions (painted in bright colors) for a Day of the Dead meets Halloween vibe. 

Where to Display Your Milk Jug Skulls

  • Hanging in a cluster by the front door to greet trick-or-treaters. 
  • Along the garden fence, glowing with tea lights inside. 
  • Dangling from tree branches for a haunted yard look. 
  • As a budget-friendly centerpiece for a Halloween party. 

This is hands-down one of my favorite DIY Halloween porch decorations because it’s so simple yet so effective. The best part? Every jug can look slightly different, so you end up with a collection of skulls that each has its own “personality.” It’s spooky, it’s thrifty, and it’s a great way to get the kids involved in holiday crafting.

So don’t recycle those milk jugs just yet—give them a creepy new life as part of your Halloween décor. You’ll be surprised at how quickly they become a porch staple you bring out year after year.


Explore

books Christmas CraftGossip Giveaways Craft Inspirations Easter glass halloween Home Decor kid crafts More Crafts Patterns & Tutorials Recycled and Thrifted Ideas recycled art Recycled Clothing Recycled Jewelry Recycled kids crafts Recycled Sewing Recycling Ideas Recycling Organizing tin can

Featured Posts

MacGyver Runners-Up

How to make a a wire wall organizer

Extreme recycled crafting that is beautiful

Recycled cigar box makes a cute bird house

Got Milk? Well, once you have finished it-recycle the carton into a recipe box

RSS feed: More Articles More Articles

  • DIY Milk Jug Halloween Skulls – Recycled Porch Decor
  • Make One Christmas Gift for Everyone: How to Save Money With Bulk Craft Supplies
  • Crocheting Christmas Gifts? Make This Supply Checklist Before You Buy More Yarn
  • DIY Faux Candy Apples: Easy Glossy Fall Decorations
  • 12 Fall Decorations You Can Make from Thrift Store Finds
  • DIY Witchy Chopping Board Decor With a Free Vintage Spirit Board Printable
  • How to Make a Cozy Coffee Gift Card Holder
  • Free Animal Person Embroidery Design Review
  • DIY Halloween Sock Pumpkins: Easy Fuzzy Pumpkins With Ghosts, Stripes and Witch Hats
  • Free Felting Tutorial Friday: Felt Into Autumn with Heidi Feathers

Copyright © 2026 · CraftGossip | Start Here | Contact Us | Link to Us | Your Editors | Privacy and affiliate policy