• Home
  • Suggest A DIY
  • DIY Newsletter

Recycled Crafts

Creative DIY Projects That Turn Trash Into Treasure

  • About CraftGossip
  • Our Network
    • Bath & Body Crafts
    • Candle Making Ideas
    • Crochet Ideas
    • Cross Stitch
    • Edible Crafts
    • Felting Patterns
    • Glass Art
    • Home & Garden Ideas
    • Indie Crafts
    • Jewelry Making
    • Kids Crafts
    • Knitting Patterns
    • Lesson Plans
    • Needlework
    • Party Ideas
    • Polymer Clay
    • Quilting Ideas
    • Recycled Crafts
    • Scrapbooking
    • Sewing Patterns
    • Card Making
    • DIY Weddings
    • Not Craft Ideas
  • Giveaways
  • Roundups
  • Store
  • Search

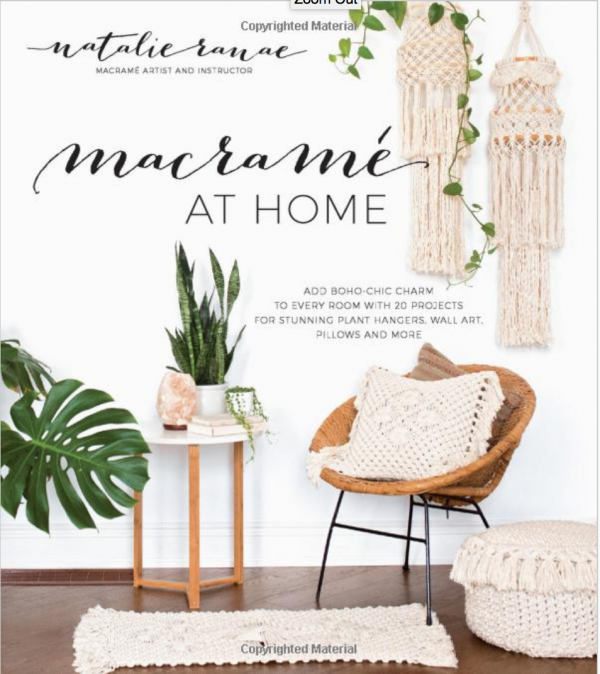
Giveaway-Macramé at Home: Add Boho-Chic Charm to Every Room

June 25, 2018 by Stefanie Girard

Giveaway-Macramé at Home: Add Boho-Chic Charm to Every Room with 20 Projects for Stunning Plant Hangers, Wall Art, Pillows and More

Leave a comment in today’s post by July 3, 2018 and you are in the running for this super pretty book.

Open to U. S. residents only please.

Handmade Woven Art for Beginners & Beyond

Indulge your macramé obsession the fun way?by making it yourself! Macramé artist and teacher Natalie Ranae will guide you step by step to create stunning designer art pieces to adorn any space with boho vibes. From contemporary plant hangers to elegant wall hangings to practical home accents such as pillows, rugs and floor poufs, you’ll be amazed at how easy it is to get an impressive result with your very first project.

All of the twenty projects include detailed photos and instructions for every step, and each project features a variation at the end that changes the look, for a total of forty potential designs. Featuring a practical guide to common knots and patterns, no other DIY macramé book offers this much variety and instruction for designer pieces. Natalie provides you the knowledge and skills to recreate her pieces exactly as shown, or confidently branch off with your own design. With such beautiful inspiration at your fingertips, the only limit is your imagination.
 

«
»

Comments

  1. Susan Kerbel says

    June 25, 2018 at 12:49 pm

    Wow can’t wait might have to buy it. Thanks for giving me the chance to win.

  2. Pam says

    June 25, 2018 at 4:24 pm

    That looks like a fun new craft to try. Love your ideas.
    Peace.

  3. Lee says

    June 25, 2018 at 4:48 pm

    This would be so much fun!! Thank you!

  4. Carla Hundley says

    June 25, 2018 at 11:45 pm

    How fabulous this would
    be to win and use to make
    decor for the home!
    Carla from Utah

  5. Ruya says

    June 26, 2018 at 2:39 am

    Ahhhh this looks awesome!

  6. annehaun says

    June 26, 2018 at 7:30 am

    What a fun book – used to do macrame back in the 70’s.

  7. Karey says

    June 26, 2018 at 8:30 am

    I was looking at this book in the bookstore recently. It’s full of lots of great ideas!

  8. Nancy Olejarczyk says

    June 26, 2018 at 9:32 am

    Did macrame years ago! Would love to try again!

  9. amy white says

    June 26, 2018 at 9:58 am

    I love to macrame

  10. Amy DiGiulio says

    June 26, 2018 at 9:59 am

    Super excited to get this and start macrame’ing

  11. spierssusan says

    June 26, 2018 at 10:35 am

    Love macrame, thank you, Susan!

  12. Mary Helene says

    June 26, 2018 at 11:14 am

    Still love doing Macrame. Love this book with new designs.

  13. Caroline says

    June 26, 2018 at 11:23 am

    Just recently tried my hand at macrame and would love this book to learn more! https://pleatandpom.com/square-knot-macrame-wall-hanging/

  14. Michelle Martin says

    June 26, 2018 at 11:44 am

    I can’t wait to learn a new craft!

  15. Linda M. Mundy says

    June 26, 2018 at 12:41 pm

    I’ve macramed quite a bit during the late 70’s. So glad to see a revival.
    Thank you for the giveaway.

  16. Sheree Fournerat says

    June 26, 2018 at 1:38 pm

    Trying to get my granddaughter into new things and macrame would be perfect.

  17. Patricia Neal says

    June 26, 2018 at 1:55 pm

    Hoping to win, cause can’t afford the book now. I just love the hanging plant hangers and all the other Macramé projects.

  18. Deborah W says

    June 26, 2018 at 2:18 pm

    My in-laws used to do macrame and made us some really cool things. I would love to learn the in’s and out’s of macrame with this book!

  19. Nan Davis says

    June 26, 2018 at 3:41 pm

    I am just getting back into macrame. There is so much I’ve forgotten. I would love to win this. Thank you,
    Nan D

  20. Jane S. says

    June 26, 2018 at 4:37 pm

    This looks like such a fun book! I’d love to have some macrame in my home, do the retro thing. Thanks for the chance to win!

  21. regina scarberry says

    June 26, 2018 at 5:38 pm

    I made macrame in school. I have always wanted to do it since. Thank for the chance to win!

  22. Suzanne VanSickle Eastman says

    June 26, 2018 at 6:19 pm

    I have always wanted to learn macrame. Thank you for the opportunity to win!

  23. Audrey Pache says

    June 26, 2018 at 7:17 pm

    This would be So special

  24. Carol Becht says

    June 26, 2018 at 8:01 pm

    I’m so glad to see macramé making a comeback. Loved it back when, and love it now.

  25. MaryAnn Byrne says

    June 26, 2018 at 8:24 pm

    Love macrame’. I made my parents a large owl for their basement wall when I was in high school . It eventually fell apart. I would love to get back into macrame’ and this book would be perfect! Awesome giveaway!

  26. Stephanie S says

    June 26, 2018 at 11:37 pm

    Love that macrame is coming back around! Looks like a fabulous book!

  27. Maureen says

    June 27, 2018 at 4:49 am

    I can’t wait for this….I want to learn so bad

  28. Shari Harniss says

    June 27, 2018 at 7:10 am

    Love to win this book for my Hubby who likes to macramé!

  29. Teresa Mason says

    June 27, 2018 at 8:49 am

    I am looking for a new craft and I think macrame would be very relaxing and fun. Thank you for all you do.

  30. Debra Williams says

    June 27, 2018 at 9:13 am

    Wow! I have all the supplies to do macramé, but am missing the instructions. Looks like a great book, I will have to buy it if I am not the lucky winner. Thanks for the opportunity!

  31. Corinne in SC says

    June 27, 2018 at 10:10 am

    This comes at the perfect time! I challenge myself with learning new things and this is my next project! Thank you for a great giveaway!!!

  32. Cindy S says

    June 27, 2018 at 1:09 pm

    I think it’s cool macrame is making a comeback, says a teen of the 70s!

  33. Duane says

    June 27, 2018 at 1:11 pm

    I really would love to have this book!

  34. Bobbie Jo Williams says

    June 30, 2018 at 11:59 pm

    I love macrame! I did so much back in “the day” and glad to see it making a comeback. Would love to start up again.

  35. Paula says

    July 1, 2018 at 6:56 pm

    I love the look of macrame! I would love to learn this!

  36. Marie says

    July 3, 2018 at 7:55 am

    Love how an old craft gets a dusting-off and re-tweaked for another go-round trend. ?

Have you read?

How To Make A Recycled Bottle Cap Planter From An Empty Tin Can

There are two types of people in this world: people who throw bottle caps straight into the bin, and crafters who look at them and think, “Hmm… I could probably make something with those.”

This recycled bottle cap planter is exactly that kind of project. It takes an empty tin can, a handful of bottle caps, a little glue, paint, and turns the whole thing into a cheerful upcycled plant pot for herbs, succulents, kitchen windowsills, patios, craft rooms or kids’ garden projects.

It is bright, thrifty, a little bit quirky, and very satisfying if you love trash-to-treasure crafts. It is also a great excuse to save those colourful metal caps from soft drinks, soda bottles, kombucha bottles or bottled drinks. Finally, a reason for the little pile on the kitchen bench.

If you love recycled garden ideas, you might also enjoy browsing the Recycled Crafts section on CraftGossip or the recycled crafts on CraftBits for more projects using jars, tins, bottles, lids and packaging. CraftBits also has a cute recycled planter project if you like giving odd found objects a second life as plant pots.

Why Bottle Caps Make Great Craft Supplies

Bottle caps are small, sturdy, colourful and easy to collect. They work beautifully for mosaic-style crafts because they create texture and pattern without needing expensive supplies.

You can leave them as they are for a bright recycled look, or paint over the whole planter for a more coordinated finish. That makes this project easy to style in different ways — colourful and playful for kids, metallic and modern for adults, rustic for garden décor, or pastel for a cottage-style windowsill.

This is also a good craft for using an empty coffee can, tomato tin, soup can or powdered drink tin. The bottle caps cover the surface and turn something plain into something that looks handmade and intentional.

And let’s be honest, there is something very pleasing about making a plant pot out of things that were headed for the bin.

Supplies You Will Need

Empty clean tin can
Metal bottle caps
Strong glue or hot glue
Spray paint or acrylic paint
Primer, optional but helpful
Clear sealer, especially for outdoor use
Potting mix
Small plant, herb or succulent
Hammer and nail or drill for drainage holes
Sandpaper or metal file
Protective gloves
Drop cloth or newspaper

If you are making several planters, Amazon is handy for basics like glue sticks, spray paint, clear sealer, craft gloves, mini succulents, potting tools and small bags of cactus mix. For extra embellishments, Etsy can be lovely for vintage-style plant markers or handmade garden labels, but you definitely do not need anything fancy for this one.

Choosing The Right Can

A tin can with straight sides is easiest to cover with bottle caps. Coffee cans, large tomato tins and food tins all work well.

Before you begin, wash the can thoroughly and remove the label. If there is sticky residue, soak it in warm soapy water, then use a little oil or adhesive remover to clean it off.

Check the top edge of the can carefully. If it is sharp, smooth it with a metal file or cover the edge with strong tape, folded fabric, twine, rope or a strip of felt. This is especially important if children will be helping.

A larger can works well for herbs, while a smaller tin is perfect for succulents. If you are using the planter indoors, place it on a saucer or inside a waterproof tray to protect your windowsill.

Add Drainage Holes

Plants do not enjoy sitting in soggy soil, so drainage matters.

Turn the can upside down and use a hammer and nail, awl, or drill to make several drainage holes in the base. Four to six small holes are usually enough for a small tin.

If you cannot add holes because the planter will sit indoors on furniture, keep the plant in a small nursery pot and use the decorated tin as a cover pot instead. That way you can remove the plant for watering and avoid surprise puddles. Ask me how I know.

For succulents, drainage is especially important because they dislike wet roots. CraftGossip has a useful roundup of small DIY planters and plant pots for succulents if you want more small planter inspiration.

Prepare The Bottle Caps

Give your bottle caps a quick wash and dry before gluing. Sticky caps will not hold paint or glue as well.

You can use all one colour, arrange them in stripes, make a rainbow, create a random mosaic, or paint them all the same colour after they are attached.

If some of the caps are slightly bent, flatten them gently with a hammer. Place them on a scrap piece of wood first so you do not damage your table.

For a neater look, sort the caps by colour before you start. For a more playful recycled look, use them completely randomly.

CraftBits has a fun bottle cap daisy garden wall art project if you are looking for another colourful bottle cap craft to link from this article or pair with the planter.

How To Make The Bottle Cap Planter

Start with a clean, dry tin can.

If you are painting the can first, apply a coat of primer or base paint and let it dry. This helps hide any branding or marks that might show between the bottle caps.

Lay the can on its side and begin gluing bottle caps around the bottom edge. Work in rows, keeping the caps close together. You can place them flat-side down for a raised circular texture, or open-side down if you prefer a smoother look.

Continue gluing bottle caps around the can until the outside is covered. Let the glue dry completely before moving to the next step.

If you want a bright recycled look, leave the bottle caps as they are. If you want a more polished look, spray paint the entire planter once the glue has cured.

Let the paint dry fully, then add a clear sealer if the planter will be used outdoors or near water.

Fill the can with potting mix and add your plant. Water lightly and place it somewhere bright and cheerful.

Paint Options

You can take this project in several different directions depending on your paint choice.

For a bright garden planter, paint each cap a different colour or use colourful caps as they are.

For a modern look, spray the whole planter matte black, white, sage green or soft terracotta.

For a metallic finish, use copper, gold, bronze or hammered metal spray paint.

For a cottage garden feel, paint the planter cream or pastel blue, then lightly dry-brush the raised bottle caps to bring out the texture.

For kids’ crafts, let children paint the caps before gluing them on. It is messier, but it gives them more ownership of the finished planter.

Best Plants For A Recycled Tin Can Planter

Because tin cans are usually small, choose plants that do not need deep roots.

Good options include:

Succulents
Cress
Chives
Parsley
Mint
Thyme
Small basil plants
Baby spider plants
Pothos cuttings
Small ferns
Mini flowers
Wheatgrass

Succulents are a great option if you want a low-maintenance planter. Herbs are lovely for a kitchen windowsill, especially if you are using larger coffee tins.

If you are making this with children, fast-growing seeds like cress or wheatgrass are satisfying because kids can see results quickly.

Indoor Or Outdoor Use

This planter can be used indoors or outdoors, but the finish matters.

For indoor use, a basic painted finish is fine. Just keep the planter on a saucer if you have drainage holes.

For outdoor use, seal the finished planter with a clear weather-resistant spray. This helps protect the paint and glue from moisture.

If your climate is very wet or humid, keep the planter under cover on a porch, patio table or sheltered windowsill. Tin cans can eventually rust, which can look charming in a rustic garden but less charming on a white windowsill.

Make It A Kids’ Craft

This project can be adapted for kids, but an adult should handle sharp edges, drainage holes and hot glue.

Children can help collect caps, sort colours, paint the tin, paint the caps, choose the plant and decorate plant labels.

For younger children, use a strong tacky glue instead of hot glue and allow extra drying time. The caps may slide a little while drying, so work with the can lying on its side and let one section dry before turning it.

This would make a sweet Earth Day craft, school garden activity, holiday project or rainy-day recycled craft.

For more eco-friendly kids’ project ideas, CraftGossip has a roundup of sustainable activities to teach kids about going green.

Make It More Decorative

Once the bottle caps are attached, you can keep embellishing if you like.

Add a chalkboard plant label
Tie twine around the top edge
Add a wooden plant marker
Glue on small beads or buttons
Paint a simple pattern across the caps
Use metallic wax to highlight texture
Add a saucer painted to match
Make three planters in different heights

A row of three bottle cap planters looks lovely on a windowsill, especially if each one holds a different herb.

If you like recycled garden décor, CraftGossip also has ideas for DIY garden glass art and an upcycled gin bottle terrarium that would pair nicely with this sort of project.

Troubleshooting

If the bottle caps keep sliding, the glue may not be strong enough or the can may be too glossy. Rough up the can lightly with sandpaper before gluing.

If the paint does not stick well, use primer first. Metal and glossy caps can be fussy without it.

If the planter feels too heavy on one side, check that the caps are evenly spaced. A larger can is easier to balance than a very narrow one.

If water leaks onto furniture, use the decorated tin as a cover pot instead of planting directly into it.

If the top edge is sharp, do not ignore it. Cover it with rope, felt, tape, folded fabric or a strip of cork before using.

More Bottle Cap Craft Ideas

Once you start saving bottle caps, one planter may not be enough.

Bottle caps can also be used for garden art, magnets, wreaths, mosaics, flowers, ornaments, jewellery, kids’ crafts and mini frames.

CraftBits has a recycled bottle cap pocket mirror listed in its recycled crafts collection, and the site also features bottle cap projects in its broader craft categories. There is also a recycled bottle cap people project idea in the group crafts section if you want something more kid-friendly.

And if you are building a recycled craft cluster for CraftGossip, this bottle cap planter would sit beautifully alongside recycled jar crafts, tin can crafts, garden upcycles and Earth Day projects.

Why This Project Is Worth Making

A recycled bottle cap planter is cheerful, practical and wonderfully thrifty. It uses materials most people throw away, it is easy to customise, and it gives you a finished project you can actually use.

It is also a nice reminder that recycled crafts do not have to look dull or worthy. They can be bright, useful, colourful and full of personality.

So next time you open a bottle, save the cap. Add it to a jar, wait until you have a good handful, and turn that little pile of metal into something lovely for your windowsill or garden table.

And if anyone asks why you are saving bottle caps again, just point at your planter and say, “See? I had a plan.”


Explore

books Christmas CraftGossip Giveaways Craft Inspirations Easter glass halloween Home Decor kid crafts More Crafts Patterns & Tutorials Recycled and Thrifted Ideas recycled art Recycled Clothing Recycled Jewelry Recycled kids crafts Recycled Sewing Recycling Ideas Recycling Organizing tin can

Featured Posts

How to make beautiful abstract bubble art

Tin Can Jewelry

Surprise material really “pops” with this jewelry transformation

Great collection of recycled wire spool ideas

Cable Reel Tables Are Back – And I’m Obsessed

RSS More Articles

  • How to Paint a Fabric Chair: 10 DIY Tutorials for Budget Furniture Makeovers
  • 12 Free Cable Knit Sweater Patterns for a Cosy Handmade Wardrobe
  • Unisex Crochet Slouch Hat – A Beginner-Friendly Crochet Pattern You Can Actually Finish
  • How To Make A Recycled Bottle Cap Planter From An Empty Tin Can
  • 15 Irresistible Chocolate And Date Recipes For Naturally Sweet Treats
  • 15 Free Poncho Knitting Patterns for Babies, Children and Adults
  • Free 4×6 Free Printable Chevron Backgrounds for Cardmaking – 5 Modern Designs
  • 15 Above Kitchen Cabinet Decor Ideas That Make Your Kitchen Look Finished
  • How to Make a DIY Cooling Neck Scarf: Easy Beginner Sewing Tutorial
  • 6 FREE Wedding Pattern Papers to Download

Copyright © 2026 · CraftGossip | Start Here | Contact Us | Link to Us | Your Editors | Privacy and affiliate policy