• Home
  • Suggest A DIY
  • DIY Newsletter

Recycled Crafts

Creative DIY Projects That Turn Trash Into Treasure

  • About CraftGossip
  • Our Network
    • Bath & Body Crafts
    • Candle Making Ideas
    • Crochet Ideas
    • Cross Stitch
    • Edible Crafts
    • Felting Patterns
    • Glass Art
    • Home & Garden Ideas
    • Indie Crafts
    • Jewelry Making
    • Kids Crafts
    • Knitting Patterns
    • Lesson Plans
    • Needlework
    • Party Ideas
    • Polymer Clay
    • Quilting Ideas
    • Recycled Crafts
    • Scrapbooking
    • Sewing Patterns
    • Card Making
    • DIY Weddings
    • Not Craft Ideas
  • Giveaways
  • Roundups
  • Store
  • Search

Giveaway: 3 copies of Upcycled Jewelry: Bags, Belts, and More

January 28, 2015 by Stefanie Girard

upcycled jewelry bags belts more
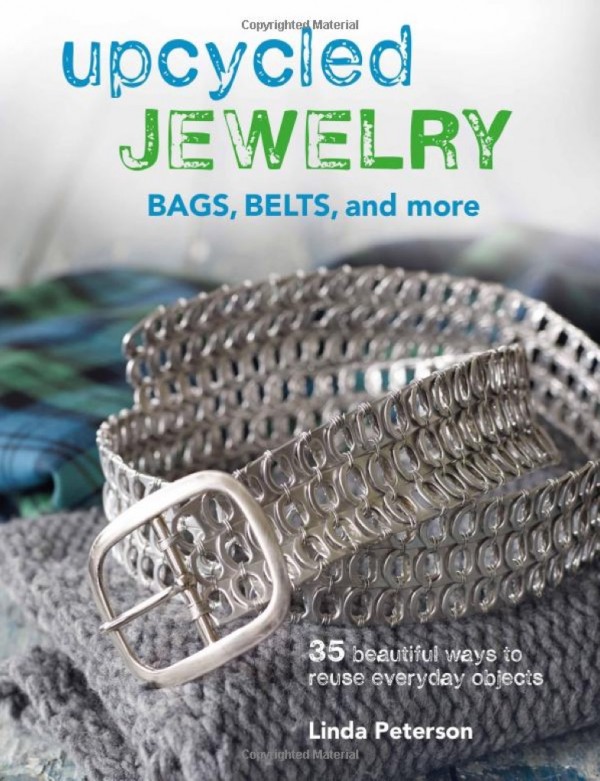
Today I have an extra special giveaway, Cico Books has provided 3 copies of the book Upcycled Jewelry: Bags, Belts, and More by Linda Peterson to giveaway to you lucky Craft Gossip readers. Leave a comment in today’s post by February 14th, 2015 and you will be in the running for this super creative and innovative book.

I have seen a lot of recycled jewelry and accessories in my day as it’s one of my all time faves to make but in this new book there are a whole bunch of projects that feature really innovative techniques. There are quite a few projects as well that feature materials I have never seen used in such unique and pretty ways! If you like this kind of thing I bet you will be as inspired as I am.

More about the book:

Upcycle to create 35 stunning pieces of jewellery and accessories. Discover how to take something that was destined for the rubbish bin and give it a new purpose, transforming it into something beautiful. Expert crafter Linda Peterson shows you 35 creative ways to upcycle ring pulls from drinks cans, zips, plastic, bike chains, tyre tubes and more. From a stylish ring pull belt to a pretty gold zip bracelet, and from stamped plastic earrings to a chunky bike chain bangle, there’s plenty here to inspire you to get crafting. Every project has clear step-by-step photographs to guide you, and a basic techniques section covers all you’ll need to know.

Related Posts:

  • 15 Recycled Golf Ball Crafts For Garden Art, Gifts…
  • Eco-Craft Fun: 25+ Sustainable Activities to Teach…
«
»

Comments

  1. Heidi leeck says

    January 28, 2015 at 3:31 pm

    Would love a chance to win. Love the idea of making
    Art from trash!

  2. Kris Kelley says

    January 28, 2015 at 3:41 pm

    I’d love to have this book! I already make some upcycled jewelry, and would like to learn how to make more.

  3. shannon says

    January 28, 2015 at 3:44 pm

    very cool!

  4. Kathryn says

    January 28, 2015 at 3:53 pm

    This looks like a fantastic book!

  5. Bonney says

    January 28, 2015 at 3:56 pm

    I’m always looking for ways to use all these bits I have laying around. This book looks perfect!

  6. Janet Cobb says

    January 28, 2015 at 4:07 pm

    A girl can never have too much inspiration for Upcycling projects!

  7. amy dodaro says

    January 28, 2015 at 4:50 pm

    Would love a chance to win thanks I love to recycle trash to treasure

  8. H Stanger says

    January 28, 2015 at 5:38 pm

    I love to use belts as embellishments on the bags I make. Vintage shops are my new go to place to find some great ones. Would loved to see how they are used in the book.

  9. Staci Pollock says

    January 28, 2015 at 6:05 pm

    Love everything Linda Peterson makes! It would be awesome to win this up cycle book!!!

  10. angie says

    January 28, 2015 at 6:27 pm

    This book speaks to my heart. I’m always looking to re-purpose items I come across.
    I hope to win a copy.
    Angie

  11. Autumn Crawford says

    January 28, 2015 at 6:36 pm

    Love the ideas.i make crsfts out of recycled objects..and everything in my home or or in our yard is made from refurbished items..

  12. Kathy Nethken Daniels says

    January 28, 2015 at 7:50 pm

    I am always searching for new things, new ways to upcycle, recycle, updo, redo, haveto, gotta do, etc… lol, hope I win one of them! Good luck everyone!

  13. Kari Thompson says

    January 28, 2015 at 10:37 pm

    Upcycling is such a great way to repurpose items and create such unique and individual treasures. I’d love a copy of this book!

  14. lynneweinberger says

    January 29, 2015 at 12:44 am

    This is right up my alley! Intrigued.

  15. Christina M. says

    January 29, 2015 at 12:52 am

    This book is totally up my alley! Thanks for the chance to win it!

  16. lindarumsey says

    January 29, 2015 at 4:39 am

    Great idea for a book!

  17. Malisa Davies says

    January 29, 2015 at 6:03 am

    I’m in charge of the craft during VBS at St. Paul Lutheran Church every summer. Every year I make sure we make a craft from recycled items. The kids love to see what we can make out of what they call junk. Would love to win your book!!!!!

  18. Jerry Wyrosdick says

    January 29, 2015 at 6:34 am

    I am also throwing my hat as one of those vying for this book. It would be amazing to learn more from Linda.

  19. priyanka says

    January 29, 2015 at 6:35 am

    I would love to win this cos i have a whole lot of junk in my house n i love recycling 🙂

  20. Meiko Lucas says

    January 29, 2015 at 6:47 am

    I also want to learn these innovative methods to create jewelry from Linda. I hope I am not too late and would be considered as one of the contenders.

  21. Virginia Griffiths says

    January 29, 2015 at 6:51 am

    I love to recycle and this book looks like it has some great new ideas

  22. Gina says

    January 29, 2015 at 6:56 am

    Thanks for the chance to win this book. I love upcycling.

  23. Donna H says

    January 29, 2015 at 7:36 am

    This book looks like it is full of creative ideas and projects. Thanks for another great giveaway!!

  24. Kim Limbaugh says

    January 29, 2015 at 8:07 am

    I would love to win this book!

  25. Jennifer Pereira Obillo says

    January 29, 2015 at 8:20 am

    This is a great idea! Thanks for the giveaway!

  26. Vicki Weinhld says

    January 29, 2015 at 9:25 am

    Sound likeso much fun, I use od ties & incorporate into clutches and other items, love to see what else can be done with cast-offs (treasures).

  27. Brenda Young says

    January 29, 2015 at 9:43 am

    Tutorial on pop top art, Always wanted to create some pop top upcycle!

  28. Adrienne says

    January 29, 2015 at 10:07 am

    Nice!

  29. retrosandie says

    January 29, 2015 at 10:55 am

    Thank you and Cico Books for the chance to win this interesting book!!!

  30. Your Friendly Home Economist says

    January 29, 2015 at 11:18 am

    Love upcycle and reusing so this would be a dream book! Thank you for the giveaway!

  31. marla albertson says

    January 29, 2015 at 11:22 am

    such a great book to own!

  32. Mary Mac says

    January 29, 2015 at 11:32 am

    Fantastic book, would love to have.

  33. Eileen Hughes says

    January 29, 2015 at 11:35 am

    Would be great to recycle more into useful items.

  34. rrjane011749 says

    January 29, 2015 at 11:37 am

    Junk to jewels–my kind of fun!

  35. PHYLLIS BIESECKER says

    January 29, 2015 at 11:40 am

    There is no such thing as trash. Only art waiting to be unearthed.

  36. Flo L says

    January 29, 2015 at 11:43 am

    Would love to make things while recycling products…this book is awesome!! Thanks for the chance to win!

  37. Linda Knappenerger says

    January 29, 2015 at 11:54 am

    I’ve been recycling all kinds of stuff for years, but this book takes it to an higher level-JEWELRY-love to win a copy!!!!!!

  38. Nancy K. says

    January 29, 2015 at 12:03 pm

    What a fun and intriguing book! Thanks for the lovely giveaway!

  39. Julie Henderson says

    January 29, 2015 at 12:18 pm

    Ooo – what a fun book this has to be! I am SO in my happy element when upcycling cast-off stuff, of all kinds. I grew up w/ a creative mom who did this & taught it to us. I’d be so blessed to win a copy of this cool book. Thanks for the giveaway & Happy Valentine’s to all!! 🙂

  40. Peggy says

    January 29, 2015 at 12:31 pm

    I love to upcycle and always looking for new and different crafts. Thanks

  41. Denise Swanson says

    January 29, 2015 at 12:41 pm

    Would love some new ideas for upcycling crafts.

  42. Bonnie Mazar says

    January 29, 2015 at 12:44 pm

    I love the concept of reusing things I already have and would love the book for more ideas. Thanks for the chance

  43. Becky says

    January 29, 2015 at 1:22 pm

    I loooove upcycling! It’s both economically and environmentally responsible, and it allows a crafter to flex different creativity muscles than crafting from scratch. Would love a chance to win this book!

  44. Dianne McIntyre says

    January 29, 2015 at 1:30 pm

    I am a recycling crafter and newbie to this site. I am really using all of this site’s ideas to motivate and inspire me. Thank you Craftgossip.

  45. Isabell Sandoval says

    January 29, 2015 at 1:35 pm

    Would love to make the belt on the cover. Have Pop-tabs ready!!!

  46. Duane says

    January 29, 2015 at 1:54 pm

    This looks like a really useful book to share with the family.

  47. Join Hudson says

    January 29, 2015 at 1:55 pm

    I am getting in to crafting and I am a jewelry/ bling kind of girl. Need direction!

  48. Bobbi says

    January 29, 2015 at 1:55 pm

    The book sounds really interesting. I love learning new ways to upcycle.

  49. P says

    January 29, 2015 at 1:59 pm

    I love making jewelry, especially with upcycled materials. I even made a crocheted pull tab belt once.

  50. marlene strarit says

    January 29, 2015 at 2:18 pm

    Always looking for new ideas!!! This sounds perfect

Newer Comments »

Have you read?

Vintage Doily Jar Lanterns: A Pretty Recycled Jar Craft For Weddings, Tables & Cozy Corners

Turn old glass jars, thrifted doilies, lace, burlap and twine into romantic DIY jar lanterns for weddings, table décor, porch styling and handmade gifts. A pretty recycled craft for adults using supplies you may already have.

There is something about an old doily that instantly makes a project feel soft, nostalgic and just a little bit romantic. Add a recycled glass jar, a scrap of burlap or lace, and a warm little candle glow, and suddenly you have the kind of handmade décor that looks like it belongs on a wedding table, a mantel, a porch step or a cozy sideboard.

These vintage doily jar lanterns are one of those lovely recycled crafts for adults that feel much fancier than they actually are. You can make them from empty pasta sauce jars, jam jars, mason jars, old candle jars or any clear glass container you’ve been saving because “it might come in handy one day.” And finally, yes, it has.

They are perfect for rustic weddings, bridal showers, Mother’s Day table settings, handmade gifts, Christmas displays, garden parties or quiet little corners that need a bit of glow. If you enjoy recycled crafts, you might also like browsing the Recycled Crafts section on CraftGossip for more upcycling ideas, or the Recycled Crafts category on CraftBits for practical projects using jars, tins, bottles and everyday household bits.

Why This Recycled Jar Craft Works So Well

The beauty of this project is in the contrast. Glass keeps it clean and simple, the doily adds delicate detail, and burlap or twine gives it that rustic handmade finish. It is a sweet little meeting point between vintage, farmhouse and shabby-chic décor.

This is also a very forgiving craft. Your jars do not need to match. Your doilies do not need to be perfect. In fact, slightly mismatched jars and thrifted doilies often look better together because they feel collected rather than mass-produced.

If you are making these for a wedding or party, you can create a whole table full of them without spending a fortune. If you are making one or two for home décor, it is a lovely way to use up a pretty doily that has been sitting in a drawer waiting for its moment.

And if you are anything like me, you probably already have at least three suitable jars hiding in the cupboard because they were “too nice to throw out.” This is their time to shine.

Supplies You Will Need

Clean recycled glass jars
Small vintage doilies, crochet doilies or lace pieces
Burlap ribbon, lace ribbon, torn fabric strips or twine
Craft adhesive spray or Mod Podge
Small buttons, charms or ribbon scraps
Battery-operated tealights
Scissors
A paintbrush, if using Mod Podge
Rubbing alcohol or vinegar for cleaning glass
Optional: jute string, pearl trim, dried flowers, tags or small fabric scraps

For supplies, I’d use what you already have first. This project is perfect for raiding the sewing basket, the linen cupboard and the “random trims I bought years ago” box. If you need basics, Amazon is useful for battery tealights, Mod Podge, twine, glue guns and craft adhesive spray. Etsy can be lovely for vintage doilies or lace bundles, but use it sparingly if you only need one or two pieces.

Choosing The Right Jars

Clear glass jars work best because they allow the light to glow through the doily pattern. Jam jars, pasta sauce jars, pickle jars, old candle jars and mason jars are all good choices.

Look for jars with straight or gently curved sides. Heavily ridged jars can make it harder for the doily to sit flat, although they can still work if you are using a smaller lace motif.

Remove all labels and sticky residue before you begin. Soak the jars in warm soapy water, then use a little oil, rubbing alcohol or adhesive remover if the label glue is being stubborn. Dry the jars completely before adding your doily.

A quick wipe with rubbing alcohol or vinegar helps remove fingerprints and oils from the glass, which gives your adhesive a better surface to grip.

Choosing Doilies And Lace

Vintage cotton doilies give the prettiest effect because the openwork pattern lets the candlelight shine through. Crochet doilies, small lace motifs, cut pieces from damaged lace tablecloths, or old lace curtain scraps can all work beautifully.

If your doily is too large for the jar, you can cut a section from it, especially if it is already damaged or stained. I know cutting into vintage linens can feel a bit naughty, but if the piece is otherwise unusable, turning it into something lovely is much better than leaving it in a drawer forever.

Paper doilies can work for a quick party version, but they do not have the same texture or softness as fabric or crochet doilies. They can also wrinkle more easily when glued.

For a softer romantic look, use white or cream doilies. For a rustic farmhouse look, pair cream doilies with burlap and jute twine. For weddings, choose lace and ribbon colours that match your theme.

How To Make Vintage Doily Jar Lanterns

Start by washing and drying your jars thoroughly. Make sure there is no grease, dust or label residue left on the glass.

Lay your doily flat and position the jar over it to decide where the design should sit. For most jars, placing the doily on one side works beautifully and keeps the lantern from looking too busy.

If using adhesive spray, place the doily face down on scrap paper or inside a cardboard box to catch overspray. Lightly spray the back of the doily, then carefully press it onto the jar. Smooth from the centre outward so the lace or crochet sits neatly against the glass.

If using Mod Podge, brush a thin layer onto the back of the doily or directly onto the jar. Press the doily in place, then gently smooth it down. You can brush a light layer over the top to seal it, but avoid overloading it or the doily may become too stiff and cloudy.

Let the jar dry completely before adding trims.

Wrap burlap ribbon, lace, torn fabric or twine around the neck of the jar. Tie it in a simple bow or knot. Add a small button, charm, tag or dried flower if you want a more finished look.

Place a battery-operated tealight inside the jar and watch the doily pattern glow.

Candle Safety Notes

For this project, I strongly recommend battery-operated tealights, especially if you are using burlap, twine, lace, dried flowers or any fabric trim near the top of the jar.

If you choose to use real candles, keep all fabric, twine and trims well away from the flame. Never leave lit candles unattended, and do not use real candles for outdoor events where wind could shift trims or decorations.

Battery candles are safer, reusable and much easier for weddings or parties because you can turn them on before guests arrive without worrying about wax, flames or little hands reaching across the table.

Pretty Variations To Try

For a wedding centerpiece, group three jars of different heights together on a wood slice or tray. Add greenery, baby’s breath, dried lavender or small scattered flowers around the base.

For a Christmas version, use cream lace, red ribbon, tiny pinecones and warm white battery lights.

For a coastal version, skip the burlap and add jute twine with a small shell charm. This would sit beautifully with other beachy upcycled pieces, especially if you like projects such as the DIY scallop shell and can organizer on CraftBits.

For a farmhouse table, use torn ticking fabric, jute twine and wooden buttons.

For a romantic Valentine’s Day version, add soft pink ribbon, a small heart charm or a tiny tag with a handwritten message. You could pair it with other handmade Valentine décor from the Valentine’s Day crafts collection on CraftBits.

For a garden party, use mismatched jars and hang them from shepherd hooks or place them along a path. Use battery lights only if hanging them outdoors.

How To Make Them Look More Expensive

The secret is restraint. I know, I know — the craft table says “add more ribbon,” but sometimes the jar just wants one good bow and a button.

Stick to two or three textures. For example: glass, lace and twine. Or glass, doily and satin ribbon. Too many trims can make the jar look cluttered.

Use matching candle colours. Warm white battery tealights look much better than harsh blue-white ones.

Trim loose threads neatly. Burlap can fray in a charming way, but there is a fine line between rustic and “dragged through the craft cupboard.”

Group jars in odd numbers. Three or five lanterns together usually look more styled than two or four.

Use height variation. Mix short jam jars with taller pasta sauce jars or mason jars for a more collected display.

Where To Use Doily Jar Lanterns

These recycled jar lanterns work beautifully as:

Wedding centerpieces
Bridal shower table décor
Mother’s Day gifts
Mantel decorations
Porch lanterns
Guest room nightstand décor
Christmas table accents
Rustic party decorations
Handmade hostess gifts
Craft stall items
Memorial table lights
Garden party decorations

They are also lovely for using up inherited linens in a gentle way. If you have a damaged doily from a grandmother or aunt, this can be a sweet way to keep part of it visible rather than packed away.

Tips For Batch-Making These For Weddings Or Events

If you are making a large number of jar lanterns, start collecting jars early. Ask friends and family to save jars for you, but be specific about the size and shape you want or you may end up with 47 pickle jars and one tiny mustard pot.

Clean all jars in one go and remove labels before the crafting day. This is the least glamorous part of the project, so do it ahead of time.

Choose two or three trim styles and repeat them across the jars. For example, some jars might have lace ribbon, some might have burlap, and some might have twine, but keep the colour palette consistent.

Use battery tealights in bulk. They are much easier than managing real candles at an event, and guests can take the lanterns home afterwards as favours.

If you want name tags or table numbers, tie small kraft tags around the necks of the jars. This turns the lanterns into useful wedding décor rather than just pretty extras.

Troubleshooting

If your doily keeps lifting, your jar may not be clean enough or the doily may be too heavy. Wipe the jar again and use a stronger adhesive or a thinner lace piece.

If the doily wrinkles, use less glue. Too much wet adhesive can cause fabric and lace to buckle.

If the jar looks cloudy, you may have used too much Mod Podge over the top. A thin coat is enough.

If the burlap frays too much, add a tiny line of clear glue along the cut edge or use wired burlap ribbon instead.

If the lantern looks too plain, add a small charm, button, tag or ribbon bow to the neck. Do not cover too much of the glass, though — the glow is the prettiest part.

More Recycled Jar Craft Ideas

Once you start saving jars, it is hard to stop. They are useful for candle holders, pantry storage, craft room organisation, vases, gift jars and seasonal displays.

For another recycled jar idea, have a look at this Mason Jar Photo Frame on CraftBits. It has the same “simple jar turned into something special” feel.

You may also enjoy browsing the jars tag on CraftGossip for more jar-based craft inspiration, especially if your recycling bin is currently looking a little too inspiring.

A Gentle Little Upcycling Reminder

Projects like these are why I love recycled crafts. You are not buying a whole new pile of supplies. You are taking something ordinary — a jar, a doily, a scrap of ribbon — and giving it a second life.

It is soft, pretty, budget-friendly and practical. And if anyone asks why you have a cupboard full of empty jars, simply point to your glowing doily lanterns and say, “See? I had a plan.” 

Explore

books Christmas CraftGossip Giveaways Craft Inspirations Easter glass halloween Home Decor kid crafts More Crafts Patterns & Tutorials recycled art Recycled Clothing Recycled Jewelry Recycled kids crafts Recycled Sewing Recycled Tutorials Recycling Ideas Recycling Organizing tin can

RSS More Articles

  • 4 FREE Downloadable Sentiments for Dad
  • Everything You Need to Know About Embroidery Hoops
  • Printable Stickers for Journals and Planners – Self Care
  • Needle Felting Fairy Tutorial by Santa Meada
  • Stitch Your Favorite Fruit on a Sweater
  • 12 Color Wheel Inspired Scrapbook Layouts
  • Crafts With Old Bricks: Creative Ways To Upcycle Leftover Bricks
  • How To Make A Milk Mache Molding Compound
  • The 5 Outlet Placement Mistakes You Don’t Want to Make
  • Celebrate the Spirit of the Southwest with These Stunning Indian Navajo Tribal Quilt Patterns

Copyright © 2026 · CraftGossip | Start Here | Contact Us | Link to Us | Your Editors | Privacy and affiliate policy