• Home
  • Suggest A Craft
  • DIY Newsletter

Recycled Crafts

Creative DIY Projects That Turn Trash Into Treasure

  • About CraftGossip
  • Our Network
    • Bath & Body Crafts
    • Candle Making Ideas
    • Crochet Ideas
    • Cross Stitch
    • Edible Crafts
    • Felting Patterns
    • Glass Art
    • Home & Garden Ideas
    • Indie Crafts
    • Jewelry Making
    • Kids Crafts
    • Knitting Patterns
    • Lesson Plans
    • Needlework
    • Party Ideas
    • Polymer Clay
    • Quilting Ideas
    • Recycled Crafts
    • Scrapbooking
    • Sewing Patterns
    • Card Making
    • DIY Weddings
    • Not Craft Ideas
  • Giveaways
  • Roundups
  • Store
  • Search

Don’t Toss That Old Fence! Here’s How to Give It a Second Life in the Garden

June 15, 2025 by Shellie Wilson Leave a Comment

When our old fence blew down during the recent cyclone (thanks, nature ), I did what any slightly obsessive DIYer would do—I went straight to Google to find a way to repurpose the whole lot instead of sending it to the tip.

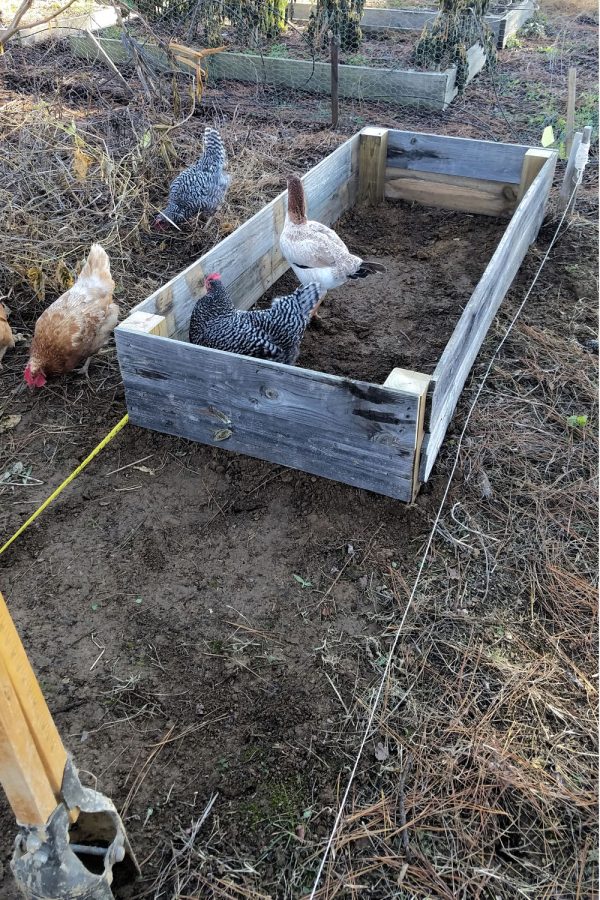
That’s when I stumbled across this brilliant tutorial from Journey with Jill about turning old fence boards into DIY raised garden beds. Total game changer. Not only does it save you money on lumber (which, let’s be real, isn’t cheap right now), but it also gives that weathered wood a gorgeous, rustic look that fits so well in the garden.

Her step-by-step guide is super practical, especially if you’re like me and not quite ready to part with “good wood” even if it’s a little rough around the edges. I loved how she emphasized prepping the boards properly and keeping the build simple—no fancy tools or complex measurements, just a solid, doable weekend project.

Why I’m Loving This Raised Bed Idea:

  • It’s eco-friendly (hello, upcycling win!)

  • The aged wood has such a cozy, natural aesthetic

  • It’s perfect for veggie beds, herbs, or even a rustic flower patch

  • And hey, there’s something very satisfying about turning storm chaos into garden calm

So if you’ve got a sad pile of fence boards and a patch of dirt calling your name, check out Jill’s full tutorial right here. Your future tomatoes will thank you.

Now I just need to convince the family that pulling nails from old fence boards is “fun quality time”

Related Posts:

  • DIY Review: Handmade Wooden American Flag – Rustic,…
  • Creative Ways to Reuse UNO Cards: Fun Upcycled Crafts to Try
«

Have you read?

Come On Baby, Start My Fire – DIY Firestarters

I stumbled across this brilliant little project the other day from one of my favorite upcycling bloggers, Sadie Seasongoods, and I had to share it. 

The firestarters Sadie makes are crafted from dryer lint, wax, and the cardboard bottoms of egg cartons. She even pretties them up with some dried herbs and flower petals, which honestly takes them from “I made this in my garage” to “Pinterest Queen Energy.” What I love most is how simple and budget-friendly they are. I mean, who doesn’t have dryer lint, an old candle stub, and a toilet roll lying around?

She walks you through the whole process with her usual clear instructions the end result looks more like a rustic gift item than something you’d toss into a fire pit. It’s the perfect kind of project for anyone who likes camping, cozy backyard firepits, or even just prepping for winter in a crafty way.

Other DIY Firestarter Ideas I’ve Tried (and Loved)

Feeling inspired by Sadie’s creativity, I thought I’d toss in a few of my own favorite DIY firestarter methods—because once you make one, you kinda want to try them all!

Pine Cones Dipped in Wax

This one’s a holiday fave. Gather some pine cones, melt some candle wax (crayons work too!), and dip them until they have a nice coating. You can even add a few drops of essential oils for a nice scent as they burn.

Cork Firestarters

Soak used wine corks in rubbing alcohol for about a week. Keep them in a tightly sealed jar and pull one out when needed. They light up like magic (just be safe—these burn hot and fast!).

Orange Peel Twists

Let orange peels dry and twist them into spirals. They’re flammable and naturally full of oils that help them catch easily. Plus, they smell amazing when burned!

Paper Muffin Liners + Wax + Sawdust

Pour melted wax into muffin liners filled with sawdust (or wood shavings, or even coffee grounds). Let them cool, and you’ve got sturdy little fire cakes ready to go.

Leave a Reply

Your email address will not be published. Required fields are marked *

Explore

books Christmas CraftGossip Giveaways Craft Inspirations Easter glass halloween Home Decor kid crafts mason jar More Crafts Patterns & Tutorials recycled art Recycled Clothing Recycled Jewelry Recycled Sewing Recycled Tutorials Recycling Ideas Recycling Organizing tin can

RSS More Articles

  • Etsy Spotlight: Boys’ Sewing Pattern Bundle – Raglan T-Shirt and Pants
  • Why You Should Donate Your Excess Yarn: Bringing Relief to Charities and Peace to Your Stash
  • Don’t Toss That Old Fence! Here’s How to Give It a Second Life in the Garden
  • Where to Find Secondhand, Deadstock, and Vintage Fabric Online
  • Celebrate Independence Day with a Beautiful Hand-Lettered USA Art Project
  • That Time a Thrift Store Employee Yelled at Me – And Changed How I See “Thrift Flips” Forever
  • Deer Needlepoint Cushion Kit from The Fox Collection
  • 6 FREE Wild Flower Pattern Papers to Download
  • Master the Art of Appliqué with This Ultimate Guide
  • Are Thread Bundles Worth the Money

Pick Your Blog

  • Sewing
  • Knitting
  • Quilting
  • Crochet
  • Home & Garden
  • Recycled Crafts
  • Scrapbooking
  • Card Making
  • Polymer Clay
  • Cross-Stitch
  • Edible Crafts
  • Felting
  • Glass Art
  • Indie Crafts
  • Kids Crafts
  • Jewelry Making
  • Lesson Plans
  • Needlework
  • Bath & Body
  • Party Ideas
  • Candle Making
  • DIY Weddings
  • Not Craft
  • Free Craft Projects

Copyright © 2025 · CraftGossip | Start Here | Contact Us | Link to Us | Your Editors | Privacy and affiliate policy