• Home
  • Suggest A Craft
  • DIY Newsletter

Recycled Crafts

Creative DIY Projects That Turn Trash Into Treasure

  • About CraftGossip
  • Our Network
    • Bath & Body Crafts
    • Candle Making Ideas
    • Crochet Ideas
    • Cross Stitch
    • Edible Crafts
    • Felting Patterns
    • Glass Art
    • Home & Garden Ideas
    • Indie Crafts
    • Jewelry Making
    • Kids Crafts
    • Knitting Patterns
    • Lesson Plans
    • Needlework
    • Party Ideas
    • Polymer Clay
    • Quilting Ideas
    • Recycled Crafts
    • Scrapbooking
    • Sewing Patterns
    • Card Making
    • DIY Weddings
    • Not Craft Ideas
  • Giveaways
  • Roundups
  • Store
  • Search

Come On Baby, Start My Fire – DIY Firestarters

June 12, 2025 by Shellie Wilson

I stumbled across this brilliant little project the other day from one of my favorite upcycling bloggers, Sadie Seasongoods, and I had to share it. 

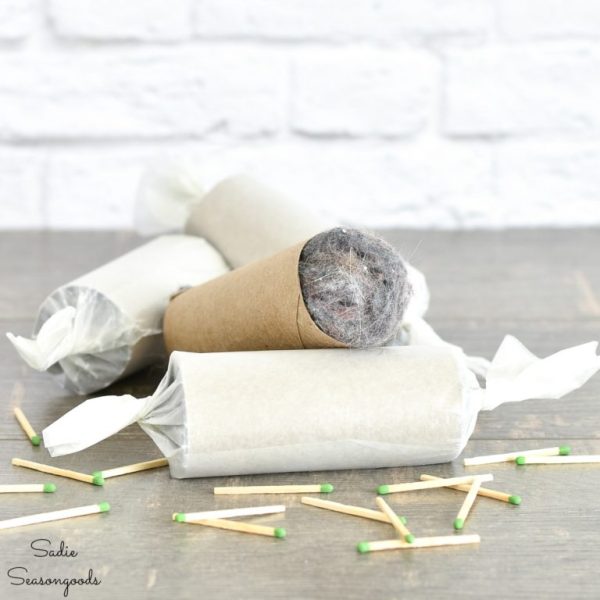
The firestarters Sadie makes are crafted from dryer lint, wax, and the cardboard bottoms of egg cartons. She even pretties them up with some dried herbs and flower petals, which honestly takes them from “I made this in my garage” to “Pinterest Queen Energy.” What I love most is how simple and budget-friendly they are. I mean, who doesn’t have dryer lint, an old candle stub, and a toilet roll lying around?

She walks you through the whole process with her usual clear instructions the end result looks more like a rustic gift item than something you’d toss into a fire pit. It’s the perfect kind of project for anyone who likes camping, cozy backyard firepits, or even just prepping for winter in a crafty way.

Other DIY Firestarter Ideas I’ve Tried (and Loved)

Feeling inspired by Sadie’s creativity, I thought I’d toss in a few of my own favorite DIY firestarter methods—because once you make one, you kinda want to try them all!

Pine Cones Dipped in Wax

This one’s a holiday fave. Gather some pine cones, melt some candle wax (crayons work too!), and dip them until they have a nice coating. You can even add a few drops of essential oils for a nice scent as they burn.

Cork Firestarters

Soak used wine corks in rubbing alcohol for about a week. Keep them in a tightly sealed jar and pull one out when needed. They light up like magic (just be safe—these burn hot and fast!).

Orange Peel Twists

Let orange peels dry and twist them into spirals. They’re flammable and naturally full of oils that help them catch easily. Plus, they smell amazing when burned!

Paper Muffin Liners + Wax + Sawdust

Pour melted wax into muffin liners filled with sawdust (or wood shavings, or even coffee grounds). Let them cool, and you’ve got sturdy little fire cakes ready to go.

Related Posts:

  • Eco-Craft Fun: 25+ Sustainable Activities to Teach…
  • Turn That Old Fridge Into a Backyard Showstopper –…
«
»

Have you read?

Recycled Paper Cylinder Face Art – A Colorful Win for All Ages

I recently stumbled across this super creative project on Instructables – “Face With Recycled Paper Cylinders” – and I had to share it with you all because it’s just the kind of craft that checks all my favorite boxes: recycled materials, hands-on creativity, and fun for literally any age.

The idea is simple but genius—roll strips of recycled paper (think junk mail, old magazines, leftover printer paper) into cylinders, then arrange and glue them to form a unique abstract face. You can make it funky, realistic, Picasso-inspired—whatever your mood or style dictates!

What I really love is the blend of eco-conscious crafting with true artistic expression. This isn’t just another kids’ project—it’s something you could easily do with a group of little ones, a classroom full of teens, or even as an adult art therapy or weekend wind-down activity. It’s super relaxing and surprisingly satisfying seeing all those paper rolls come together to form something new and expressive.

The tutorial itself is easy to follow, with plenty of visuals to guide you along the way. You don’t need any fancy materials—just glue, paper, scissors, and a board or piece of cardboard to serve as your canvas.

I also appreciate how this project leaves so much room for personalization. Want to make it into a full face? Go for it. Prefer to focus on a single eye or mouth? Totally works. You can even play with color schemes by choosing papers with a certain palette, or painting over them once they’re rolled.

In short: this is a total keeper for anyone who loves crafting with purpose. It’s the kind of project that sparks creativity while gently reinforcing the idea that beautiful things can come from what we usually throw away.

Highly recommend giving it a go—solo or with a group. And if you try it, tag me or drop a pic—I’d love to see your recycled masterpiece!

Explore

books Christmas CraftGossip Giveaways Craft Inspirations Easter glass halloween Home Decor kid crafts mason jar More Crafts Patterns & Tutorials recycled art Recycled Clothing Recycled Jewelry Recycled Sewing Recycled Tutorials Recycling Ideas Recycling Organizing tin can

RSS More Articles

  • Cozy Up Your Holidays with This Stunning Christmas Blanket!
  • 5 Must-Know Secrets to Turning Your Suburban Home into a Profitable, Sustainable Homestead
  • Recycled Paper Cylinder Face Art – A Colorful Win for All Ages
  • 12 FREE Summer Digital Stamps to Download
  • Today Only: 50% Off When You Spend $50 at Crochet.com!
  • Today only 50% OFF When You Spend $50 at KnitPicks.com
  • Kids and Adults Will Love this Paper Version of Tetris
  • Knit a Hat with a Flock of Chickens
  • That Time a Thrift Store Employee Shamed Me – And Your Honest Responses
  • DMC American Camping Embroidery Pattern – A Nostalgic Outdoor Stitch for Summer Lovers

Copyright © 2025 · CraftGossip | Start Here | Contact Us | Link to Us | Your Editors | Privacy and affiliate policy