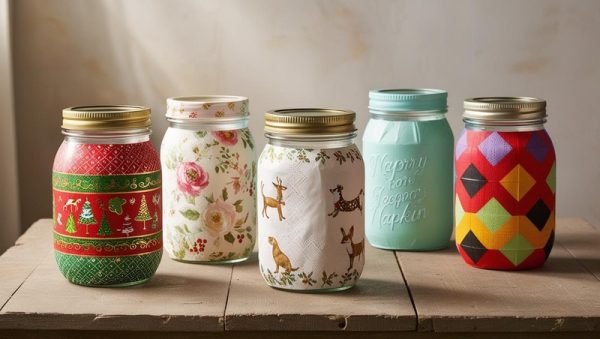
If you’ve got a pile of empty jars and a few pretty paper napkins lying around, you’re already halfway to creating something magical. Napkin decoupage is one of those crafts that looks fancy but is surprisingly easy (and oddly satisfying). The best part? Each jar turns out totally unique, and no two will ever be the same.
What You’ll Need:
Clean, empty glass jars (mason jars, pasta sauce jars, anything!)
Decorative paper napkins (floral, botanical, holiday—whatever you like)
Decoupage glue (like Mod Podge) or a mix of white glue and water (about 1:1 ratio)
A soft brush or foam brush
Scissors
Optional: acrylic paint, twine, ribbon, or tea lights for finishing touches
Step 1: Clean Your Jars
Make sure your jars are clean and dry. Peel off any labels (soak them in hot soapy water if they’re stubborn), and wipe off any sticky residue. A bit of rubbing alcohol works wonders for this.
Step 2: Prepare Your Napkins
Most decorative napkins are 2-3 ply. Gently separate the top printed layer from the backing layers—you only want the thinnest, printed piece for decoupage. Cut or tear out the design you want to use. You can go big with full napkin coverage or small and simple with just a few cut-out flowers or shapes.
Step 3: Optional Base Coat
If you want your design to really pop, especially if your napkin is light or translucent, you can paint the jar first with white acrylic paint. Let it dry completely before moving on.
Step 4: Apply the Glue
Using your soft brush, apply a thin, even coat of decoupage glue to a small section of the jar. Carefully place the napkin piece on the glue and gently smooth it down with your fingers or the brush. Work slowly to avoid tearing the napkin. Wrinkles? Don’t stress—they add character!
Continue section by section until your design is placed. If you’re covering the whole jar, work your way around bit by bit. Once it’s in place, gently brush another layer of glue over the top of the napkin to seal it. Let dry.
Step 5: Seal and Finish
Once everything is dry, you can add a second layer of glue or even a clear sealant spray if you want extra durability. Decorate the rim with twine, lace, or ribbon for an extra handmade touch.
Want to use them as candle holders? Pop in a tea light and watch the design glow when it’s lit from inside. Or use them as flower vases, pen holders, or even in the kitchen to store small utensils.
Tips & Tricks:
Don’t over-saturate the napkin—it can tear easily when too wet.
If your jar is very curved, small napkin pieces are easier to work with than trying to apply one big piece.
Experiment with layering designs for a collage effect.
And that’s it! Your plain old jars just got a brand new life. This is one of those crafts that’s super relaxing and oddly addictive—you’ll want to decoupage every jar in sight.