• Home
  • Suggest A DIY
  • DIY Newsletter

Recycled Crafts

Creative DIY Projects That Turn Trash Into Treasure

  • About CraftGossip
  • Our Network
    • Bath & Body Crafts
    • Candle Making Ideas
    • Crochet Ideas
    • Cross Stitch
    • Edible Crafts
    • Felting Patterns
    • Glass Art
    • Home & Garden Ideas
    • Indie Crafts
    • Jewelry Making
    • Kids Crafts
    • Knitting Patterns
    • Lesson Plans
    • Needlework
    • Party Ideas
    • Polymer Clay
    • Quilting Ideas
    • Recycled Crafts
    • Scrapbooking
    • Sewing Patterns
    • Card Making
    • DIY Weddings
    • Not Craft Ideas
  • Giveaways
  • Roundups
  • Store
  • Search

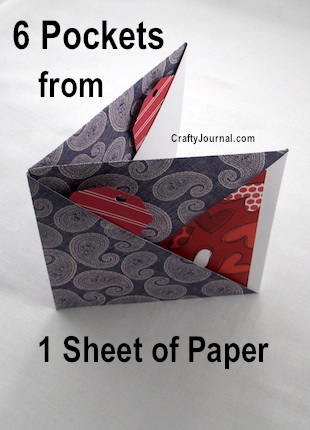
Cool way to fold a 6 pocket paper book

February 2, 2018 by Stefanie Girard

This DIY project would be an adorable and thoughtful gift for Valentine’s Day. Using heart-themed paper to create the envelopes will give the project an extra special touch. Whether you’re a seasoned scrapbooker or a beginner, the possibilities are endless when it comes to customizing this project to suit your own style.

You could fill the envelopes with all sorts of goodies for a scrapbooker or planner addict. Some ideas include stickers, washi tape, stamps, die cuts, or even small embellishments. You could also include handwritten notes or special memories to make the gift even more personal. 

This project is not only fun to make but also an inexpensive way to create a meaningful and thoughtful gift for someone special. Whether you’re looking for a DIY gift for a friend, a family member, or a significant other, this project is sure to be a hit.

This is so cute and I bet would be fun to make for Valentine’s Day out of pretty heart themed papers like these.

Pop on over to the blog Crafty Journal for the step by step tutorial on how to fold 6 pockets from a single sheet of paper.


«
»

Comments

  1. Debrah says

    September 26, 2018 at 1:46 pm

    What a cool idea! I have two little grandkids on the other side of the country that I’m trying to stay in touch with so tucking notes into these pockets would make a delivery from Grandma so much more fun to get than just a plain letter. Thanks for the great idea.

Have you read?

DIY Review: Vintage Milk Can Side Table Makeover – Upcycled Charm with a Story

You know that thrill when you find an old, rusty piece of junk and immediately see its potential? That’s exactly the vibe I got reading the tutorial from A Pretty Happy Home on turning a vintage milk can into a side table. It’s one of those simple yet satisfying projects that blends upcycled charm with real functionality—and adds a whole lot of character to your space.

First off, there’s just something magical about milk cans. They’ve got history. You just know they’ve lived on a dusty farm porch or sat beside a barn door through decades of seasons. In this project, that history gets to shine—literally—after a little elbow grease and creative thinking.

What I loved about this makeover is how unfussy it is. The milk can wasn’t scrubbed within an inch of its life or made to look overly polished. Instead, it got a respectful refresh: a little cleaning, a bit of clear coat to protect the patina, and a sturdy, round wood top to complete the transformation into a DIY farmhouse side table.

The wood top itself was made from leftover pieces—hello, recycled wood projects—which gives this whole DIY an extra eco-friendly touch. It’s a small win for the environment and a big win for anyone who appreciates budget-friendly home decor that doesn’t look cheap.

You don’t need fancy tools or a woodworking shop to pull this off. That’s the beauty of these repurposed furniture ideas—they’re accessible. And they let the vintage pieces speak for themselves. This one, in particular, looks just as good next to a cozy armchair as it would on a porch with a cup of tea and a warm breeze.

The final result? A rustic milk can side table that’s equal parts practical and nostalgic. It’s got that collected-over-time feel that you just can’t buy from a big box store. And as someone who loves giving old things new life, it absolutely inspired me to go digging through the nearest antique store (or maybe my parents’ shed) to see what I can rescue next.

If you’re looking for easy upcycled decor projects, or a way to add authentic farmhouse style without breaking the bank, this tutorial is a perfect weekend project. Honestly, this is the kind of piece that guests will ask about, and you’ll get to say, “Oh, that old thing? I made it.”

And you will say it with pride.

Explore

books Christmas CraftGossip Giveaways Craft Inspirations Easter glass halloween Home Decor kid crafts More Crafts Patterns & Tutorials Recycled and Thrifted Ideas recycled art Recycled Clothing Recycled Jewelry Recycled kids crafts Recycled Sewing Recycling Ideas Recycling Organizing tin can

Featured Posts

Giveaway- Loome Party: 20 Tiny Yarn Projects to Make from Your Stash

12 ways to make greenhouses

How to make a recycled pallet clock

How to make a succulent turtle

30 Brilliant Uses for Empty Pill Bottles You Probably Haven’t Tried Yet

RSS More Articles

  • Barrel Pants for Women: 12 Summer Bottoms Sewing Patterns
  • FREE Beauty and the Beast Book Nook Cut Files
  • 15 Unusual Granny Square Crochet Patterns You Can Make for Free
  • Book Review: Knitted Safari Friends – 20 Adorable Animals to Make
  • Krylon Classic Spray Paint Is Back – And That Retro Can Is Pure Craft-Room Nostalgia
  • Designer Spotlight: Colorfully Sarah Shop
  • How to Organize Scrapbook Supplies in a Small Space (Without Losing Your Creativity)
  • Dollar Tree Free Shipping Code: Shop Online and Save
  • How to Make an Upcycled Shaker Card
  • Free Felted Woodland Mini Mending Pattern Review

Copyright © 2026 · CraftGossip | Start Here | Contact Us | Link to Us | Your Editors | Privacy and affiliate policy