• Home
  • Suggest A Craft
  • DIY Newsletter

Recycled Crafts

Creative DIY Projects That Turn Trash Into Treasure

  • About CraftGossip
  • Our Network
    • Bath & Body Crafts
    • Candle Making Ideas
    • Crochet Ideas
    • Cross Stitch
    • Edible Crafts
    • Felting Patterns
    • Glass Art
    • Home & Garden Ideas
    • Indie Crafts
    • Jewelry Making
    • Kids Crafts
    • Knitting Patterns
    • Lesson Plans
    • Needlework
    • Party Ideas
    • Polymer Clay
    • Quilting Ideas
    • Recycled Crafts
    • Scrapbooking
    • Sewing Patterns
    • Card Making
    • DIY Weddings
    • Not Craft Ideas
  • Giveaways
  • Roundups
  • Store
  • Search

Paper Pups: 35 Free Printable Dog Templates to Cut & Fold (2025 Update)

May 29, 2013 by Stefanie Girard

Paper pups patternsPaper Pups: 35 Dogs to Copy, Cut & Fold by Hiroshi Hayakawa is one of those books that you can simple sit back and enjoy the experience of making something, kind of like paint by numbers. 

Paper crafting just got paws-itively delightful! Whether you’re a seasoned origami enthusiast or looking for fun kids’ crafts, these 35 dog templates from Paper Pups offer endless creative possibilities. Originally published in 2013, we’ve completely updated this guide with new tips, template variations, and reader success stories.

Why try these templates today?
? Perfect for school projects & rainy day activities
? Great way to upcycle scrap paper
? Develops fine motor skills in children
? Creates charming homemade decorations

What’s Included in Paper Pups

The book features ready-to-use templates for:

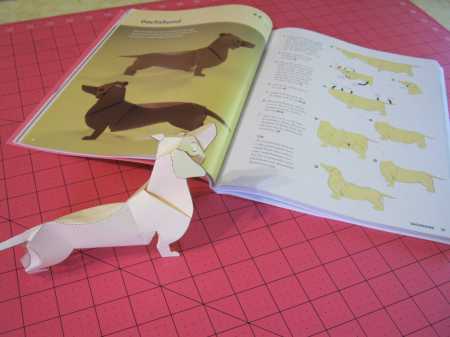
  • Popular breeds: Dachshunds, Labradors, Poodles

  • Difficulty levels: From beginner to advanced

  • Special designs: Holiday-themed dogs, accessories

Pro Tip: Scan and enlarge templates for bigger projects!


folded paper dog dachshund 3-d

So whether you are a dog lover or paper lover or both you will surely get a kick out of making all these little Paper Pups! By the way that is my next plan is to try another of the patterns with some recycled paper, maybe a fun page from a magazine or old art catalog.

Looking for more Paper folding crafts? Check out these Origami books

More about the book from the publisher Lark Crafts:

“Cute crafts and adorable dogs—what could be more irresistible? From a Golden Retriever and French Bulldog to the beloved mutt, these 35 paper pups are appealing and fun to create. They’re made using kirigami, an art similar to origami: just photocopy the full-size templates and follow the simple steps to transform a flat shape into a dimensional animal! In addition to the dogs, accessories include a fire hydrant, doghouse, and a collection of collars to adorn your paper pet.

Hiroshi Hayakawa is a professor of drawing and mixed-media photography at the Columbus College of Art and Design. He earned BFAs in Photography and Fine Arts from the Columbus College of Art and Design, as well as his MFA in Photography at Cranbrook Academy of Art in Michigan. Hiroshi began making kirigami animal sculptures in the mid-’90s when he was asked to create table decorations for a Chinese New Year’s party. The Sherrie Gallerie in Columbus, OH represents Hiroshi’s photography. He lives in Columbus.”

Coloring in sheets are a great way to calm the busy mind, as you focus on the coloring techniques your brain is actually able to calm itself and focus on less. Coloring is used to help relax and calm anxiety and stress. Coloring keeps out mental health in check and allows us to develop of creative brain. We highly recommend Copic markers or Faber castell coloring pencils .

Related Posts:

  • 25 Genius Ways to Repurpose Old Chairs Into…
  • 45 amazing ways to reuse and recycle old playing cards
«
»

Comments

  1. Holly Young says

    May 30, 2013 at 8:34 am

    How cute! I hope you share your dog when it’s finished!

Have you read?

How To Make A Milk Carton Village – A Recycled Craft for Kids

Ready to turn your recycling bin into a colorful, miniature village? Grab those empty milk cartons and let’s create a town filled with tiny houses, shops, and even a school or bakery! This craft is perfect for kids of all ages and encourages imagination, storytelling, and eco-friendly creativity.

 What You’ll Need:

  • Empty milk or juice cartons (washed and dried)

  • Paints or markers

  • Paintbrushes

  • Craft glue or glue stick

  • Scissors (adult supervision recommended)

  • Colored paper or old magazines

  • Bottle caps, buttons, or plastic lids (for windows or decorations)

  • Sticks, straws, or skewers (for flag poles or chimneys)

  • Optional: glitter, stickers, washi tape, cotton balls (for snow or clouds!)

 Step-by-Step Instructions:

Step 1: Clean and Prep the Cartons
Make sure your milk or juice cartons are washed and completely dry. Remove any plastic lids or caps and keep them for decorations!

Step 2: Plan Your Village
Decide how many buildings you want to make. Each milk carton becomes a house, shop, or whatever your imagination dreams up. Arrange them side by side or in a circle like a real village square.

Step 3: Cut Out Doors and Windows
With the help of an adult, carefully cut small door and window shapes into your cartons. You can also glue cut-out shapes from colored paper if you’d rather not cut into the carton.

Step 4: Paint and Decorate
Use paint or markers to bring your buildings to life. Make brick patterns, colorful siding, or roof tiles. Let each child choose their own theme – rainbow bakery, monster house, fairy home, or tiny fire station!

Step 5: Add the Roofs
You can paint the top pointy part of the carton like a roof, or glue on cardboard triangles to create overhangs. Want to add a chimney? Glue a straw or cardboard roll on top!

Step 6: Make Flags and Signs
Cut small flags from recycled plastic or paper and tape them to straws or sticks. Glue your flags to the rooftops. You can even create tiny signs for each building – “Toy Store,” “Library,” or “Super Cat’s House.”

Step 7: Build Your Village
Place all the finished buildings together on a large piece of cardboard, tray, or table. Use bottle caps for stepping stones, cotton balls for bushes or clouds, and draw roads with marker.

Step 8: Play!
Now that your village is built, use little toys, action figures, or LEGO people to live in your new town. Create stories and adventures—your Milk Carton Village is officially open!

 Learning Bonus:

This craft is not just fun—it also teaches recycling, fine motor skills, creative thinking, and storytelling. Plus, it’s a great group activity for playdates, classrooms, or family craft nights.

Let your kids’ imaginations run wild—and remember, no two villages need to look the same. Each one tells its own story!

Explore

books Christmas CraftGossip Giveaways Craft Inspirations Easter glass halloween Home Decor kid crafts More Crafts Patterns & Tutorials recycled art Recycled Clothing Recycled Jewelry Recycled kids crafts Recycled Sewing Recycled Tutorials Recycling Ideas Recycling Organizing tin can

RSS More Articles

  • Printable Cross Stitch Sheets Make it Easy to Cross Stitch on Clothes
  • Layered Embroidery on Watercolor Fabric: Mixed Media Magic
  • Paf – Panda Dad Free Crochet Pattern
  • How To Use Bath Salts in the Shower Without a Bath – Relaxation, Skincare, and a DIY Salt Recipe
  • How to Make Two Labubu Greeting Cards
  • DIY Fabric Twine Plant Hanger: A Stylish Way to Display Your Plants
  • Knit a Stunning Shawl That Wears Like a Collar
  • How to Make a Summer Pocket Mini Scrapbook Album
  • Book Review: This is How a Ball Rolls
  • A Sweet Top to Show Off Colorful Yarns

Copyright © 2025 · CraftGossip | Start Here | Contact Us | Link to Us | Your Editors | Privacy and affiliate policy