• Home
  • Suggest A Craft
  • DIY Newsletter

Recycled Crafts

Creative DIY Projects That Turn Trash Into Treasure

  • About CraftGossip
  • Our Network
    • Bath & Body Crafts
    • Candle Making Ideas
    • Crochet Ideas
    • Cross Stitch
    • Edible Crafts
    • Felting Patterns
    • Glass Art
    • Home & Garden Ideas
    • Indie Crafts
    • Jewelry Making
    • Kids Crafts
    • Knitting Patterns
    • Lesson Plans
    • Needlework
    • Party Ideas
    • Polymer Clay
    • Quilting Ideas
    • Recycled Crafts
    • Scrapbooking
    • Sewing Patterns
    • Card Making
    • DIY Weddings
    • Not Craft Ideas
  • Giveaways
  • Roundups
  • Store
  • Search

7 Things To Do With Milk Jugs

August 29, 2014 by Larissa Coleman

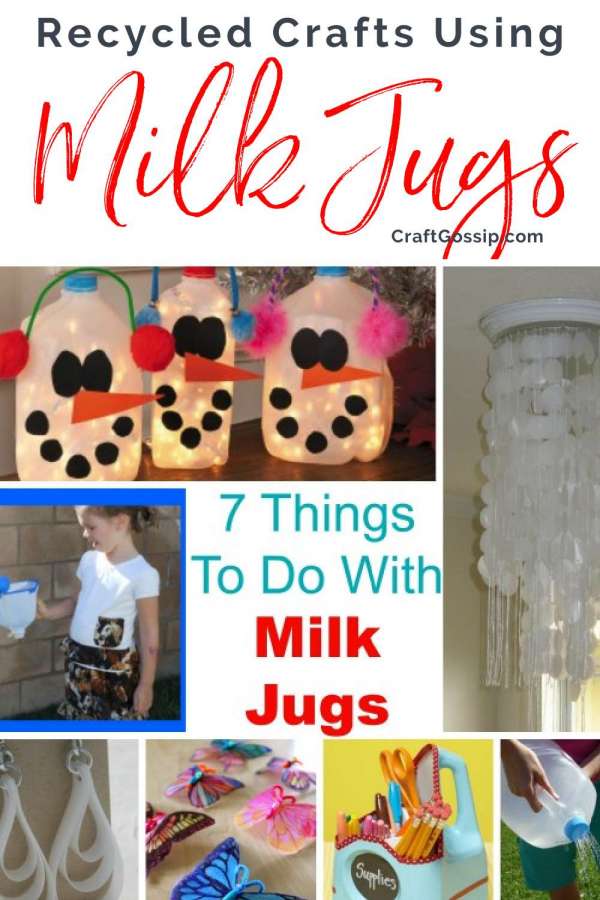
Plastic milk jugs are something that most of us have in our homes on a regular basis.  If you have a hard time throwing them away because you know there just has to be something more useful you can do with them, then you have got to read this post!  Here are 7 things to do with milk jugs.    Love working with recycled items? Check out this amazing recycled Crafts book.


snowman

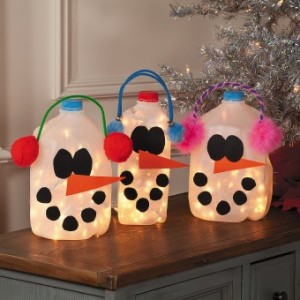
1- Light Up Snowmen from Free Fun Christmas

chandeleir

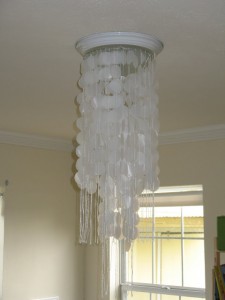
2- Faux Capiz Shell Chandelier from Shoe String Pavillion

toss-jug

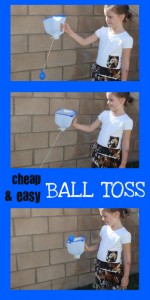
3- Milk Jug Yo-Yo from A Mom With A Lesson Plan

earrings

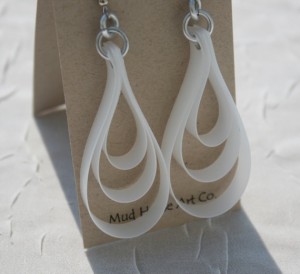
4- Recycled Milk Jug Earrings from Mud Horse Art

butterflies

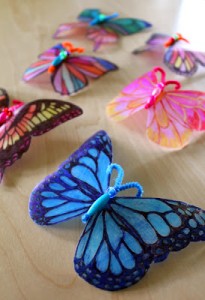
5- Milk Jug Butterflies from Filth Wizardry

supplies

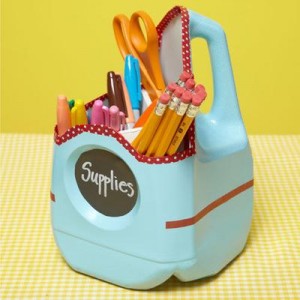
6- School Supply Container from All You

Wateringcarn

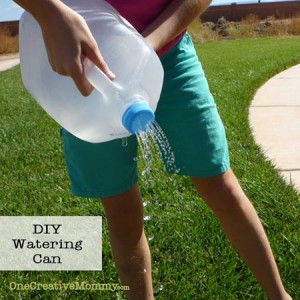
7- DIY Watering Can from One Creative Mommy

Related Posts:

  • 45 amazing ways to reuse and recycle old playing cards
  • 35 Creative Ways to Make Bowls from Recycled…
«
»

Comments

  1. jacky jenkins says

    August 29, 2014 at 8:04 pm

    Had no idea where do people get there ideas from briliant !!!!!!!!!!!!

  2. Melinda Guerra says

    November 13, 2014 at 2:19 am

    Cut off the bottom half and use as a scoop

Have you read?

DIY Paper Bag Mushrooms – A Creative Upcycled Craft for Kids and Nature Lovers

There’s something magical about mushrooms — maybe it’s the fairy-tale vibes or their cozy woodland charm. Either way, turning ordinary brown paper bags into mushrooms is a fun, hands-on craft project that kids (and adults) will enjoy. The best part? You’re reusing materials that might otherwise go to waste. Win-win!

This easy tutorial walks you through making your very own forest of recycled mushrooms using simple supplies you likely already have around the house.

What You’ll Need:

  • Brown paper lunch bags (you can even use grocery bags cut to size)

  • Scrap paper or newspaper for stuffing

  • String, yarn, or twine

  • Scissors

  • Paints (acrylic or tempera work best)

  • Paintbrushes or sponges

  • Optional extras: markers, stickers, googly eyes, craft glue

Step-by-Step: How to Make Your Mushrooms

Step 1: Create the Mushroom Top
Start by opening your paper bag and gently crumpling up some newspaper or scrap paper. Stuff it into the bottom of the bag — not too tight, just enough to give it a rounded shape that will form the mushroom cap.

Step 2: Form the Stem
Once the top is nice and puffy, hold the bag just underneath the stuffed section and twist it lightly to shape the stem. Tie a piece of twine or string around this part to hold the form. You’ll now have a mushroom top with a long paper bag hanging down — that’s your stem.

Step 3: Trim to Size
If the stem looks too long or uneven, grab your scissors and snip it down to your preferred height. You can even experiment with making some taller and some short and chubby for a little mushroom variety.

Step 4: Paint and Decorate
Time for the fun part — painting! Flip the mushroom cap upright and paint it any way you like. Classic red with white spots? Go for it. Bright blue with glitter? Why not! Use brushes or dabbers to add spots, swirls, or patterns. Let kids express their creativity — there’s no wrong way to decorate a magic mushroom!

Step 5: Let It Dry
Place your mushrooms somewhere safe to dry. You can use a sheet of newspaper or cardboard to avoid mess. Once dry, they’ll stiffen a little and hold their shape nicely.

Step 6: Display Your Mushroom Garden
Line them up on a windowsill, add them to a play area, or build a fairy village in the corner of a room. You can even glue them to a cardboard base and add moss, pebbles, and tiny paper critters for a full scene.

Extra Ideas:

  • Add flags or tiny doors to make mushroom homes.

  • Draw faces or names on the stems to turn them into characters.

  • Use cotton balls or pom-poms for fluffy mushroom spots.

Why This Project Rocks:

This is one of those crafts that doesn’t need a trip to the store or fancy tools — just a little time, a few basic supplies, and a bit of imagination. Plus, it encourages kids to see the creative potential in everyday materials — a great step toward more mindful, eco-conscious crafting.

So go ahead, raid the recycling bin and bring a mini mushroom forest to life.

How to make giant toadstools out of recycled tires

How to make champagne cork toadstools

How to make recycled Easter egg mushrooms

How to make recycled toilet paper tube mushrooms

How to make a rainbow forest of adorable recycled mushrooms

Explore

books Christmas CraftGossip Giveaways Craft Inspirations Easter glass halloween Home Decor kid crafts More Crafts Patterns & Tutorials recycled art Recycled Clothing Recycled Jewelry Recycled kids crafts Recycled Sewing Recycled Tutorials Recycling Ideas Recycling Organizing tin can

RSS More Articles

  • DIY Paper Bag Mushrooms – A Creative Upcycled Craft for Kids and Nature Lovers
  • Book Review – Stitched Photo Mosaic Quilting
  • Free Crochet Pattern – Halloween Skull Sweater
  • 5 FREE Cute, Comfy and Cozy Fall Coloring Pages
  • Meet Mr. Boo – The Ultimate Halloween Decoration That Will Steal the Show
  • Book Review: Cross Stitch Alphabet and Number Patterns
  • Knit a Jacket Inspired by an Iconic Coco Chanel Look
  • Learning about Côte D’ivoire for Kids
  • 12 Autumn Botanical Scrapbook Layout Ideas
  • Green Gifting: Sustainable Gift Wrap Ideas Using What You Already Have

Copyright © 2025 · CraftGossip | Start Here | Contact Us | Link to Us | Your Editors | Privacy and affiliate policy