• Home
  • Suggest A Craft
  • DIY Newsletter

Recycled Crafts

Creative DIY Projects That Turn Trash Into Treasure

  • About CraftGossip
  • Our Network
    • Bath & Body Crafts
    • Candle Making Ideas
    • Crochet Ideas
    • Cross Stitch
    • Edible Crafts
    • Felting Patterns
    • Glass Art
    • Home & Garden Ideas
    • Indie Crafts
    • Jewelry Making
    • Kids Crafts
    • Knitting Patterns
    • Lesson Plans
    • Needlework
    • Party Ideas
    • Polymer Clay
    • Quilting Ideas
    • Recycled Crafts
    • Scrapbooking
    • Sewing Patterns
    • Card Making
    • DIY Weddings
    • Not Craft Ideas
  • Giveaways
  • Roundups
  • Store
  • Search

Rubber stamped and embossed word rocks collage

July 24, 2017 by Stefanie Girard

stefanie girard crafter's companion word rocks Have you found any word rocks in your neighborhood? Have you created any and left them about? Well, I have had the pleasure of finding one in my yard and I thought I’d try rubber stamping and embossing some rocks for both a shadow box rock collage and then make a bunch to leave around in my neighborhood.

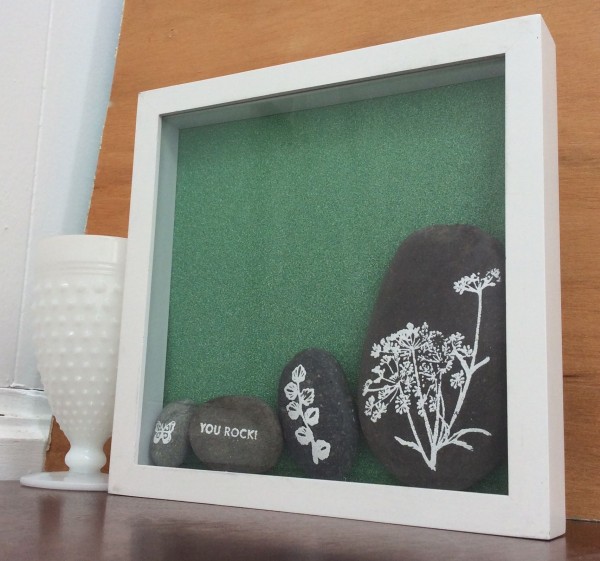
My favorite phrase to put on a rock is, you guessed it, “YOU ROCK!” and there is that phrase included in the Spectrum Noir Colorista Aqua set.

The rocks are from my last trip to the beach.

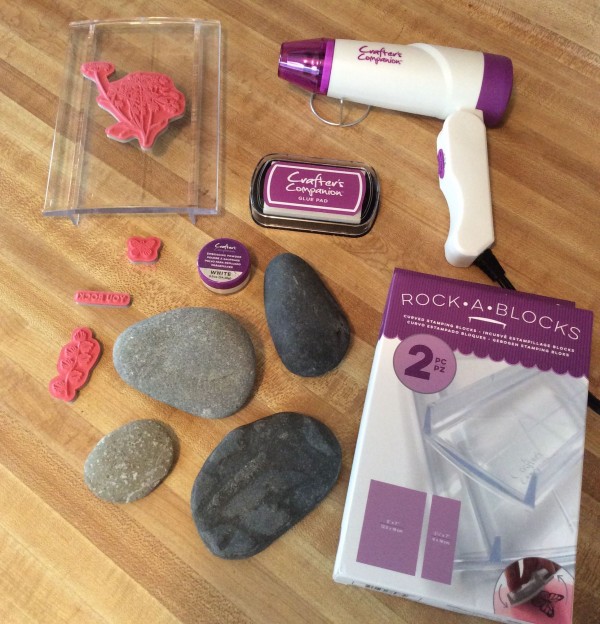
The Crafter’s Companion Rock-a-blocks are great for stamping on uneven surfaces.

I used white embossing powder to create the phrase, flowers and butterfly on the rocks.

The shadow box was from the dollar store and I slipped a piece of Glitter green cardsock behind the rocks.

Love using natural materials found in nature? Check out these books on Crafting with nature. 


Related Posts:

  • Why Do Your Kids Play with the Box? An Interview…
  • Teaching Kids About Recycling: Fun Activities to…
«
»

Comments

  1. Kali Parsons says

    August 7, 2017 at 4:28 pm

    Great idea! Now I need to go get some rocks. It would be fun to give “You Rock!” rocks to my students. And I subscribed to this blog. Thanks!

Have you read?

This DIY Board Game Table Made Me Want to Dust Off My Cricut

You know that feeling when you see a project and instantly start mentally rearranging your whole weekend to fit it in? That was me with The Carpenter’s Daughter’s DIY Board Game Table tutorial. I mean, it’s so good. Functional, stylish, and honestly—such a conversation starter.

It’s the kind of piece that looks high-end, but she breaks it down step-by-step in a way that makes it totally achievable, even if you’re not a woodworking wizard. And if you’ve got a Cricut machine (like I do, gathering dust in the corner), this is your cue to plug it in and actually use it. She used hers to create the game board top, and it adds such a clean, custom finish.

I never really thought about how handy a built-in game board could be—no more shuffling Monopoly pieces off the kitchen table when it’s time for dinner! It’s perfect for families, game nights with friends, or even just a cool coffee table alternative with a little hidden fun.

What I Love About This Project:

  • It doubles as a gorgeous piece of furniture.

  • You can totally customize the games—checkers, chess, tic-tac-toe, you name it.

  • It’s an awesome way to up your Cricut game (seriously, I’ve been inspired).

  • And let’s be honest—it’s a great excuse to get crafty and competitive.

If you’re looking for a project with style and function, check out the full tutorial here. Fair warning though—you’ll probably end up wanting to make more than one.

Now if you’ll excuse me, I’m off to charge my Cricut and pretend I know how to play chess again…

Explore

books Christmas CraftGossip Giveaways Craft Inspirations Easter glass halloween Home Decor kid crafts More Crafts Patterns & Tutorials recycled art Recycled Clothing Recycled Jewelry Recycled kids crafts Recycled Sewing Recycled Tutorials Recycling Ideas Recycling Organizing tin can

RSS More Articles

Copyright © 2025 · CraftGossip | Start Here | Contact Us | Link to Us | Your Editors | Privacy and affiliate policy