• Home
  • Suggest A Craft
  • DIY Newsletter

Recycled Crafts

Creative DIY Projects That Turn Trash Into Treasure

  • About CraftGossip
  • Our Network
    • Bath & Body Crafts
    • Candle Making Ideas
    • Crochet Ideas
    • Cross Stitch
    • Edible Crafts
    • Felting Patterns
    • Glass Art
    • Home & Garden Ideas
    • Indie Crafts
    • Jewelry Making
    • Kids Crafts
    • Knitting Patterns
    • Lesson Plans
    • Needlework
    • Party Ideas
    • Polymer Clay
    • Quilting Ideas
    • Recycled Crafts
    • Scrapbooking
    • Sewing Patterns
    • Card Making
    • DIY Weddings
    • Not Craft Ideas
  • Giveaways
  • Roundups
  • Store
  • Search

10 fun ways to recycle Scrabble tiles

June 21, 2015 by Stefanie Girard

scrable-tiles-how-to-use-upcycled.jpg

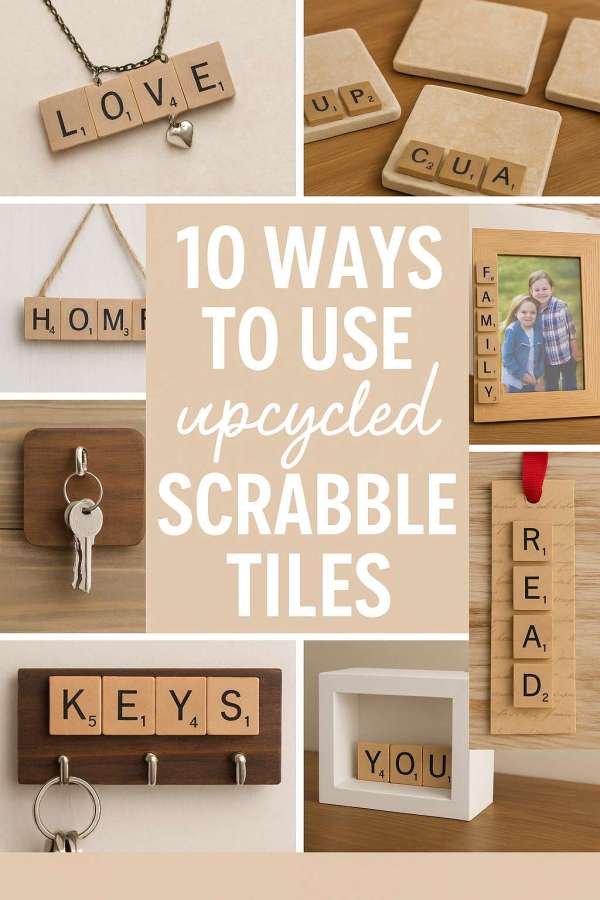
We have all seen jewelry featuring recycled Scrabble tiles but this way to use the tile holders and the Scrabble board to display them is positively wonderful. I bet this would work to display all sorts of art and cards? Pop on over to the blog Recycle Nation to see 9 more ways to create with recycled Scrabble tiles.

If you have a box full of Scrabble tiles to upcycle, check out these other crafty ways to use tiles that are not jewelry-oriented.

DIY Scrabble Tile Coasters — CraftBits.com

Father’s Day Craft: Scrabble Tile Coaster — CraftBits.com

Father’s Day Craft: Scrabble Tile Picture Holder

Recycled Scrabble Tile Earrings 

Ring – Scrabble Tile 

Recycled Scrabble Tile Magnets 

Recycled Scrabble Tile Pendant 

Scrabble Bracelet 


Related Posts:

  • 45 amazing ways to reuse and recycle old playing cards
  • Creative Ways to Reuse UNO Cards: Fun Upcycled Crafts to Try
«
»

Comments

  1. senthil T says

    May 6, 2018 at 2:26 pm

    very good build

  2. senthil T says

    May 22, 2018 at 10:09 pm

    Interestingly scrabble is played by at least 30% of the american population and projects like this will help improve utilizing recycled goods as opposed to playing in online channels like http://scrabblewordfinderguide.com which really doesn’t help the economy.
    Do more stuffs like this wherever possible:)

Have you read?

How To Make A Milk Carton Village – A Recycled Craft for Kids

Ready to turn your recycling bin into a colorful, miniature village? Grab those empty milk cartons and let’s create a town filled with tiny houses, shops, and even a school or bakery! This craft is perfect for kids of all ages and encourages imagination, storytelling, and eco-friendly creativity.

 What You’ll Need:

  • Empty milk or juice cartons (washed and dried)

  • Paints or markers

  • Paintbrushes

  • Craft glue or glue stick

  • Scissors (adult supervision recommended)

  • Colored paper or old magazines

  • Bottle caps, buttons, or plastic lids (for windows or decorations)

  • Sticks, straws, or skewers (for flag poles or chimneys)

  • Optional: glitter, stickers, washi tape, cotton balls (for snow or clouds!)

 Step-by-Step Instructions:

Step 1: Clean and Prep the Cartons
Make sure your milk or juice cartons are washed and completely dry. Remove any plastic lids or caps and keep them for decorations!

Step 2: Plan Your Village
Decide how many buildings you want to make. Each milk carton becomes a house, shop, or whatever your imagination dreams up. Arrange them side by side or in a circle like a real village square.

Step 3: Cut Out Doors and Windows
With the help of an adult, carefully cut small door and window shapes into your cartons. You can also glue cut-out shapes from colored paper if you’d rather not cut into the carton.

Step 4: Paint and Decorate
Use paint or markers to bring your buildings to life. Make brick patterns, colorful siding, or roof tiles. Let each child choose their own theme – rainbow bakery, monster house, fairy home, or tiny fire station!

Step 5: Add the Roofs
You can paint the top pointy part of the carton like a roof, or glue on cardboard triangles to create overhangs. Want to add a chimney? Glue a straw or cardboard roll on top!

Step 6: Make Flags and Signs
Cut small flags from recycled plastic or paper and tape them to straws or sticks. Glue your flags to the rooftops. You can even create tiny signs for each building – “Toy Store,” “Library,” or “Super Cat’s House.”

Step 7: Build Your Village
Place all the finished buildings together on a large piece of cardboard, tray, or table. Use bottle caps for stepping stones, cotton balls for bushes or clouds, and draw roads with marker.

Step 8: Play!
Now that your village is built, use little toys, action figures, or LEGO people to live in your new town. Create stories and adventures—your Milk Carton Village is officially open!

 Learning Bonus:

This craft is not just fun—it also teaches recycling, fine motor skills, creative thinking, and storytelling. Plus, it’s a great group activity for playdates, classrooms, or family craft nights.

Let your kids’ imaginations run wild—and remember, no two villages need to look the same. Each one tells its own story!

Explore

books Christmas CraftGossip Giveaways Craft Inspirations Easter glass halloween Home Decor kid crafts More Crafts Patterns & Tutorials recycled art Recycled Clothing Recycled Jewelry Recycled kids crafts Recycled Sewing Recycled Tutorials Recycling Ideas Recycling Organizing tin can

RSS More Articles

  • Designer Spotlight: Murder Puffin
  • DMC Striker Embroidery Pattern – A Free Football-Themed Stitch for Sports Fans
  • Knits to Make for Your Labubu
  • Little Birds: 26 Handmade Projects to Sew, Stitch, Quilt and Love
  • Stenciling Like a Pro? You NEED These Must-Have Supplies
  • 15 Highland Cows You Can Crochet
  • Etsy Spotlight – The Thomas Boys Shirt Sewing Pattern
  • 7 FREE Back to School SVG Cut Files
  • How to Make a Sticks and Stones Quilt – Free Quilting Tutorial
  • Cozy Toes Await: Cable Crochet Slipper Boots Botties Wool Insoles Kit

Copyright © 2025 · CraftGossip | Start Here | Contact Us | Link to Us | Your Editors | Privacy and affiliate policy