• Home
  • Suggest A Craft
  • DIY Newsletter

Recycled Crafts

Creative DIY Projects That Turn Trash Into Treasure

  • About CraftGossip
  • Our Network
    • Bath & Body Crafts
    • Candle Making Ideas
    • Crochet Ideas
    • Cross Stitch
    • Edible Crafts
    • Felting Patterns
    • Glass Art
    • Home & Garden Ideas
    • Indie Crafts
    • Jewelry Making
    • Kids Crafts
    • Knitting Patterns
    • Lesson Plans
    • Needlework
    • Party Ideas
    • Polymer Clay
    • Quilting Ideas
    • Recycled Crafts
    • Scrapbooking
    • Sewing Patterns
    • Card Making
    • DIY Weddings
    • Not Craft Ideas
  • Giveaways
  • Roundups
  • Store
  • Search

Paint Chip Garland

December 3, 2008 by robyn charles

Today we’ve got an extra special guest tutorial, thanks to reader Amy Quarry.

Collect lots of big paint chips in your preferred colours. I used Debbie Travis chips from Canadian Tire, but I think they have the big ones in Home Depot as well.

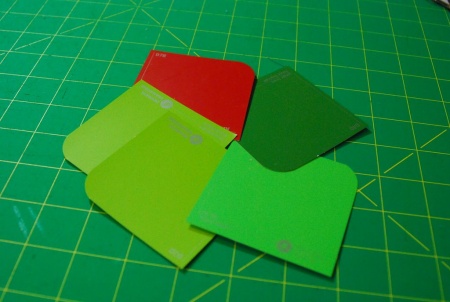
Place two chips together, back to back. You could glue them, but I didn’t bother. Cut out the shape you want, getting rid of any writing that is on the chips. I went with a rounded diamond shape, but circles, squares or triangles would all be cute. Do this step a few dozen times.

Sew down the centre of each pair of chips, attaching them together in a garland. I found that leaving a stitch or two in between each pair made them spin nicely once the garland is hung up.

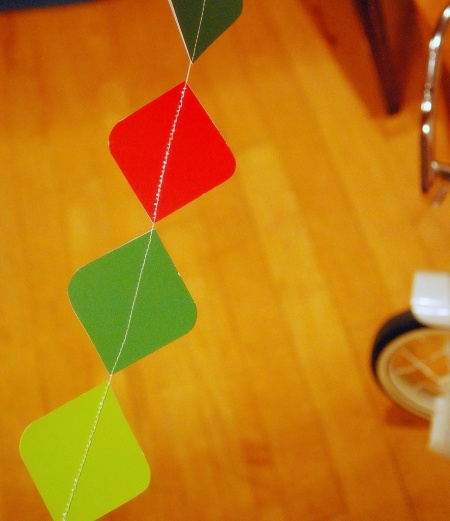
There you have it! A pretty and free craft project.

* * * * * * * * * * * * * * * * * * * * * * * * * * * * * * * * * *

For more amazing tutorials and great ways to recycle everyday objects into items of beauty, head over to Amy’s blog!

Related Posts:

  • DIY Upcycled Fabric Bowls and Baskets: A Fun and…
  • Upcycled Writing Desk to Cocktail Cabinet
«
»

Comments

  1. Trina says

    December 4, 2008 at 9:33 pm

    Instead of cutting off the writing (in case that messes up the shape you want to use), you can try erasing it with one of the white chunk erasers, or try using a q-tip and acetone (fingernail polish remover). It won’t work on all of them, but its worth a shot. (If it doesn’t work? No problem, go ahead and cut it off. *smiles*)

Have you read?

How To Make A Milk Carton Village – A Recycled Craft for Kids

Ready to turn your recycling bin into a colorful, miniature village? Grab those empty milk cartons and let’s create a town filled with tiny houses, shops, and even a school or bakery! This craft is perfect for kids of all ages and encourages imagination, storytelling, and eco-friendly creativity.

 What You’ll Need:

  • Empty milk or juice cartons (washed and dried)

  • Paints or markers

  • Paintbrushes

  • Craft glue or glue stick

  • Scissors (adult supervision recommended)

  • Colored paper or old magazines

  • Bottle caps, buttons, or plastic lids (for windows or decorations)

  • Sticks, straws, or skewers (for flag poles or chimneys)

  • Optional: glitter, stickers, washi tape, cotton balls (for snow or clouds!)

 Step-by-Step Instructions:

Step 1: Clean and Prep the Cartons
Make sure your milk or juice cartons are washed and completely dry. Remove any plastic lids or caps and keep them for decorations!

Step 2: Plan Your Village
Decide how many buildings you want to make. Each milk carton becomes a house, shop, or whatever your imagination dreams up. Arrange them side by side or in a circle like a real village square.

Step 3: Cut Out Doors and Windows
With the help of an adult, carefully cut small door and window shapes into your cartons. You can also glue cut-out shapes from colored paper if you’d rather not cut into the carton.

Step 4: Paint and Decorate
Use paint or markers to bring your buildings to life. Make brick patterns, colorful siding, or roof tiles. Let each child choose their own theme – rainbow bakery, monster house, fairy home, or tiny fire station!

Step 5: Add the Roofs
You can paint the top pointy part of the carton like a roof, or glue on cardboard triangles to create overhangs. Want to add a chimney? Glue a straw or cardboard roll on top!

Step 6: Make Flags and Signs
Cut small flags from recycled plastic or paper and tape them to straws or sticks. Glue your flags to the rooftops. You can even create tiny signs for each building – “Toy Store,” “Library,” or “Super Cat’s House.”

Step 7: Build Your Village
Place all the finished buildings together on a large piece of cardboard, tray, or table. Use bottle caps for stepping stones, cotton balls for bushes or clouds, and draw roads with marker.

Step 8: Play!
Now that your village is built, use little toys, action figures, or LEGO people to live in your new town. Create stories and adventures—your Milk Carton Village is officially open!

 Learning Bonus:

This craft is not just fun—it also teaches recycling, fine motor skills, creative thinking, and storytelling. Plus, it’s a great group activity for playdates, classrooms, or family craft nights.

Let your kids’ imaginations run wild—and remember, no two villages need to look the same. Each one tells its own story!

Explore

books Christmas CraftGossip Giveaways Craft Inspirations Easter glass halloween Home Decor kid crafts More Crafts Patterns & Tutorials recycled art Recycled Clothing Recycled Jewelry Recycled kids crafts Recycled Sewing Recycled Tutorials Recycling Ideas Recycling Organizing tin can

RSS More Articles

  • Easy to make fall garland
  • Fancy Pumpkin Cross Stitch Patterns
  • DMC Orange Punch Needle Pattern
  • How To Make A Milk Carton Village – A Recycled Craft for Kids
  • Easy Sleeveless Top – Free Crochet Pattern
  • Poke Root And Castor Oil Recipes
  • 13 FREE Summerween Digital Stamps
  • “Transform Popsicle Sticks into Adorable Garden Makers – A Crafting Project You’ll Love
  • Book Review: The Sewing Book by Alison Smith
  • Apple Learning Activities

Copyright © 2025 · CraftGossip | Start Here | Contact Us | Link to Us | Your Editors | Privacy and affiliate policy