• Home
  • Suggest A Craft
  • DIY Newsletter

Recycled Crafts

Creative DIY Projects That Turn Trash Into Treasure

  • About CraftGossip
  • Our Network
    • Bath & Body Crafts
    • Candle Making Ideas
    • Crochet Ideas
    • Cross Stitch
    • Edible Crafts
    • Felting Patterns
    • Glass Art
    • Home & Garden Ideas
    • Indie Crafts
    • Jewelry Making
    • Kids Crafts
    • Knitting Patterns
    • Lesson Plans
    • Needlework
    • Party Ideas
    • Polymer Clay
    • Quilting Ideas
    • Recycled Crafts
    • Scrapbooking
    • Sewing Patterns
    • Card Making
    • DIY Weddings
    • Not Craft Ideas
  • Giveaways
  • Roundups
  • Store
  • Search

Watermelon painted rocks-part 2

June 14, 2017 by Stefanie Girard

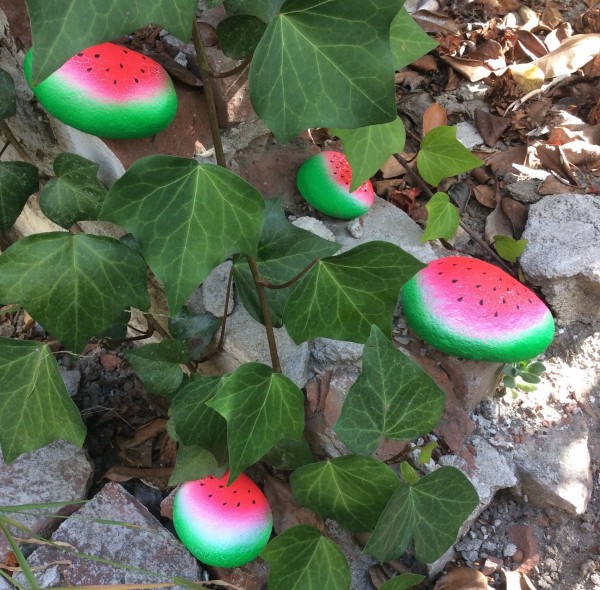
Yesterday I shared my new summer watermelon hat and flip-flop painting tutorial. Today is the second part of my watermelon painting fun. I am a little obsessed with word rocks and rock painting. So I thought that it would be fun to dress up my yard (and maybe these guys will make their way out into the neighborhood?) with some bright and colorful watermelon painted rocks.

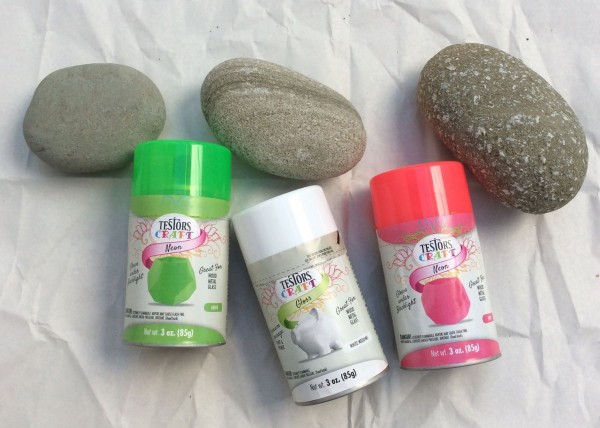
Testors Craft spray paint comes in lots of pretty colors like these Neon Green and Pink along with white.

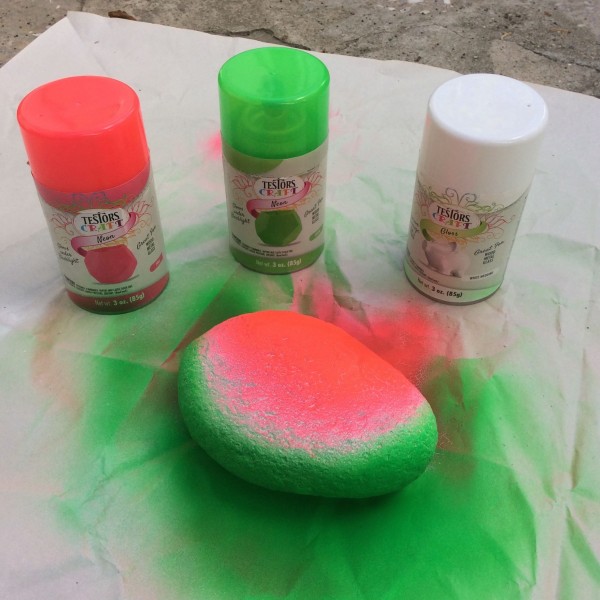
I did a bunch of rocks. I started with white as it is the smallest area. Then I did the green and pink. I did overspray in a few areas so I went back and forth a bit until I was happy with the paint job. The rocks were different shapes and sizes but I liked them all.

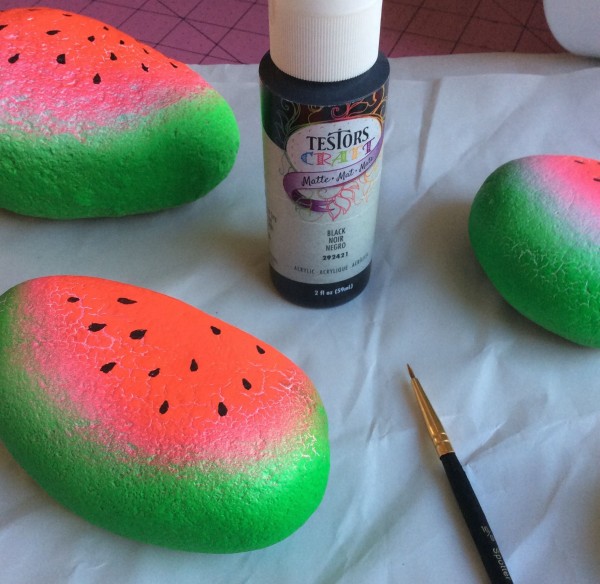
The last details to paint were the seeds. I did these with a tiny brush and Testors craft paint .

These watermelon painted rocks really add a pretty splash of color in my yard. I will definitely be painting more rocks! And sharing them!


You can paint your rocks with themes in mind too –  Check out these other articles we featured too on painted rocks. 

Related Posts:

  • How to make recycled clothes pin puppets
  • Cool way to combine weaving and clay
«
»

Have you read?

Making Popsicle Stick Playing Cards – Surprisingly Fun and Totally Charming!

Okay, I’ll be honest — when I first saw the Popsicle Stick Playing Cards project floating around on Instructables, I wasn’t entirely sold. Popsicle sticks and playing cards? Sounds like a summer camp throwback, right? But curiosity got the best of me (as it usually does with anything slightly crafty and slightly quirky), and I decided to give it a whirl.

And let me just say: I loved this project way more than I expected to.

At its core, this DIY is super simple. You’re basically fusing old playing cards with humble craft sticks to create chunky, tactile “cards” that are durable enough for little hands — or just to enjoy as a cool novelty set. The end result? A full deck that feels a little bit rustic, a little bit retro, and totally unique.

What I really appreciated about this project was how accessible it was. You don’t need anything fancy to get started — just some basic glue, scissors, popsicle sticks (standard size worked fine for me), and of course, a deck of cards that’s either past its prime or missing a few members. We all have one of those lying around somewhere, right?

I ended up using an old UNO deck that was looking pretty rough around the edges, and it turned out great. The cards stick well to the wood, and once everything’s dry, you get these sturdy, chunky pieces that have such a fun hand-feel. It almost reminds me of vintage tile games or big wooden dominoes.

This would be such a great project for kids — whether it’s as a rainy-day craft, a classroom activity, or even as part of a DIY learning game (think memory matching or number recognition). I can see this also being a hit with older adults or people who need cards with a little more grip or visual clarity.

Plus, if you’re a DIY gift-giver like I am, imagine pairing these with a handmade fabric pouch or wooden box for a personalized twist. It would make a really thoughtful and low-cost present for a game lover or nostalgic friend.

Now, one tiny tip: make sure to let everything dry completely before stacking or using them. I rushed a bit on my first batch and ended up with a few cards stuck together. A bit of sanding or sealing would probably help prevent that too, especially if you want them to last.

Overall, this craft hit all the right notes — easy, upcycled, fun, and surprisingly satisfying to hold in your hands when they’re done. It’s a fantastic way to breathe new life into something old, and I honestly can’t wait to make a few themed sets as gifts.

So if you’re on the fence, give it a try. It’s playful, it’s practical, and hey, it might just be your new favorite weekend project.

Explore

books Christmas CraftGossip Giveaways Craft Inspirations Easter glass halloween Home Decor kid crafts mason jar More Crafts Patterns & Tutorials recycled art Recycled Clothing Recycled Jewelry Recycled Sewing Recycled Tutorials Recycling Ideas Recycling Organizing tin can

RSS More Articles

  • Quick Tip: How to Keep Cross Stitch Fabric from Fraying
  • Cute Donut Monkey Crochet Kit
  • FREE Beautiful Mermaid Digital Stamp Download
  • Making Popsicle Stick Playing Cards – Surprisingly Fun and Totally Charming!
  • Book Review: Sewing Made Simple: Craft Your Own Clothes with Confidence
  • 12 Scrapbook Layouts with Lots of Layers
  • Cat Themed Learning Activities
  • The Panel Quilting Workshop: 12 Quick-and-Easy Quilting Ideas
  • DIY Beaded Garden Stakes
  • Free Jelly Fish Crochet Pattern

Pick Your Blog

  • Sewing
  • Knitting
  • Quilting
  • Crochet
  • Home & Garden
  • Recycled Crafts
  • Scrapbooking
  • Card Making
  • Polymer Clay
  • Cross-Stitch
  • Edible Crafts
  • Felting
  • Glass Art
  • Indie Crafts
  • Kids Crafts
  • Jewelry Making
  • Lesson Plans
  • Needlework
  • Bath & Body
  • Party Ideas
  • Candle Making
  • DIY Weddings
  • Not Craft
  • Free Craft Projects

Copyright © 2025 · CraftGossip | Start Here | Contact Us | Link to Us | Your Editors | Privacy and affiliate policy

Copyright © 2025 · Sprinkle Theme on Genesis Framework · WordPress · Log in