• Home
  • Suggest A DIY
  • DIY Newsletter

Recycled Crafts

Creative upcycle and downcycle ideas

  • About CraftGossip
  • Our Network
    • Bath & Body Crafts
    • Candle Making Ideas
    • Crochet Ideas
    • Cross Stitch
    • Edible Crafts
    • Felting Patterns
    • Glass Art
    • Home & Garden Ideas
    • Indie Crafts
    • Jewelry Making
    • Kids Crafts
    • Knitting Patterns
    • Lesson Plans
    • Needlework
    • Party Ideas
    • Polymer Clay
    • Quilting Ideas
    • Recycled Crafts
    • Scrapbooking
    • Sewing Patterns
    • Stamping
    • DIY Weddings
    • Not Craft Ideas
  • Giveaways
  • Roundups
  • Christmas
  • Search
  • Our Store

Step by step tutorial on how to build a pumpkin out of Legos

October 26, by Stefanie Girard. Leave a Comment

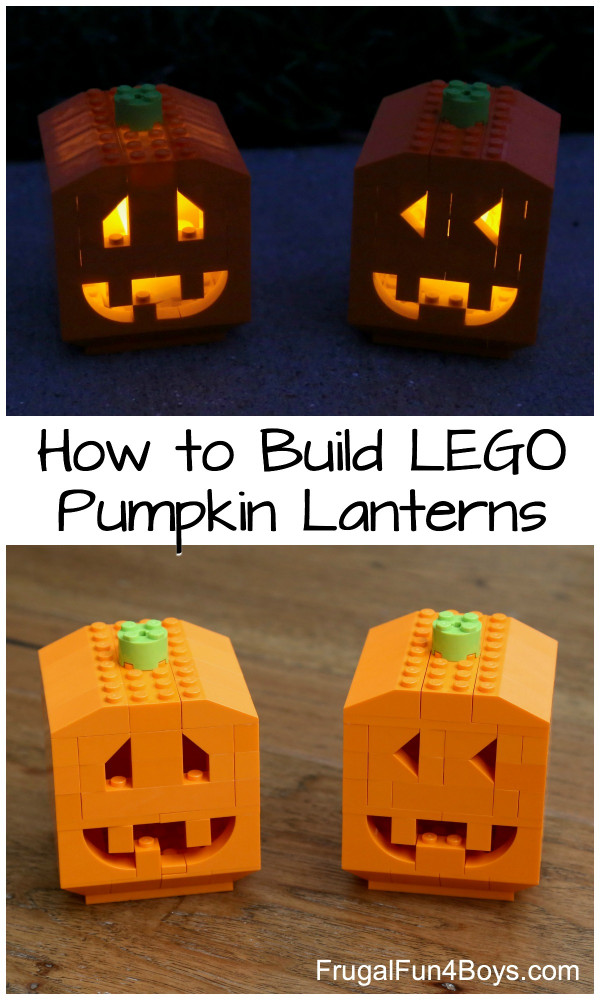
And when I say step by step I really mean step by step! These are really detailed. I don’t think I have all the right parts especially all in orange but I am wondering if they would look cool in all different colors with some odd shapes here and there? Pop on over to the blog Frugal Fun 4 Boys and Girls to see how to make Lego Jack-o-lantern votives out of Legos.

Check out this Brick Subscription box, Building kits delivered to your door each month.

A great gift idea for little Lego building engineers.

Related Posts:

  • Cool building activity of with a fan and Legos
  • Legos can help you organize and charge your devices
«
»

Have you read?

How to make concrete Easter eggs

Easter is just around the corner, and it’s the perfect time to get creative with your egg decorating! While there are plenty of traditional ways to decorate eggs, such as dyeing them or using stickers, have you ever considered using concrete to make some unique and unconventional Easter eggs?

Concrete Easter eggs may not be the first thing that comes to mind when you think of Easter decorations, but they can make for an interesting and eye-catching display. To make concrete Easter eggs, you’ll need some plastic Easter egg molds, concrete mix, and some patience. First, mix the concrete according to the package instructions and pour it into the molds. Let the concrete dry and set, which may take several hours or even overnight. There are full instructions a little later at the blog post of Kim Six Fix.

Once the concrete Easter eggs are dry, you can decorate them in a variety of ways. You could use paint or markers to add colorful designs or patterns to the surface. Alternatively, you could wrap them in twine or ribbon, or even use decoupage to add printed designs, which is what Kim has done.

One another fun idea is to turn your concrete Easter eggs into planters. Simply use a drill or hammer and nail to make a small hole in the top of the egg and fill it with soil and a small plant. These unique planters can add a touch of greenery to your Easter decor.

Concrete Easter eggs may not be for everyone, but they’re a great option for those who are looking for something different and creative. They’re also a fun project to do with kids, who will love getting messy and making something unique. Try making some concrete Easter eggs this year and see how they turn out? Who knows, they might just become your new favorite Easter decoration!

For my point of view, I’m sure most of us think of Easter decor as being cute and fluffy but I have to say these concrete eggs with just a bit of colored string as an embellishment call to me as a modern festive Easter decoration. You too?

If you are looking for some step by step direction, they are pretty easy to make using the tutorial on how to make concrete Easter eggs featured at the blog The Kim Six Fix.

Leave a Reply Cancel reply

RSS From The Network

  • Bunny Activities for Kids
  • Knit a Giant Peep-Style Easter Bunny
  • 35 Elephant Themed Quilt Patterns
  • Evermore Blanket Crochet Pattern
  • 30 FREE SVG Easter Sentiments
  • Flower Bouquet Cross Stitch Patterns
  • How to make concrete Easter eggs
  • Chick Knitting Patterns
  • Baby Afghans Little Boy Blue Crochet ePattern
  • 20 Must Try Recipes Using Cadbury Creme Easter Eggs

Trending popular ideas

How to drill holes in pebbles and pretty projects made with them
Great Image transfer technique with acrylic paint
How To use cling wrap to Transfer an image
How to make iridescent Fairy wings
Cool tip for adding more table top work/display space
Lots of great ideas for seed starting
How to drill into pebbles and stones
9 fun glow-in-the-dark projects great for summer fun
7 Ways to Reuse an Old Ironing Board
Recycled wood thread spools make a great tiny "canvas" for fiber art

Pick Your Blog

  • Sewing
  • Knitting
  • Quilting
  • Crochet
  • Home & Garden
  • Recycled Crafts
  • Scrapbooking
  • Stamping
  • Polymer Clay
  • Cross-Stitch
  • Edible Crafts
  • Felting
  • Glass Art
  • Indie Crafts
  • Kids Crafts
  • Jewelry Making
  • Lesson Plans
  • Needlework
  • Bath & Body
  • Party Ideas
  • Candle Making
  • DIY Weddings
  • Not Craft
  • Free Craft Projects

Categories

Christmas CraftGossip Giveaways Craft Patterns & Tutorials DIY Tutorials and Patterns halloween kid crafts Recycle Crafts - General recycle decorating Recycled Jewelry Recycled Tutorials Recycling Ideas tin can

Copyright © 2023 · CraftGossip | Start Here | Contact Us | Link to Us | Your Editors | Privacy and affiliate policy

Copyright © 2023 · Sprinkle Theme on Genesis Framework · WordPress · Log in