• Home
  • Suggest A DIY
  • DIY Newsletter

Recycled Crafts

Creative DIY Projects That Turn Trash Into Treasure

  • About CraftGossip
  • Our Network
    • Bath & Body Crafts
    • Candle Making Ideas
    • Crochet Ideas
    • Cross Stitch
    • Edible Crafts
    • Felting Patterns
    • Glass Art
    • Home & Garden Ideas
    • Indie Crafts
    • Jewelry Making
    • Kids Crafts
    • Knitting Patterns
    • Lesson Plans
    • Needlework
    • Party Ideas
    • Polymer Clay
    • Quilting Ideas
    • Recycled Crafts
    • Scrapbooking
    • Sewing Patterns
    • Card Making
    • DIY Weddings
    • Not Craft Ideas
  • Giveaways
  • Roundups
  • Store
  • Search

Recycled plastic cups make great greenhouses for seed starting

April 28, 2023 by Stefanie Girard

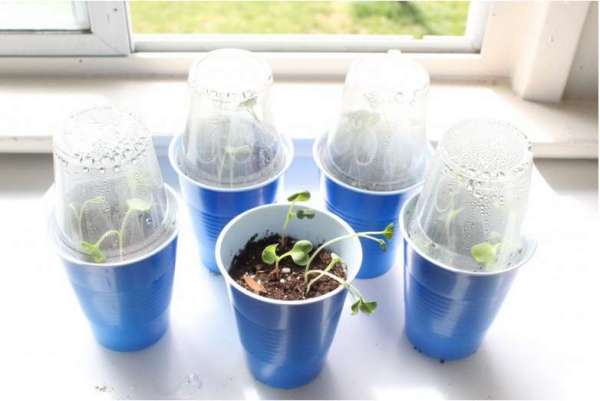
This may sound strange but I have started taking home my plastic and paper cups when I am out at an event or meeting that provided beverages. Why you ask? Well I have started using them to mix concrete and caste bases for little sculptures I make. I can’t quite bring myself buy cups to simply use them once. This is another idea that looks perfect for cups that have been used once and then brought home and repurposed into little seed starting or rooting of clippings to give away. Pop on over to the blog Mama Papa Bubba to read all about using recycled plastic cups to make greenhouses.

12 ways to make greenhouses –  Greenhouses provide an excellent way to extend your growing season and protect your plants from the harsh elements of the environment. They come in all shapes and sizes, and you can choose from a variety of materials to suit your needs and budget. Whether you’re a seasoned gardener or just starting, a greenhouse can be a fantastic addition to your garden, providing a controlled environment where you can grow a wide variety of plants all year round.  From simple DIY designs to more complex structures, there are many ways to make greenhouses that are both functional and beautiful. In this article, we’ll explore 12 different ways to make greenhouses that are sure to inspire your next gardening project. So grab your tools and get ready to create a beautiful and functional greenhouse that will help you grow healthy, thriving plants in any season.


Related Posts:

  • 40 Recycled Crafts For Adults That Turn Trash Into Treasure
  • 25 Clever Things To Make With Sweaters That Shrunk…
«
»

Have you read?

26 Clever Ways to Upcycle Your Old Sewing Machine Table or Parts

You know that old sewing machine table that’s been tucked in the garage or gathering dust in Grandma’s basement? Or maybe just the rusted machine head that no longer runs but still looks so cool? Before you haul it to the curb or let it sit for another decade, let’s talk about upcycling.

Vintage sewing machines and their charming tables are full of history, character, and surprisingly sturdy craftsmanship. And even if they’re no longer functional for stitching seams, they’ve got a whole second life waiting for them — as creative, practical, and totally stylish pieces for your home.

Over the years, crafters and DIYers have found the most brilliant ways to breathe new life into old sewing machines. We’re talking about transformations that are equal parts functional and fabulous — everything from home décor and garden pieces to furniture and quirky conversation starters.

Here’s what you’ll find in this roundup:

  • Tables turned into stunning bathroom vanities or hallway consoles.

  • Machine bases repurposed into plant stands, bar carts, or kitchen islands.

  • Sewing machine drawers used as rustic organizers, shelves, or even planters.

  • Beautiful vintage machines displayed as art pieces or turned into lamp bases.

  • And plenty of ideas that combine that charming antique style with modern functionality.


DIY Earring Holder – Jewelry Display – Birdz of a Feather 

Vintage Inspired DIY Craft Table Idea – Reinvented Delaware 

Vintage sewing machines in the garden / Recycle Art 

How to Turn an Old Sewing Machine Into Book Ends With a Twist

Upcycled Antique Sewing Machine Top – Prodigal Pieces

Singer Sewing Machine 

How to Repurpose a Sewing Machine Table – Girl in the Garage® 

How to upcycle a vintage sewing machine cabinet – Quilt Addicts Anonymous

Antique Sewing Machine Drawer Upcycle – The Navage Patch 

Repurposed Vintage Sewing Machine Drawer Organizer – Lora Bloomquist~Create & Ponder 

Upcycled Vintage Sewing Machine Drawers – The House on Silverado 

https://www.instructables.com/Bookends-With-an-Old-Sewing-Machine 

Old Sewing Table Idea: Turn it into a Bevarage Station | 

Antique Sewing Machine Table via KnickofTime.net

Repurposed Sewing Table upcycled into a desk – The DIY Dreamer 

10+ Ways to Use Vintage Sewing Machine Drawers in Home Decor

Upcycled Vintage Sewing Machine Drawers – Scavenger Chic

Repurposed Antique Sewing Machine

Redo It Yourself Inspirations : Treadle Sewing Machine Upcycle 

ForFunk: I upcycled our old Singer Sewing Machine 

Sewing Machine Table Upcycled – Prodigal Pieces

Vintage Inspired DIY Craft Table Idea – Reinvented Delaware 

 Vintage Sewing Machine to Bar Cart 

 Vintage Sewing Machine Table Makeover without Refinishing

How to Repurpose an Antique Sewing Machine into an Edison Lamp  

Reclaimed Barn Wood Entry Table – Metal & Woodworking How to

Some of these projects are quick weekend wins, while others might take a bit of sanding, painting, or power-tooling. But every single one will leave you with something way cooler than anything you’d buy new at a furniture store.

The best part? You’re not just saving money or decorating your space — you’re preserving a little slice of craftsmanship from a time when things were built to last. Those heavy iron bases and well-worn wooden tables hold stories, and it’s so satisfying to give them a fresh chapter.

Whether your vibe is farmhouse rustic, industrial vintage, or cozy cottagecore, these sewing machine upcycles are a beautiful blend of nostalgia and creativity.

So before you toss out that old treadle machine or leave those drawers in a donation box, scroll through this list. You might just find the perfect DIY that’ll make you fall in love with your sewing machine all over again — even if it never threads a needle again.


How to Clean and Prep a Wrought Iron Sewing Machine Base for Painting

So you’ve got a gorgeous old sewing machine base — full of vintage charm and scrollwork — but it’s covered in rust, grime, or layers of old paint. Before you can give it a fresh coat of your favorite color, it needs a little TLC. Here’s how to get it clean and prepped for painting without too much fuss.

Step 1: Remove Loose Rust and Paint

Start by brushing off all the loose rust, dirt, or peeling paint with a stiff wire brush. You can find these at any hardware store, or even use a drill with a wire brush attachment for quicker results.

Tip: Wear safety goggles and gloves — it gets messy!

Step 2: Degrease and Clean

Use a degreasing cleaner (like Simple Green or dish soap and warm water) and a sponge or rag to scrub the entire base. Old bases often have years of oil and dust buildup, especially in the corners and crevices.

Rinse it off well and let it dry completely before moving on. You don’t want to trap moisture under the paint.

Step 3: Tackle Stubborn Rust

If some rusty areas are being stubborn, apply a rust remover or rust dissolver (like Evapo-Rust or a naval jelly product). Follow the instructions on the product, and use a wire brush or steel wool to scrub again afterward.

Alternatively, a mix of white vinegar and baking soda can be used as a natural rust-fighting soak for small parts or for dabbing on problem areas.

Step 4: Sand for Smoothness

Once the rust is gone and the surface is dry, give the whole piece a quick sand with medium-grit sandpaper (80–120 grit) to rough it up slightly and help the paint adhere better. Focus especially on any bumpy or flaky spots.

Wipe everything down with a damp cloth to remove the dust afterward.

Step 5: Prime (Optional, But Recommended)

For best results and long-lasting paint, apply a metal primer — especially one labeled for rust prevention. Spray primers are quick and easy, but brush-on primers work well too if you’re covering detailed scrollwork.

Let the primer dry fully before painting.

Step 6: Paint It!

Now you’re ready to paint! Use a spray paint designed for metal for the smoothest finish, or brush on chalk paint or enamel for a more rustic or farmhouse look.

Let the paint dry between coats and finish with a clear sealant if it’s going to be used outdoors.

And that’s it — your beautiful wrought iron base is ready for its new life, whether it becomes a vanity, console table, planter stand, or something totally unexpected.

Explore

books Christmas CraftGossip Giveaways Craft Inspirations Easter glass halloween Home Decor kid crafts More Crafts Patterns & Tutorials recycled art Recycled Clothing Recycled Jewelry Recycled kids crafts Recycled Sewing Recycled Tutorials Recycling Ideas Recycling Organizing tin can

Featured Posts

How to use recycled crayons to batik

Two ways to used recycled paper circles

How to make tissue paper covered lights

Dirt-Cheap Dorm Room Furniture

Upcycled Wallpaper Journal

RSS More Articles

  • Knit a Pet Bed on a Knitting Machine
  • How To Sew A Throw Pillow: Easy Pillow Cover Tutorials For Beginners
  • Printable Stickers for Journals and Planners – Household Chores
  • Activities for Teaching the Alphabet
  • 10 Crafty Friends Scrapbook Layout Ideas
  • Book Review Wednesday: Air-Dry Clay Making Handbook
  • The Air Fryer Queen by Steph de Sousa Review: A Colourful Cookbook That Feels as Fun as It Looks
  • Bulky Velour Poncho – Free Crochet Pattern
  • Free Summer BBQ Digital Stamps for Card Making and Paper Crafts
  • Why You Need A Stick Blender For Soap Making

Copyright © 2026 · CraftGossip | Start Here | Contact Us | Link to Us | Your Editors | Privacy and affiliate policy